Welcome to our final lesson in the "Supervised Learning" module. In our last session, you mastered hyperparameter tuning, learning how to use GridSearchCV and RandomizedSearchCV to find the best settings for a single model. Now, we'll take a step back and address a more fundamental question: out of all the different algorithms available—Linear Regression, Random Forest, Gradient Boosting, and more—how do you choose which one is the right starting point for your problem?
This lesson will equip you with a systematic framework to compare multiple algorithms fairly and efficiently. By evaluating a diverse set of models on your dataset, you can make an evidence-based decision about which one holds the most promise before you invest time in extensive tuning. This is a critical skill for any practical machine learning project.
1. The Foundation of Fair Comparison
Before we can compare models, we must ensure the comparison is fair. If we evaluate a Random Forest on an "easy" test set and a Logistic Regression on a "hard" one, our results will be meaningless. The goal is to estimate how well each model will generalize to new, unseen data, and to do that, we need a consistent and robust evaluation procedure.
The core principles of a fair comparison are:
- Identical Data Splits: Every algorithm must be trained and evaluated on the exact same subsets of data.
- Consistent Evaluation Metric: All models must be judged by the same yardstick (e.g., accuracy, RMSE, F1-score).
- Robustness: The evaluation should be based on a robust procedure like cross-validation, not just a single train-test split, to minimize the impact of randomness in how the data was split.
The following video provides an excellent recap of why we use train-test splits and cross-validation to get a reliable estimate of model performance, which is the foundation for everything we will do in this lesson.
Comparing machine learning models in scikit-learn
This video, "Comparing machine learning models in scikit-learn" from the Data School channel, effectively explains the rationale behind robust model evaluation.
Watch these two introductory sections: Model evaluation issues: This part highlights the problem of overfitting when you evaluate a model on the same data it was trained on. It introduces the risk of choosing an overly complex model that has simply "memorized" the training data. Train-test split: This section explains the train-test split procedure as the solution. Pay close attention to how it provides a more realistic estimate of performance on unseen data. This is the core idea we will extend with cross-validation.
The video shows how a single train-test split is a major improvement over training and testing on the same data. To make our comparison even more robust, we will use k-fold cross-validation, ensuring that our performance estimate is an average over several different splits.
2. A Template for Algorithm Comparison
The key to a systematic comparison is to create a reusable "test harness." This is a piece of code that defines the evaluation procedure and then iterates through a list of candidate models, applying the same procedure to each one.
The workflow looks like this:
- Prepare a list of models you want to test. It's good practice to include a variety, from simple baselines to complex ensembles.
- Define the cross-validation strategy. We will use scikit-learn's
KFold, and critically, we'll set arandom_stateto ensure that the data is split into the exact same 'folds' for every model. - Loop through the models. In each iteration, use
cross_val_score()to evaluate the current model with the defined cross-validation strategy. - Collect and summarize the results. Store the scores from each model and then present them in a clear, comparable format.
The following article provides a fantastic, concise template for implementing this exact workflow.
How To Compare Machine Learning Algorithms in Python ...
This article from Machine Learning Mastery by Jason Brownlee lays out a clear and reusable recipe for comparing algorithms.
Please read the sections Compare Machine Learning Algorithms Consistently and the code block that follows it. Focus on how the code: Creates a models list, pairing a short name with a scikit-learn model instance. Uses model_selection.KFold with a fixed seed (random_state) to create the test harness. Loops through the models, calls cross_val_score, and prints the mean and standard deviation of the results.
This template is your starting point for almost any model selection task.
3. Visualizing Performance for Better Insights
While printing the mean and standard deviation of scores is informative, a visualization can often reveal more about model performance. A box plot is the perfect tool for this job. It shows not only the median performance but also the spread (interquartile range) and variability (whiskers) of the scores across the cross-validation folds.
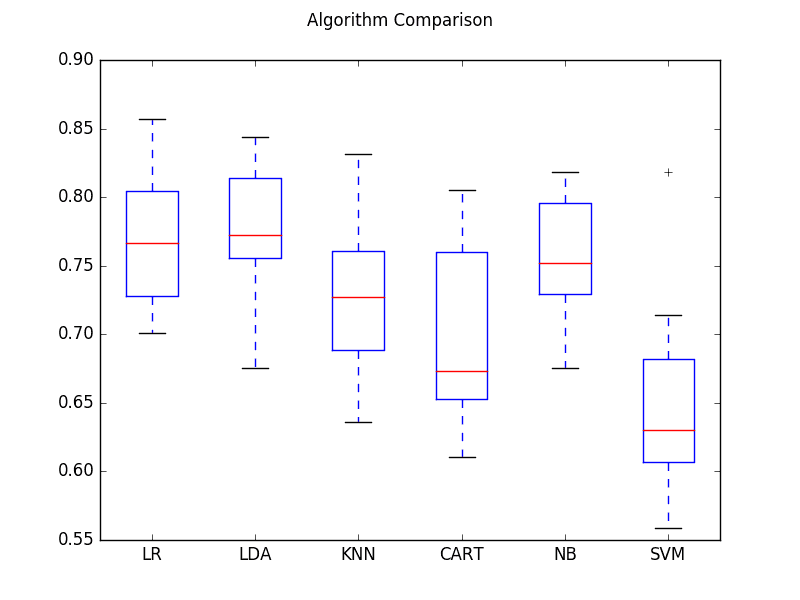
A model with a high average score but also high variance might be less reliable than a model with a slightly lower average score but much greater consistency.
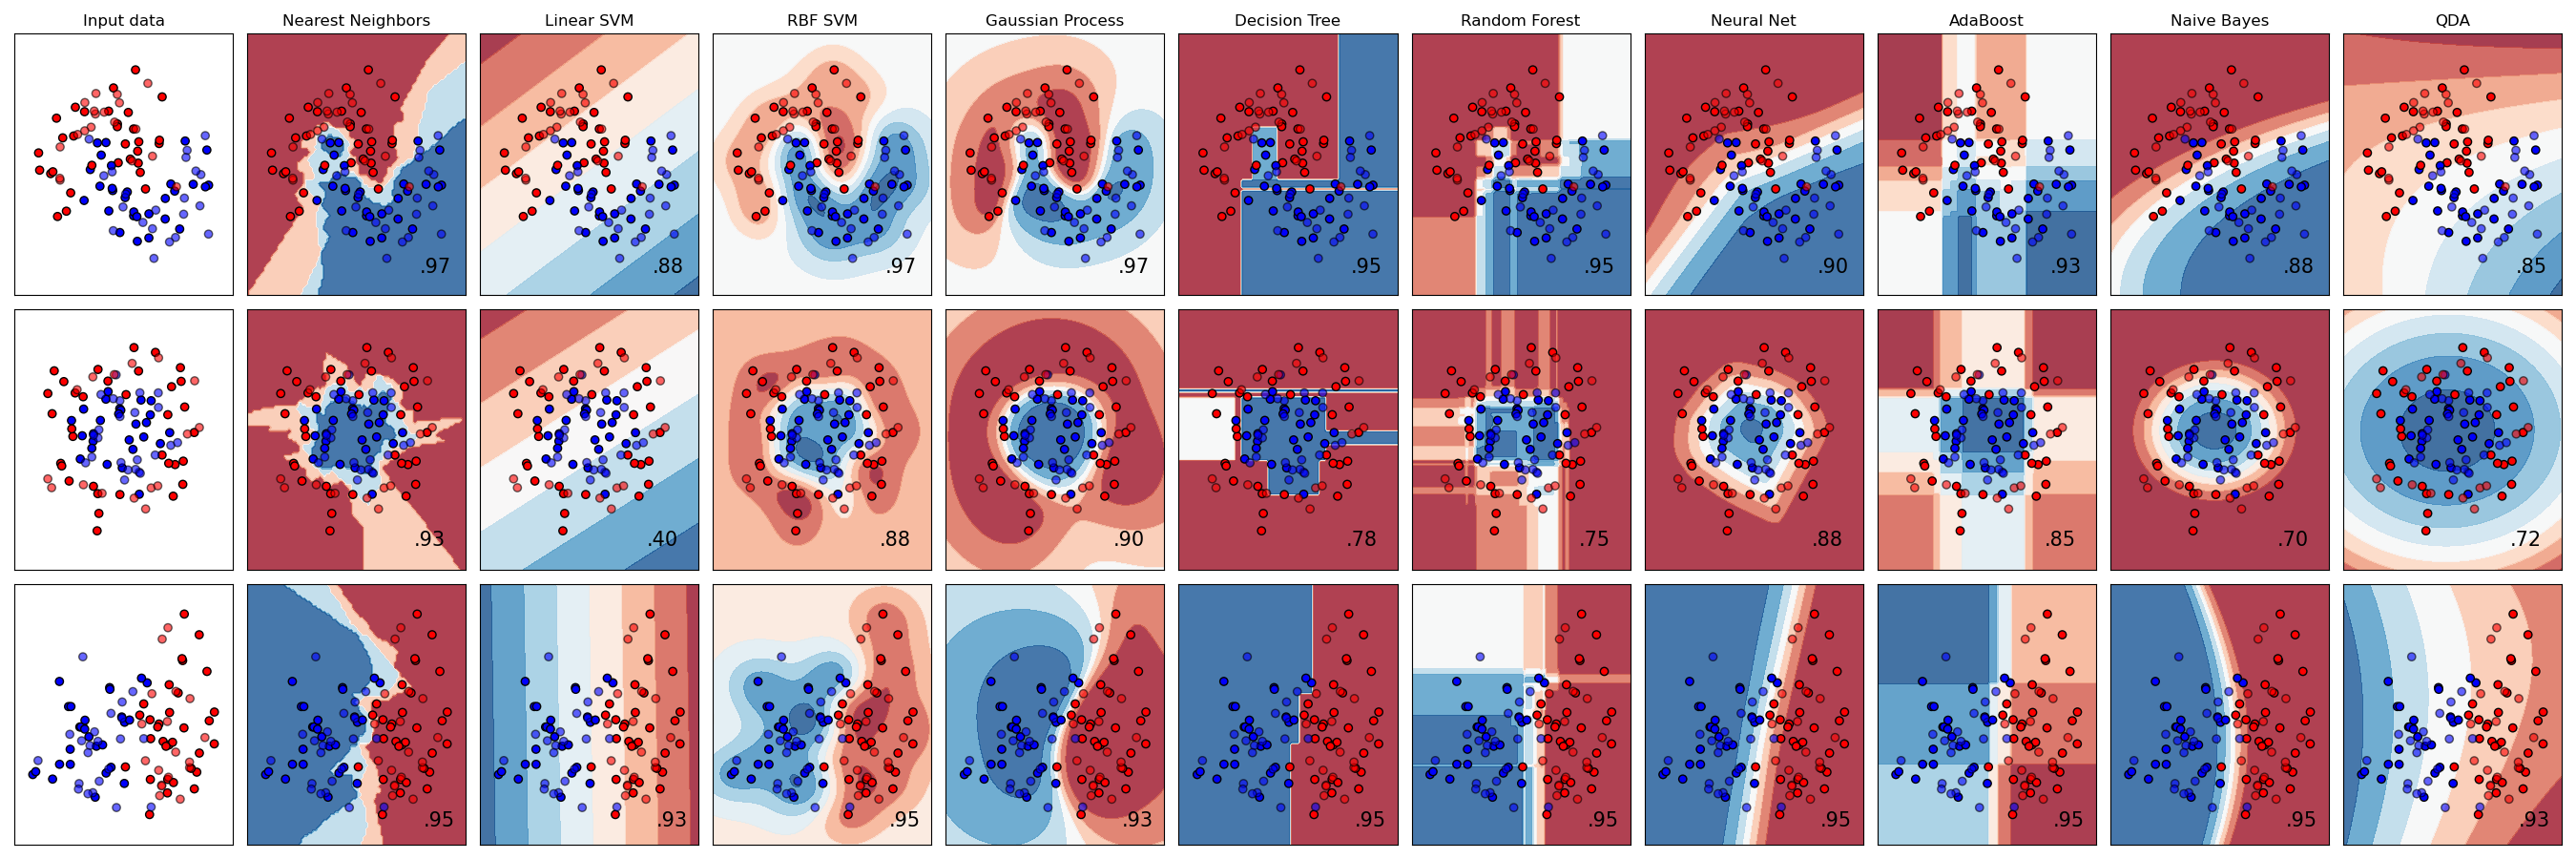
To build further intuition, consider why different algorithms perform differently. They each have different assumptions and learn different types of patterns or "decision boundaries" in the data.
4. A Practical Walkthrough
Let's see this process in action with a complete, modern coding example. The following video demonstrates the entire workflow, starting with a simple baseline model and progressively comparing it against more powerful ones. This iterative approach is very common in practice.
Simple Machine Learning Code Tutorial for Beginners with Sklearn Scikit-Learn
The video "Simple Machine Learning Code Tutorial" from the Python Simplified channel provides a clear, step-by-step implementation of model comparison.
Watch from the beginning up to the comparison of the three models. Baseline model: The instructor first splits the data and trains a single LinearRegression model to establish a baseline performance score. Evaluating the baseline: Here, the model is evaluated using the R² score, providing a concrete number to beat. Comparing multiple models: This is the key part. The instructor imports GradientBoostingRegressor and RandomForestRegressor, puts all three models in a list, and loops through them to train, predict, and print the score for each. This directly implements the model comparison workflow.
This video perfectly illustrates the core idea: you try several algorithms and let the data tell you which ones are most effective. In this case, the tree-based ensembles dramatically outperform the simple linear model, giving a clear signal on where to focus subsequent efforts like hyperparameter tuning.
5. Advanced Workflow: Using Pipelines for a Fairer Fight
Since your background is in computer science and you're in a Master's program, it's important to know the professional standard for this workflow. In a real-world project, data preprocessing (like scaling numerical features or encoding categorical ones) is almost always required.
A common mistake is to perform preprocessing on the entire dataset before cross-validation. This causes data leakage, as information from the validation fold "leaks" into the training process (e.g., the mean and standard deviation used for scaling are calculated using all the data).
The correct way is to integrate preprocessing into a scikit-learn Pipeline. This ensures that on each cross-validation fold, the preprocessing steps are "fit" only on the training portion of that fold and then applied to both the training and validation portions.
The following article demonstrates this advanced and robust workflow.
Scikit-learn tutorial for machine learning in Python - data science
This tutorial from stepbystepdatascience.com demonstrates a comprehensive and professional approach to model comparison.
Read the section titled Models. Notice how the author: Creates a list of many different modeling algorithms. Creates a Pipeline that combines the preprocessing steps with a placeholder for a model. Loops through the list of models, inserting each one into the pipeline. Uses cross_val_score on the entire pipeline. Even includes powerful, external libraries like XGBoost, CatBoost, and LightGBM in the comparison.
This approach, which combines pipelines with a test harness, represents a robust, reproducible, and professional standard for algorithm selection. It prevents data leakage and ensures that you are comparing the performance of the entire modeling process (preprocessing + algorithm) for each candidate.
Conclusion
You now have a complete framework for tackling a supervised learning problem. You can preprocess data, systematically compare a wide range of algorithms to find the most promising candidates, and then use hyperparameter tuning to optimize the best one.
Key Takeaways:
- Algorithm selection is the process of choosing the best type of model (e.g., linear vs. tree-based) for a given problem.
- A fair comparison requires a consistent test harness, typically using k-fold cross-validation with a fixed
random_stateto ensure all models see the same data splits. - A standard workflow is to create a list of candidate models and loop through them, using
cross_val_scoreto evaluate each one. - Box plots are an effective way to visualize and compare the performance distributions of different models, revealing both average performance and consistency.
- For a robust and professional workflow, preprocessing steps should be included in a scikit-learn
Pipelineto prevent data leakage during cross-validation.
With this lesson, we conclude our module on the core algorithms of supervised learning. You are now equipped to train, tune, and select high-performing models. However, a powerful model isn't useful if you can't understand its decisions or deploy it for others to use.
In our next module, we will dive into Model Explainability and Deployment. You'll learn how to peer inside the "black box" of complex models to understand why they make certain predictions and then learn how to serve your trained model as a live API.