Introduction
In our previous lesson, we established the "what" and "why" of the Linux Device Model, exploring the core components like buses, devices, and drivers, and how they are visualized in sysfs. We saw how the bus acts as a matchmaker between hardware and software.
This lesson builds directly on that foundation to address the learning outcome: Explain the probe/remove lifecycle of a platform driver and write a basic platform driver. We will zoom in on the platform bus, a virtual bus that is arguably the most common type you'll encounter in embedded Linux. You will learn the exact sequence of events that brings a device online and how to write the fundamental C code that participates in this process. For someone with your background in automotive ECUs and embedded software, this is the blueprint for controlling the myriad of on-chip peripherals that don't sit on discoverable buses like PCI or USB.
1. Platform Devices and Drivers: The Backbone of Embedded Linux
While buses like PCI and USB support dynamically discoverable "plug and play" devices, most peripherals inside a System-on-Chip (SoC) are fixed. They include components like GPIO controllers, I2C controllers, SPI engines, and custom hardware accelerators. These devices don't have a built-in mechanism to announce their presence.
The kernel uses the platform bus to manage them. It's a virtual bus for registering these memory-mapped, non-discoverable devices so they can be managed by the Linux Device Model.
The two key players are:
struct platform_device: Represents the hardware itself. In modern kernels, these are almost always instantiated by the kernel as it parses the Device Tree at boot time. Each DT node describing such a peripheral becomes aplatform_device.struct platform_driver: Represents the driver. This is the code you will write to control the device.
The critical link between them is the compatible string in the device tree, which must match an ID in the driver.
2. The Probe and Remove Lifecycle
The "lifecycle" of a platform driver revolves around the probe and remove functions. Understanding this sequence is crucial for debugging why a device isn't initializing.

Here is the step-by-step lifecycle:
-
Device Registration: At boot, the kernel parses the device tree. For a node like
my-device@f8000000 { compatible = "my-vendor,my-device"; ... };, it allocates astruct platform_deviceand registers it with the platform bus. The device now exists within the kernel's device model. -
Driver Registration: Your module is loaded (e.g., via
insmod). Your code registers astruct platform_driver. This structure contains a table ofcompatiblestrings it can handle and pointers to yourprobeandremovefunctions. -
Matching: The platform bus core is notified of the new driver. It iterates through all the unclaimed platform devices and compares their
compatiblestrings against the list in your new driver. -
Probing (
probe): If a match is found, the bus core "binds" the device to the driver and calls your driver'sprobefunction, passing it a pointer to theplatform_device. This is your driver's main entry point for initialization. Insideprobe, you will:- Acquire resources (e.g., map MMIO registers, request IRQs).
- Initialize the hardware.
- Register with other kernel frameworks (e.g., as a character device).
- If everything succeeds, you return
0. If an error occurs (e.g., memory allocation fails), you return a negative error code (like-ENOMEM), and the kernel will un-do any partial setup.
-
Removing (
remove): Theremovefunction is the counterpart toprobe. It's called when the device is being unbound from the driver. This happens when:- Your driver module is unloaded (
rmmod). - The device is manually unbound or removed via
sysfs. - The system is shutting down.
Inside
remove, you must release all resources acquired duringprobein the reverse order of acquisition. - Your driver module is unloaded (
3. Writing a Basic Platform Driver
Let's translate the lifecycle into code. We will walk through the creation of a "hello world" platform driver.
The following video provides an excellent, step-by-step demonstration of this exact process. We'll use it to guide our exploration of the code.
This video from the Linux Driver Workshop 2026 provides a clear, practical guide to writing a basic platform driver from scratch. We will watch it in segments to understand each part of the code.
First, watch from 27:39 to 35:24. The speaker outlines the essential steps and then implements them in code. Focus on the four main components he describes: Naming compatible devices (of_device_id). Implementing probe and remove functions. Bundling them in a platform_driver struct. Registering the driver struct.
Let's break down the code structures you just saw in the video.
Step 1: The ID Table
This table creates the link to the device tree.
#include <linux/of.h> // Required for of_device_id

static const struct of_device_id my_driver_of_match[] = {
    { .compatible = "my-vendor,my-device", },
    { /* Sentinel */ }
};
MODULE_DEVICE_TABLE(of, my_driver_of_match);
of_device_id: A structure that holds acompatiblestring. The array must be terminated by an empty entry.MODULE_DEVICE_TABLE: This macro exports the table to user space. This allows tools to automatically load the correct module for a given device (modprobe).
Step 2: The probe and remove Functions
#include <linux/platform_device.h>

static int my_driver_probe(struct platform_device *pdev)
{
    dev_info(&pdev->dev, "Probe function called!\n");

    /* Resource acquisition and hardware setup would go here */

    return 0; // Success
}

static int my_driver_remove(struct platform_device *pdev)
{
    dev_info(&pdev->dev, "Remove function called!\n");

    /* Resource release would go here */

    return 0;
}
- The
pdevargument is the kernel's representation of the hardware. It contains all the information from the device tree node, including memory regions, IRQs, etc. dev_info(&pdev->dev, ...)is the standard way to print informational messages associated with a specific device.
Step 3 & 4: The platform_driver Structure and Registration
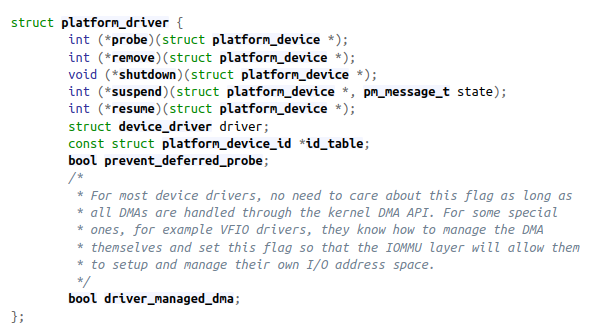
static struct platform_driver my_platform_driver = {
    .probe = my_driver_probe,
    .remove = my_driver_remove,
    .driver = {
        .name = "my-device-driver",
        .of_match_table = my_driver_of_match,
    },
};

module_platform_driver(my_platform_driver);
.probeand.remove: Pointers to your functions..driver.name: The driver's name, which will appear insysfs..driver.of_match_table: Points to your ID table for device tree matching.module_platform_driver(): This is a helper macro that handles all the boilerplate of registering your driver structure on module insertion and unregistering it on removal. It replaces the need for custommodule_initandmodule_exitfunctions for this common case.
Putting It All Together: A Hands-On Example
Now, let's see this code being compiled and run. The demonstration also covers the essential Makefile and the use of dmesg to see the output from our probe and remove functions.
Let's continue with the video to see the complete, live-coded example. This part demonstrates how to compile the driver, load it, and trigger the probe/remove functions.
Watch from 35:24 to 46:59. Pay attention to how the probe function is NOT called when the module is first inserted, but only when a matching device is added (in this case, by loading a device tree overlay). This directly demonstrates the bus matching mechanism.
4. init/exit vs. probe/remove: A Critical Distinction
A common point of confusion for those new to the modern device model is the role of module_init and module_exit versus probe and remove.
init/exit: These functions are tied to the loading and unloading of the entire module.initis called once when the module is loaded.exitis called once when it's unloaded. Their job is to register the driver with a bus subsystem and unregister it. Themodule_platform_drivermacro handles this for you.probe/remove: These functions are tied to the binding and unbinding of a specific device.probecan be called many times if your driver supports multiple identical devices and several are present in the system. Its job is to initialize a single instance of the hardware.
The following reading provides a clear explanation and a fantastic hands-on example that you can compile and run on your machine to see this distinction in action. It provides two modules: one that acts as a "device generator" to register a platform_device, and a second that is the platform_driver whose probe function is called as a result.
Linux Drivers 2 - Basic layout and Device Model
This article from Hacker Bikepacker provides an excellent text-based explanation of the probe/remove model and a practical, two-module example to solidify your understanding.
First, read the section "2. Probe and remove functions? No init and exit?" for a clear theoretical distinction. \nNext, read section "6. Revisiting init/exit vs probe/remove and platform devices". I highly recommend you copy the code for the device generator (dummy1234_dev.c), the platform driver (dummy1234.c), and the Makefile and try this on your own Linux system. Observing the dmesg output as you load and unload these two modules will give you a concrete feel for the lifecycle.
5. Interview Scenario
Scenario: You are working on a new embedded board. The device tree contains a node for a custom watchdog timer:watchdog@f0010000 { compatible = "mycorp,wdt-1.0"; ... };
You've written a platform driver with the correct of_match_table entry. When the system boots, you see your driver module is loaded. However, using dmesg, you see the "probe" message from your driver, but it's immediately followed by the "remove" message, and the watchdog device doesn't function. The probe function doesn't seem to be returning an error code explicitly.
What could be happening, and how would you debug it?
Click for Analysis
-
Most Likely Cause: The
probefunction is failing, but not in an obvious way. One of the resource acquisition functions insideprobeis returning an error, and yourprobefunction is likely returning that error code up the call stack. The device model core sees the non-zero return value, concludes that probing failed, and immediately calls yourremovefunction to clean up. -
Common Pitfalls and Debugging Steps:
- "Devm" Managed Resources: A very common pattern is to use "device-managed" resource allocation functions like
devm_kzalloc(),devm_ioremap_resource(), anddevm_request_irq(). These are fantastic because they automatically free the resource when the device is unbound, simplifying theremovefunction. However, you must check their return values! A call likeio_base = devm_ioremap_resource(&pdev->dev, res);will return anERR_PTRon failure. If you don't check for this withIS_ERR(io_base), a later attempt to useio_basewill cause a kernel crash. The correct pattern is:res = platform_get_resource(pdev, IORESOURCE_MEM, 0); io_base = devm_ioremap_resource(&pdev->dev, res); if (IS_ERR(io_base)) { // This return triggers the call to remove() return PTR_ERR(io_base); } - Debugging: The first step is to add
dev_err()print statements after every single resource acquisition call in yourprobefunction to see which one is failing and what error code it's returning. For example,devm_request_irqmight return-EINVALif the IRQ number is invalid or-EBUSYif it's already in use. This will pinpoint the exact point of failure. The error code itself will tell you why it's failing.
- "Devm" Managed Resources: A very common pattern is to use "device-managed" resource allocation functions like
Conclusion
You have now moved from the general theory of the device model to the practical implementation of a platform driver, the workhorse of embedded Linux. You understand the critical probe/remove lifecycle and how it connects the hardware description in the device tree to your driver code.
Key Takeaways:
- Platform drivers are for non-discoverable, memory-mapped devices common in SoCs.
- The
compatiblestring is the "contract" that matches aplatform_device(from the device tree) to aplatform_driver. - The
probefunction is the driver's entry point for a specific device instance, where it acquires resources and initializes hardware. - The
removefunction is the counterpart toprobe, responsible for releasing all resources. - Modern drivers use the
module_platform_driver()macro to handle registration, simplifying the code and separating module-level concerns from device-level concerns.
In the next lesson, we will dive deeper into what happens inside the probe function. Specifically, we will cover how a device driver can efficiently transfer large amounts of data without constantly involving the CPU, a technique essential for performance. We will learn to describe DMA mapping types (coherent vs. streaming) and their implications for cache coherency.