Introduction
In our previous lesson, we explored Linux namespaces, the technology that provides process isolation by controlling what a process can see. We learned how namespaces virtualize system resources like PIDs, mount points, and network interfaces, forming a cornerstone of containerization.
Today, we address the other half of resource isolation: controlling how much a process can use. This lesson focuses on the learning outcome: Describe the cgroups v2 architecture and use it to apply resource limits (CPU, memory, I/O). We will explore Control Groups (cgroups), the kernel mechanism that allows you to allocate, limit, and prioritize system resources for groups of processes. Understanding cgroups is essential for building stable, high-performance systems, managing multi-tenant environments, and is a key topic in advanced embedded and system-level interviews.
We will start with the architecture of cgroups v2, see how it is managed through a special filesystem, and then get hands-on with applying limits to CPU, memory, and I/O usage.
1. The Cgroups v2 Architecture: A Unified Approach
Control Groups solve the problem of managing and distributing system resources among collections of processes. The first version, cgroups v1, was powerful but had design issues that made it complex to manage. Cgroups v2 was designed to resolve these issues with a cleaner, more consistent model.
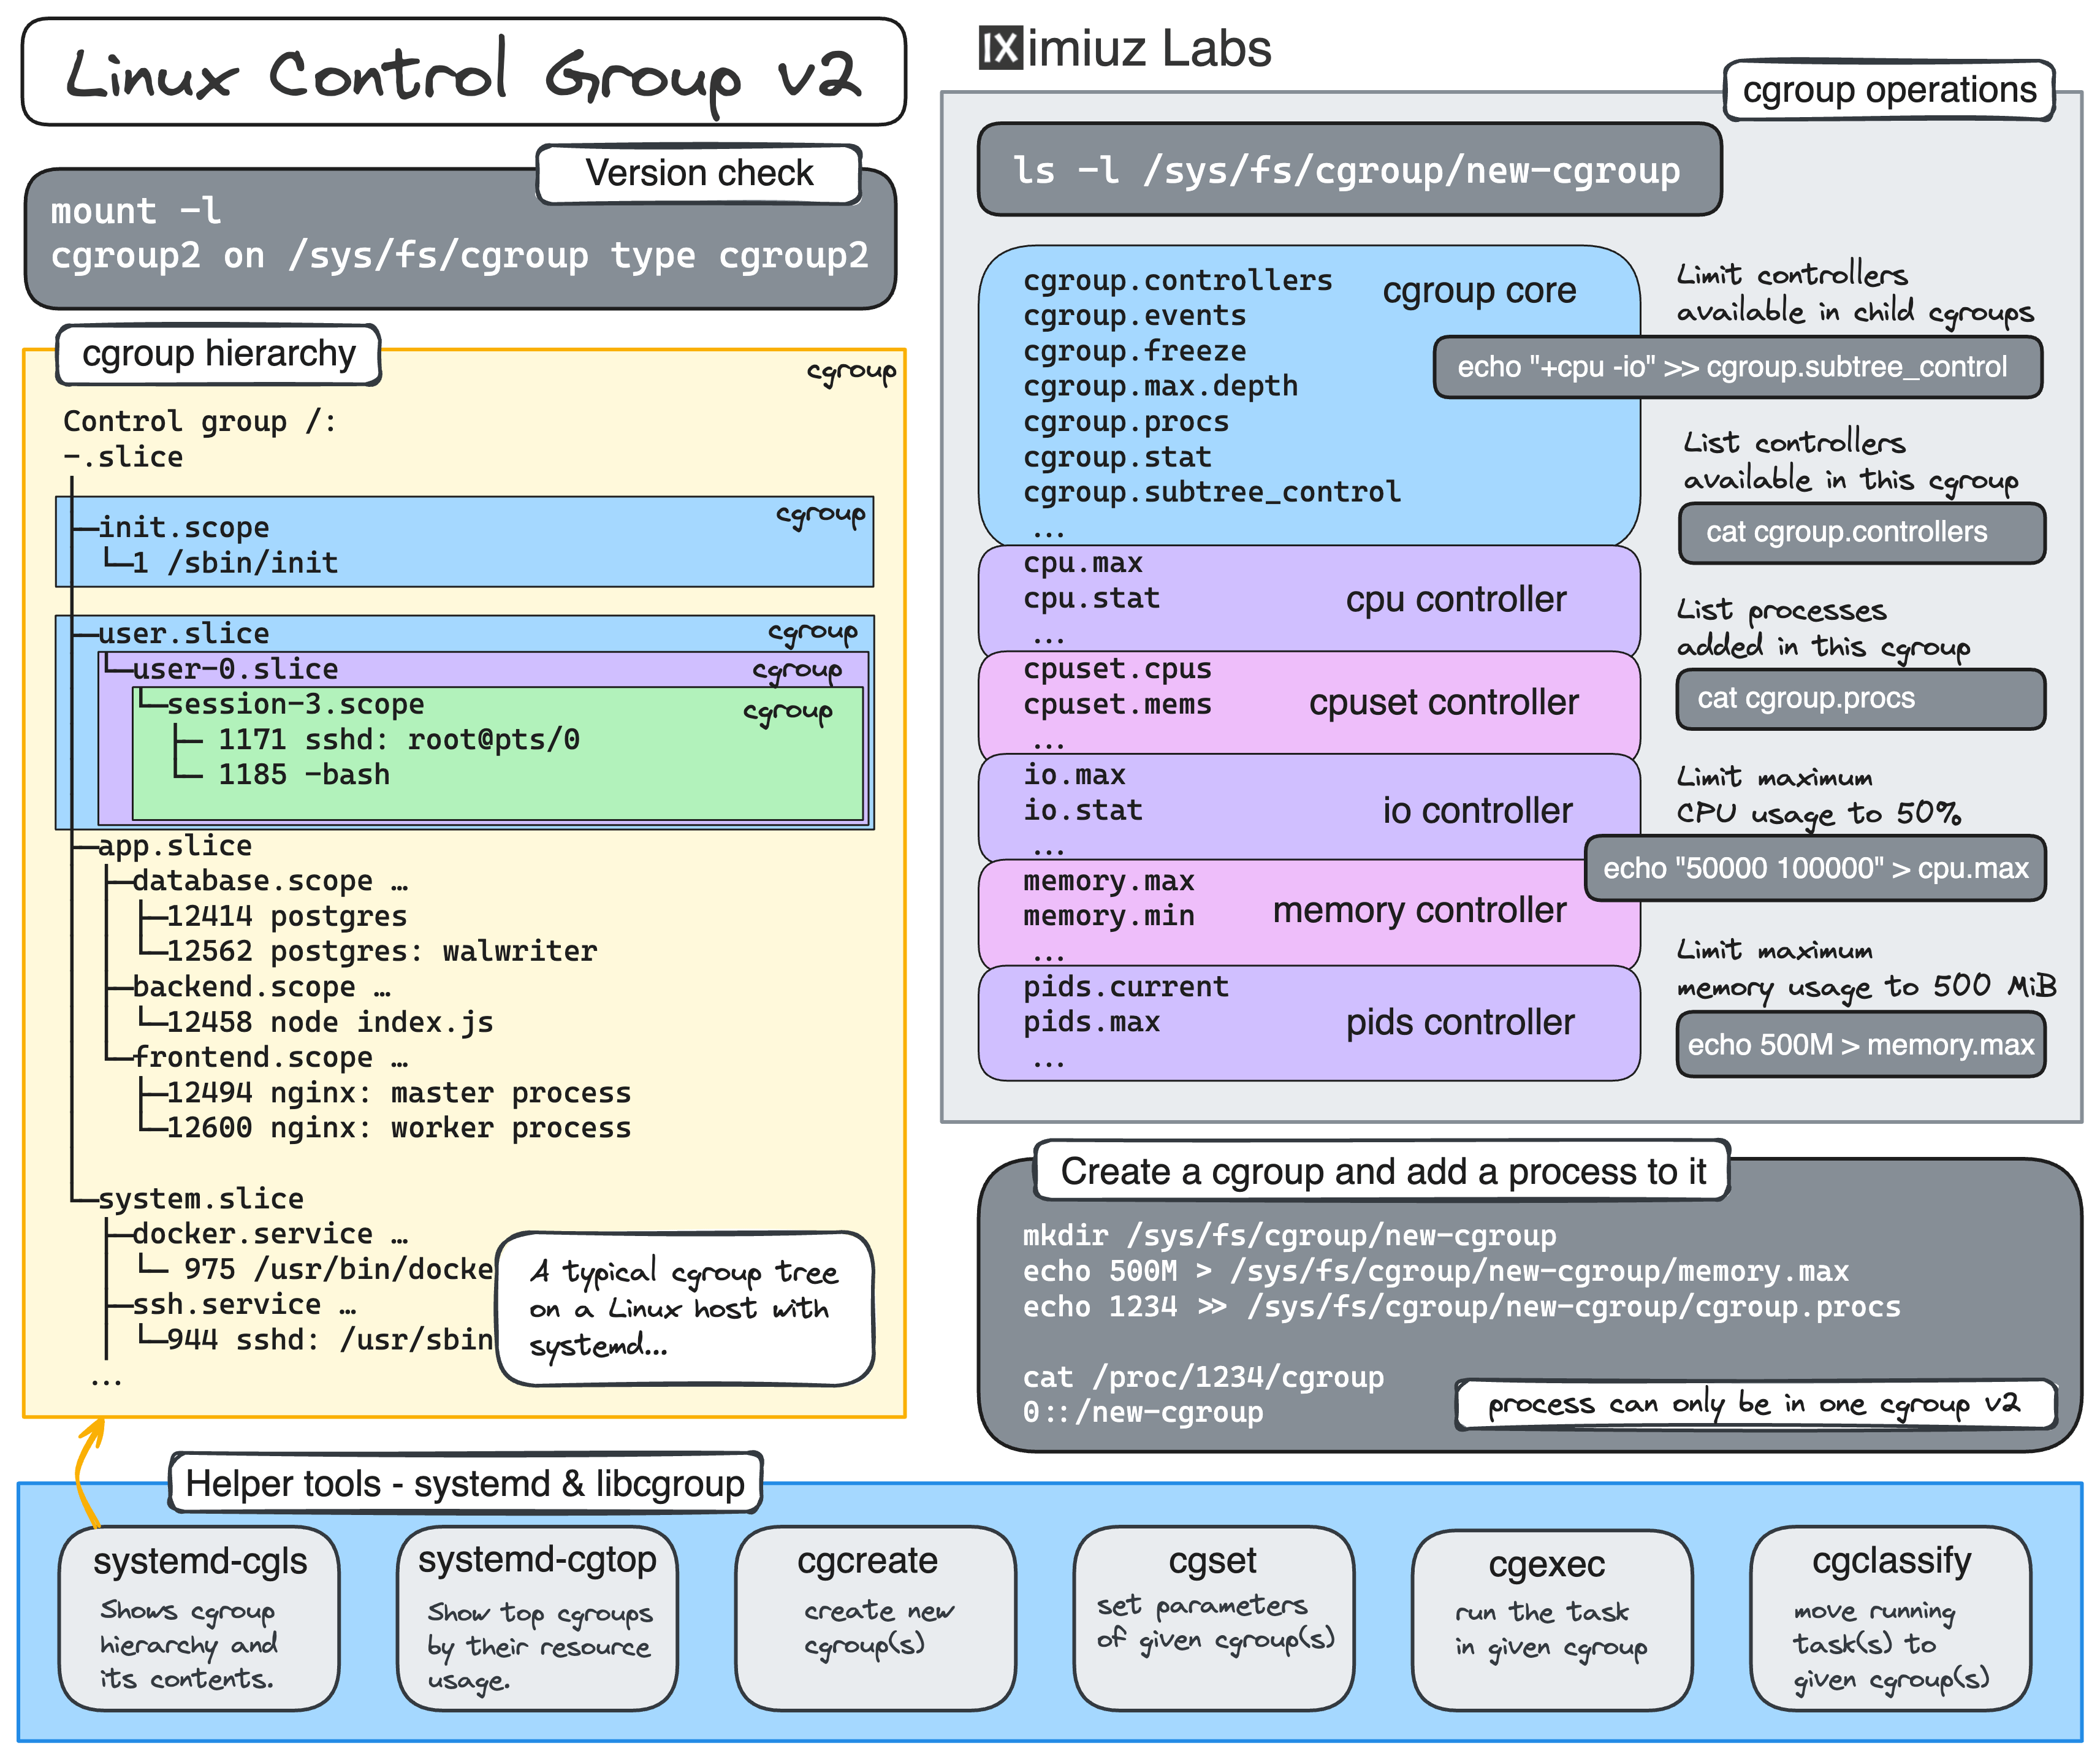
The most significant change in v2 is the move to a single, unified hierarchy. In v1, you could have multiple, independent hierarchies for different resource controllers (e.g., one for CPU, another for memory). This often led to confusion and complexity. Cgroups v2 enforces a single tree structure, which simplifies management and makes the relationship between parent and child groups clear and consistent.

To get a solid introduction from a leading expert, let's watch the beginning of a talk by Michael Kerrisk, the maintainer of the Linux man-pages project.
An introduction to control groups (cgroups) version 2 - Michael Kerrisk - NDC TechTown 2021
This video, 'An introduction to control groups (cgroups) version 2', provides an excellent overview of what cgroups are, their history, and the core principles of the v2 architecture.
Watch the segment from 00:29 to 09:15. Pay attention to: The two main components of cgroups: hierarchical grouping and controllers. The concept of the 'unified hierarchy' in v2. How the interface to cgroups is a pseudo-filesystem.
To summarize the key points:
- Core Idea: Cgroups organize processes hierarchically and distribute system resources along that hierarchy.
- Architecture: It consists of the cgroup core for managing the hierarchy and controllers for managing specific resources (CPU, memory, I/O, etc.).
- Unified Hierarchy: In v2, all controllers reside in a single filesystem tree, typically mounted at
/sys/fs/cgroup. This ensures that the process organization is the same for all resource types. - Interface: All interactions with cgroups happen through standard filesystem operations (
mkdir,rmdir,echo,cat) on the pseudo-filesystem.
For a formal definition, the official kernel documentation is the authoritative source. It's a great habit to refer to this, especially if you plan to contribute to open-source projects.
Control Group v2 — The Linux Kernel documentation
Let's read the introduction from the official kernel documentation for cgroup v2.
Read the sections 'Introduction' and 'Issues with v1 and Rationales for v2'. This will reinforce the concepts from the video and provide insight into why the unified hierarchy is a superior design.
2. Hands-On: Interacting with the Cgroup Filesystem
Theory is important, but true understanding comes from practice. Let's see how the cgroup filesystem works by creating a group, adding a process to it, and applying a simple limit. We will use the pids controller, which limits the number of processes that can exist within a cgroup. This is a great example because its effect is immediate and easy to observe.
The following video segment provides a live demonstration of these steps. I encourage you to open a terminal (with superuser privileges, e.g., sudo -s) and follow along.
An introduction to control groups (cgroups) version 2 - Michael Kerrisk - NDC TechTown 2021
This segment of Michael Kerrisk's talk demonstrates the fundamental operations of creating a cgroup and applying a resource limit using the pids controller.
Watch from 13:33 to 24:58. Replicate the commands in your own terminal to get a feel for the filesystem interface. \nKey files you'll interact with: cgroup.procs: To move a process into the cgroup. pids.max: To set the limit. pids.current: To observe the current number of processes.
Let's break down the core workflow you just observed:
- Navigate to the cgroup root:
cd /sys/fs/cgroup - Create a new cgroup: This is just a directory.
# mkdir my_group - Move a process into the cgroup: Write the process ID (PID) to the
cgroup.procsfile. We can use$$to get the PID of the current shell.# echo $$ > my_group/cgroup.procs - Set a limit: Write a value to the controller-specific file.
# echo 5 > my_group/pids.max - Test the limit: Any new process created by the shell (which is now in
my_group) will be subject to the cgroup's limits. Trying to create more processes than the limit will fail.# for i in $(seq 1 5); do sleep 120 & done # bash: fork: retry: Resource temporarily unavailable - Clean up: To remove a cgroup, you must first ensure it contains no processes and no child cgroups. Then you can simply remove the directory.
# exit  # (Exit the shell inside 'my_group' to empty it)
# rmdir my_group
This simple exercise reveals the fundamental mechanics of cgroup management through the filesystem.
3. Applying Resource Limits: CPU, Memory, and I/O
Now we get to the core of resource management. To apply a limit for a resource like CPU, you must first enable its controller.
Enabling Controllers
In cgroups v2, resource control is hierarchical. A parent cgroup must explicitly enable controllers for its children. This is done using two key files:
cgroup.controllers: Shows which controllers are available to be enabled.cgroup.subtree_control: A read/write file where you enable/disable controllers for child cgroups. You enable a controller by writing its name prefixed with+(e.g.,echo '+cpu +memory' > cgroup.subtree_control).
This next video segment explains this crucial concept.
An introduction to control groups (cgroups) version 2 - Michael Kerrisk - NDC TechTown 2021
This segment demonstrates how to enable controllers and how that makes the controller's interface files appear in the child cgroups, ready for you to apply limits.
Watch from 36:39 to 43:56. Note the 'top-down' constraint: a controller must be enabled in the parent to be used for controlling the children.
Now, let's apply this to our three target resources.
A. CPU Controller
The CPU controller manages the distribution of CPU time. It provides two main modes of control:
- Proportional Weighting (
cpu.weight): Distributes CPU time proportionally among competing cgroups. If group A has a weight of 100 and group B has a weight of 200, group B will get twice as much CPU time as group A when they are both busy. Default is 100. - Absolute Bandwidth Limit (
cpu.max): Sets a hard cap on CPU usage. It's defined by a quota and a period, both in microseconds. For example,echo "50000 100000"means the cgroup can use 50,000µs (0.05s) of CPU time every 100,000µs (0.1s), effectively limiting it to 50% of one CPU core.
Practical Exercise: Limiting CPU
- Create a test group:
mkdir /sys/fs/cgroup/cpu_test - Enable the
cpucontroller in the parent (root cgroup):echo '+cpu' > /sys/fs/cgroup/cgroup.subtree_control. - Set a 20% CPU limit on your new group:
echo "20000 100000" > /sys/fs/cgroup/cpu_test/cpu.max. - In a separate terminal, start a CPU-consuming task, like
sha1sum /dev/zero. Note its PID. - Move the task into the cgroup:
echo <PID> > /sys/fs/cgroup/cpu_test/cgroup.procs. - Observe the CPU usage with a tool like
toporhtop. You should see it drop to and hold at 20%.
B. Memory Controller
The memory controller is more complex because memory is a stateful resource. Key interface files include:
memory.max: A hard limit on memory usage. If a process in the cgroup tries to allocate memory beyond this limit (and the kernel can't reclaim memory from the cgroup), the Out-Of-Memory (OOM) killer will be invoked on a process within that cgroup.memory.high: A soft limit. When usage exceeds this, the kernel will heavily throttle the processes, forcing them to reclaim memory. It does not invoke the OOM killer, making it a safer way to control memory bloat.memory.low: A best-effort protection. The kernel tries to avoid reclaiming memory from a cgroup that is below this boundary.memory.swap.max: Limits the amount of swap space the cgroup can use.
Practical Exercise: Limiting Memory
- Create a test group:
mkdir /sys/fs/cgroup/mem_test. - Enable the
memorycontroller:echo '+memory' > /sys/fs/cgroup/cgroup.subtree_control. - Set a 100MB memory limit:
echo 100000000 > /sys/fs/cgroup/mem_test/memory.max. - Move your current shell into the cgroup:
echo $$ > /sys/fs/cgroup/mem_test/cgroup.procs. - Run a program that allocates memory.
stress-ngis great for this, but a simple Python one-liner also works:python3 -c "a = ' ' * 200 * 1024 * 1024; print('allocated')" - The command will likely be terminated by the kernel. You can check for OOM killer messages in the kernel log using
dmesg. You should see a message indicating a process was killed to satisfy the cgroup memory limit.
C. I/O Controller
The I/O controller regulates bandwidth to block devices (e.g., hard drives, SSDs). Like the CPU controller, it provides both weighted and absolute limits.
io.weight: Proportional I/O time sharing.io.max: Sets maximum read/write bandwidth (in bytes per second) or IOPS (I/O operations per second).
Practical Exercise: Limiting I/O
- Find your root disk's major and minor device numbers:
ls -l /dev/sda(ornvme0n1, etc.). For example,/dev/sdamight be8, 0. - Create a test group:
mkdir /sys/fs/cgroup/io_test. - Enable the
iocontroller:echo '+io' > /sys/fs/cgroup/cgroup.subtree_control. - Set a 1 MB/s write limit for your disk (replace
8:0with your device numbers):echo "8:0 wbps=1000000" > /sys/fs/cgroup/io_test/io.max. - Move your shell into the cgroup:
echo $$ > /sys/fs/cgroup/io_test/cgroup.procs. - Perform a disk-intensive write operation.
ddis the classic tool. Note the transfer speed.
The# dd if=/dev/zero of=testfile bs=1M count=100 oflag=directoflag=directhelps bypass the page cache to make the I/O limit more immediately apparent. You should see the speed reported byddhover around 1 MB/s. Don't forget torm testfileafterwards.
4. Interview Scenario
Your experience with resource contention in embedded systems makes cgroups a powerful tool in your arsenal.
Scenario: You're designing the software for an automotive infotainment system. It runs two main applications: a critical navigation service and a less critical media player app. The system must guarantee that the navigation service is always responsive, even if the media player is performing a heavy operation like indexing a large music library from a USB drive.
Question: How would you leverage cgroups v2 to architect a solution that ensures the navigation service's performance is protected from the media player?
Click here for the analysis
Answer: This is a classic resource prioritization problem that cgroups are designed to solve.
-
Cgroup Structure: I would create two cgroups under the root, for example,
/sys/fs/cgroup/critical_servicesand/sys/fs/cgroup/media_services. At startup, the system launcher would place the navigation process PID intocritical_services/cgroup.procsand the media player process PID intomedia_services/cgroup.procs. -
Enable Controllers: In the root cgroup's
cgroup.subtree_controlfile, I would enable thecpuandiocontrollers. -
CPU Prioritization: To ensure the navigation service always has CPU access, I would use proportional weighting.
echo 200 > /sys/fs/cgroup/critical_services/cpu.weightecho 50 > /sys/fs/cgroup/media_services/cpu.weight
This gives the critical service a 4x higher priority for CPU time during periods of contention. It doesn't wastefully reserve CPU; if the media player is idle, the navigation service can use 100% of the CPU.
-
I/O Throttling: To prevent the media player's library indexing from saturating the disk I/O, I would use an absolute limit.
- First, identify the block device for the USB drive (e.g.,
8:16). echo "8:16 rbps=5000000" > /sys/fs/cgroup/media_services/io.max
This throttles the media service's read bandwidth on that specific device to 5 MB/s, leaving plenty of I/O capacity for other system operations, including the navigation service loading map data.
- First, identify the block device for the USB drive (e.g.,
This solution uses a mix of proportional sharing (cpu.weight) for a constantly needed resource and absolute throttling (io.max) for a background task, demonstrating a nuanced understanding of resource control.
Conclusion
In this lesson, we bridged the gap from resource visibility (namespaces) to resource control (cgroups). You now have a complete foundational understanding of the two pillars of Linux containerization.
Key Takeaways:
- Unified Architecture: Cgroups v2 uses a single, hierarchical tree to manage all resources, which simplifies administration.
- Filesystem Interface: All management is done through file and directory operations in
/sys/fs/cgroup. - Hierarchical Control: Controllers must be enabled in a parent's
cgroup.subtree_controlfile to manage resources for its children. - Applying Limits: You can apply both proportional (
.weight) and absolute (.max) limits for resources like CPU, memory, and I/O to build robust, predictable systems.
Preview of the Next Lesson:
We have now seen how to control what a process can see (namespaces) and how much of a resource it can use (cgroups). The final piece of the isolation puzzle is controlling what a process can do. In our next lesson, we will explore the seccomp-bpf mechanism, which allows you to restrict the specific system calls a process is permitted to make, providing a powerful layer of security hardening.