Hello! Welcome back to your second lesson on digital sculpting in Blender.
In our first session, you learned how to move around the 3D space, which is like learning to walk around your studio. Now that you're comfortable with navigation, it's time to get familiar with the layout of your digital workshop.
Today, you will learn to identify and use the main interface areas: the 3D Viewport, the Outliner, and the Properties panel. Think of these as the three most important zones in your studio: your main work area, your inventory of materials and objects, and your panel for detailed adjustments. Understanding the role of each is crucial for an efficient workflow.
A Map of the Blender Interface
When you first open Blender, the screen can seem busy. However, it's organized into a few key, logical areas. Let's start with a high-level overview.
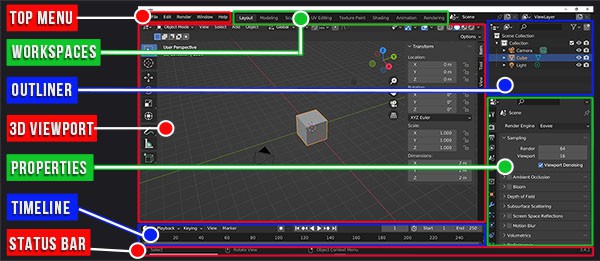
To get a feel for this structure, let's start with a short reading that clearly defines these areas.
Getting Started with Blender - iFixit Repair Guide
This guide from iFixit provides a simple and effective breakdown of Blender's user interface. It will give you a solid mental model before we dive into the details.
Please read Step 2 ('Understanding Blender's UI') and Step 3 ('Layout Workspace'). These sections introduce the main parts of the interface and then define the purpose of the 3D Viewport, Outliner, and Properties panel.
Your Digital Sculpting Studio
As the guide mentioned, the three areas we're focusing on each have a distinct purpose. Here's an analogy that might resonate with your background in physical sculpture:
- The 3D Viewport: This is your main workbench or sculpture stand. It's the interactive space where you view and manipulate your 3D model. You spent all of the last lesson moving around in here.
- The Outliner: This is your inventory. It gives you a clean, organized list of every single item in your scene—your clay (meshes), your lights, your camera, etc. If you can't find something in the viewport, you can always find it in the Outliner.
- The Properties Panel: This is your control panel for fine adjustments. When you select an object, a light, or even the world itself, this panel fills with all of its specific attributes—dimensions, material, texture, and other settings you can change.
Now, let's take a guided video tour through these three areas to see them in action.
Let's Learn Blender! #2: A Guided Tour: The User Interface & Key Preferences!
This video from the BornCG YouTube channel offers a detailed walkthrough of the Blender interface. We will watch it in three parts to explore each of our key areas.
Please watch the following segments: The Outliner (01:31 - 02:49): Pay attention to how it lists scene items and allows you to hide objects using the 'eye' icon. The Properties Panel (02:49 - 04:15): Notice the vertical tabs and how they contain different categories of settings for an object, like its location, modifiers, and materials. The 3D Viewport Panels (07:13 - 08:15): This part introduces the Toolbar on the left (shortcut T) and the Sidebar on the right (shortcut N), which contain tools and more properties specific to the viewport.
This video gave you a much deeper look at the function of each panel. The key takeaway is the relationship between them: you select an object in the 3D Viewport or the Outliner, and its details then appear in the Properties panel for you to edit.
Hands-On: Exploring the Interface
Let's put this knowledge into practice. Open Blender with its default scene (or go to File > New > General).
Activity (15 minutes):
-
Connecting the Viewport and Outliner:
- In the 3D Viewport, left-click the cube to select it. Notice that "Cube" becomes highlighted in the Outliner.
- Now, in the Outliner, click on the word "Camera". Notice two things: the camera becomes selected in the 3D Viewport, and the Properties panel changes to show the camera's settings (a green camera icon will be selected).
- Click back on the cube in either the Viewport or the Outliner.
-
Using the Outliner for Organization:
- In the Outliner, find the row for the "Cube". To the far right of it, you'll see an icon that looks like an eye. Click this eye icon. The cube will disappear from the 3D Viewport. It's hidden, not deleted.
- Click the eye icon again to make the cube reappear. This is extremely useful for temporarily hiding parts of a complex sculpture to work on other areas.
-
Using the Properties Panel for Adjustments:
- Make sure the cube is selected.
- In the Properties panel on the lower right, look for the tab with an orange square icon. This is the "Object Properties" tab. Click it if it's not already selected.
- You'll see a section called "Transform" with values for Location, Rotation, and Scale.
- Hover your mouse over the
Xvalue under Location. Left-click and drag your mouse to the right. You will see the cube move along the red X-axis in the 3D Viewport. - You can also click inside the number field and type a value, like
2, and pressEnter.
This simple exercise demonstrates the fundamental workflow: using the Outliner and Viewport to select and organize, and using the Properties panel to make precise changes.
Key Takeaways
You've now learned the "what" and "where" of Blender's main interface. This foundational knowledge will prevent you from feeling lost and allow you to work more deliberately.
- The 3D Viewport is your interactive 3D workspace.
- The Outliner is a hierarchical list of every object in your scene, perfect for selection and organization.
- The Properties Panel displays the detailed settings of your currently selected object, allowing for precise adjustments.
- These three panels work together: select in the Viewport/Outliner, and edit in the Properties panel.
Next Steps
Great job today! You've gone from navigating the space to understanding the layout of the entire workshop. Now that you know where the main tools are, the next logical step is to learn about the different modes of interaction. In the next lesson, we will explore Object Mode and Edit Mode, which will be our first step toward actually changing the shape of an object.