Introduction
Welcome to the next lesson in our exploration of hard-surface modeling! In the previous lessons, we've learned how to build complex forms non-destructively. We used the Mirror modifier for symmetry, Boolean modifiers to cut and join shapes, and the Solidify modifier to give our flat panels volume.
While these tools are powerful for creating the basic structure, our models still have one tell-tale sign of being computer-generated: perfectly sharp, razor-thin edges. In the physical world, no edge is truly perfect. Even a machined piece of metal or a sharp corner on a stone sculpture has a tiny radius that catches the light. Your experience with physical sculpture has surely given you an intuition for how light plays across an edge to define a form.
Today, we'll learn how to bring that realism into our digital work. Our goal is to master the Bevel modifier to create clean, uniform edges on our blockout models. This will soften the harshness of our digital forms and make them interact with light in a much more believable and visually appealing way.
1. The "Why" of Beveling: Catching the Light
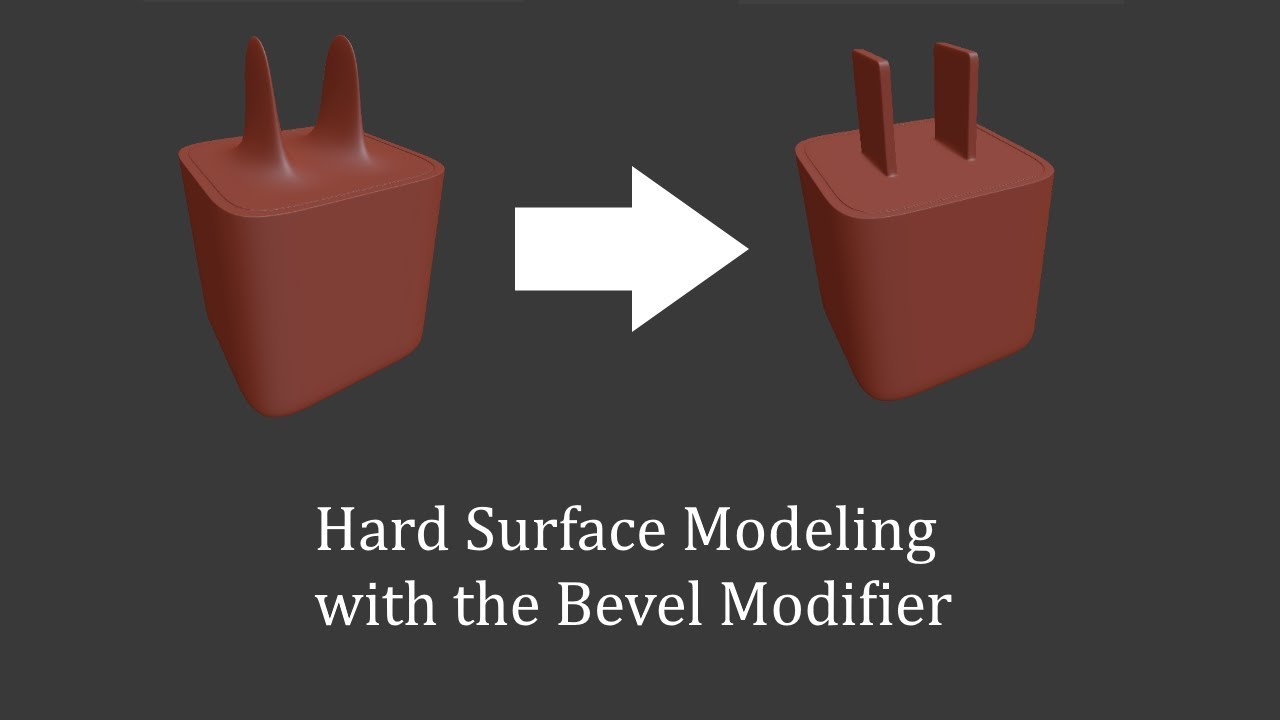
Before we jump into the tool, let's establish why beveling is so critical. It’s not just about making things look rounded; it’s about controlling shading and highlights to create a sense of tangibility.
To understand the theory behind this, let's read a short section from the article 'Mastering Bevels in Blender'. It does an excellent job explaining the difference between large, shape-defining bevels and the subtle 'micro-bevels' that add realism.
Please read the 'Introduction' and the section titled 'When to Use “Large Bevels” and When to Use “Micro-Bevels”'. This will give you a strong conceptual foundation for why we are about to do what we're about to do.
As the article explains, a tiny bevel can catch a specular highlight, clearly defining the edge of an object and separating it from an adjacent surface. This is a fundamental principle in achieving realism for hard-surface objects.
2. The Bevel Modifier: Basic Controls
Like the other tools we've used, Blender offers a non-destructive modifier for this task. While there is a manual Bevel tool (Ctrl+B), the Bevel Modifier is far more flexible for our hard-surface workflow.
Let's start by seeing how to add it and control its basic properties.
Blender Beginner Tutorial – Bevel Modifier
The 'Blender Beginner Tutorial – Bevel Modifier' from Blender Academy gives a clear, concise introduction to adding the modifier and adjusting its two most important settings.
Watch from 00:59 to 02:26. Pay attention to how the 'Amount' controls the size of the bevel and 'Segments' controls its smoothness.
Mini-Challenge 1: Your First Bevel
Let's apply this yourself.
- Open Blender and add a standard Cube.
- Go to the Modifier Properties (blue wrench icon).
- Click Add Modifier and choose Bevel.
- Experiment with the two main settings:
- Amount: Click and drag this value to change the width of the bevel. Try a small value like
0.02m. - Segments: Increase this value from 1 to 4 or 5. Notice how the edge goes from a sharp chamfer (1 segment) to a smooth curve.
- Amount: Click and drag this value to change the width of the bevel. Try a small value like
- With the Bevel modifier active, right-click the cube in the viewport and select Shade Auto Smooth to get clean shading.
3. Taking Control: The Limit Method
You probably noticed that by default, the Bevel modifier affects every single edge on your object. This is rarely what you want. The Limit Method setting is the key to telling Blender precisely which edges to bevel.
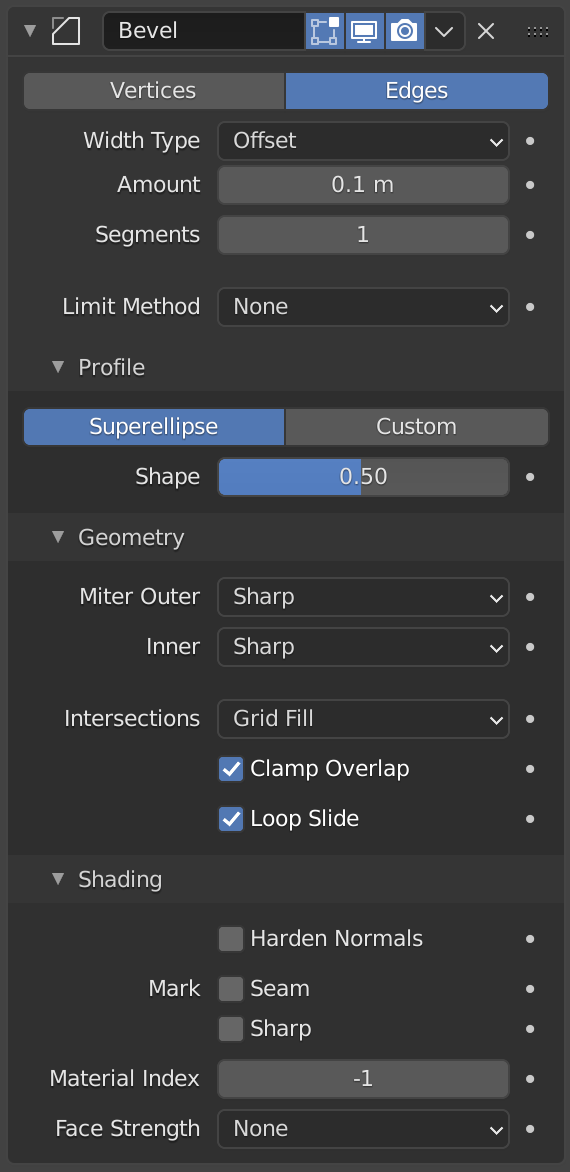
The most common and useful methods are Angle and Weight.
Limit Method: Angle
This method tells Blender to only bevel edges where the connecting faces form an angle sharper than a specified threshold. It's perfect for quickly beveling the hard corners of a blockout model while leaving flat surfaces alone.
Blender Beginner Tutorial – Bevel Modifier
Let's return to the Blender Academy tutorial to see how the 'Angle' method works.
Watch from 05:14 to 05:45. The video explains that the default 30° angle works well for sharp corners like those on a cube (which are 90°).
This is the workhorse setting for general hard-surface beveling.
Limit Method: Weight
Sometimes, you need more artistic control. The Weight method allows you to "paint" which edges you want to be beveled and even control how strong the bevel is on a per-edge basis. This gives you surgical precision.
Blender Beginner Tutorial – Bevel Modifier
This next clip is fantastic. It demonstrates how to use Bevel Weight to selectively apply the modifier, giving you complete creative control.
Watch from 05:45 to 09:06. Follow these key steps: Change the Limit Method on the modifier to 'Weight'. Go into Edit Mode and select an edge. Press N to open the sidebar, go to the 'Item' tab, and find the 'Edge Data' section. Increase the 'Bevel Weight' for the selected edge. You can even give different edges different weights to create varied bevel sizes with a single modifier.
This technique is incredibly powerful when you want to mix sharp and soft edges on the same object.
4. Best Practices and a Look Ahead
Before we conclude, let's cover a few essential tips and get a sneak peek at our next topic.
Essential Tip: Harden Normals
For clean shading on your beveled models, you should almost always enable the Harden Normals option in the Bevel modifier's Shading dropdown. This works with the Shade Auto Smooth setting on your object to prevent strange shading artifacts across your beveled edges.
Common Mistake: Unapplied Scale
Just like with the Solidify modifier, you must remember to apply your object's scale (Ctrl + A -> Scale) before adding a Bevel modifier. If you don't, your bevels may appear stretched or uneven.
Stacking Modifiers for Complex Edges
What if you want a large, shape-defining chamfer, but you also want that new chamfer's edges to have their own tiny, light-catching micro-bevel? You can do this by stacking two Bevel modifiers! This is a perfect preview for our next lesson, which is all about modifier order.
Blender Beginner Tutorial – Bevel Modifier
Watch this final clip from the Blender Academy tutorial to see how you can add a second Bevel modifier to affect the results of the first one.
Watch from 14:13 to 15:56. This demonstrates adding a large, one-segment bevel to cut a corner, and then adding a second, smaller, multi-segment bevel to soften all the new edges.
This concept of stacking is fundamental. The order in which you place your Mirror, Boolean, Solidify, and Bevel modifiers will drastically change the final result.
Conclusion
You've now learned how to add one of the most important finishing touches to a hard-surface model. By softening edges with the Bevel modifier, you add a layer of realism and visual polish that separates a basic model from a professional one.
Key Takeaways:
- Bevels are crucial for realism because they allow edges to catch light correctly.
- The Bevel modifier provides a non-destructive way to add chamfers and rounded edges.
- Amount controls the bevel size, and Segments controls its smoothness.
- The
Limit Methodgives you control over which edges are affected. Angle is great for general blockouts, while Weight offers precise artistic control. - Always remember to Apply Scale and enable Harden Normals for clean, predictable results.
Next Steps
In our next lesson, we will expand on the idea of stacking modifiers. We'll formally investigate how the modifier stack order works and how changing the sequence of your Mirror, Boolean, Solidify, and Bevel modifiers can lead to completely different outcomes. Mastering this will unlock the full potential of non-destructive modeling in Blender.