Introduction
Hello! In our last lesson, you learned how to use Face Sets to organize and isolate different parts of your hard-surface model. This is a crucial skill because it gives you the precision to work on one panel without accidentally damaging another. Now that you have this control, we can move on to the most exciting part of the process: bringing your model to life.
Today's lesson is dedicated to helping you add fine surface details and imperfections to enhance realism. A perfectly clean, uniform object often looks artificial. The small scratches, cracks, worn edges, and even layers of dust and grime are what tell the story of an object—its history, its environment, and how it has been used. This process is very similar to how a physical sculptor applies a patina to bronze or intentionally introduces tool marks to a stone carving to give it character and a sense of age.
We will explore both sculpted details you can carve directly into the mesh and touch upon how material properties can create even finer imperfections.
1. The Art of Imperfection: Where and Why to Add Detail
Before we pick up any digital tools, the most important step is to think like an artist and a storyteller. What is the history of the object you're creating? Is it a pristine piece of equipment, fresh from the factory? Or is it a battle-scarred container that has seen years of heavy use? The answer will guide every decision you make about where to add detail.
Randomly scattering damage looks chaotic. Purposeful, logical damage creates a believable world. For example:
- Edges and corners are likely to be chipped and worn from impacts.
- Recessed areas and crevices will accumulate dirt and grime.
- Protruding or handled parts might have their paint rubbed off, revealing bare metal underneath.
- Large, flat surfaces might have scrapes, stains, or a fine layer of dust.
The following article, although it uses a different software for texturing, provides an excellent mindset for thinking about realistic damage. The principles it discusses are universal to any form of digital art.
Realistic Damage Texturing In Substance 3D Painter - 80 Level
Let's read some sections from the article 'Realistic Damage Texturing In Substance 3D Painter' on 80 Level. Focus on the philosophy behind adding details, not the specific software tools mentioned.
Please read the following sections: Start with the section titled 'Texturing' and read down to just before the heading 'Rusty Bolt'. Pay attention to how the artist thinks about an object's history and making large, flat planes more interesting. Next, read the sections 'Damages' and 'Dirt & Dust'. These are the most important parts. Focus on the logic of where damage occurs (protruding parts vs. recessed areas) and how different types of wear should look (smoothly rubbed vs. sharp chips). You don't need to worry about the technical terms like 'Albedo' or 'Roughness' just yet; absorb the core ideas about placement and variety.
2. Sculpting Wear and Tear: Cracks and Worn Edges
Now, let's translate that theory into practice. One of the most effective ways to add a sense of history is to sculpt organic damage like cracks, chips, and worn-down edges. This breaks up the clean, perfect lines of the blockout model and instantly makes it more believable.
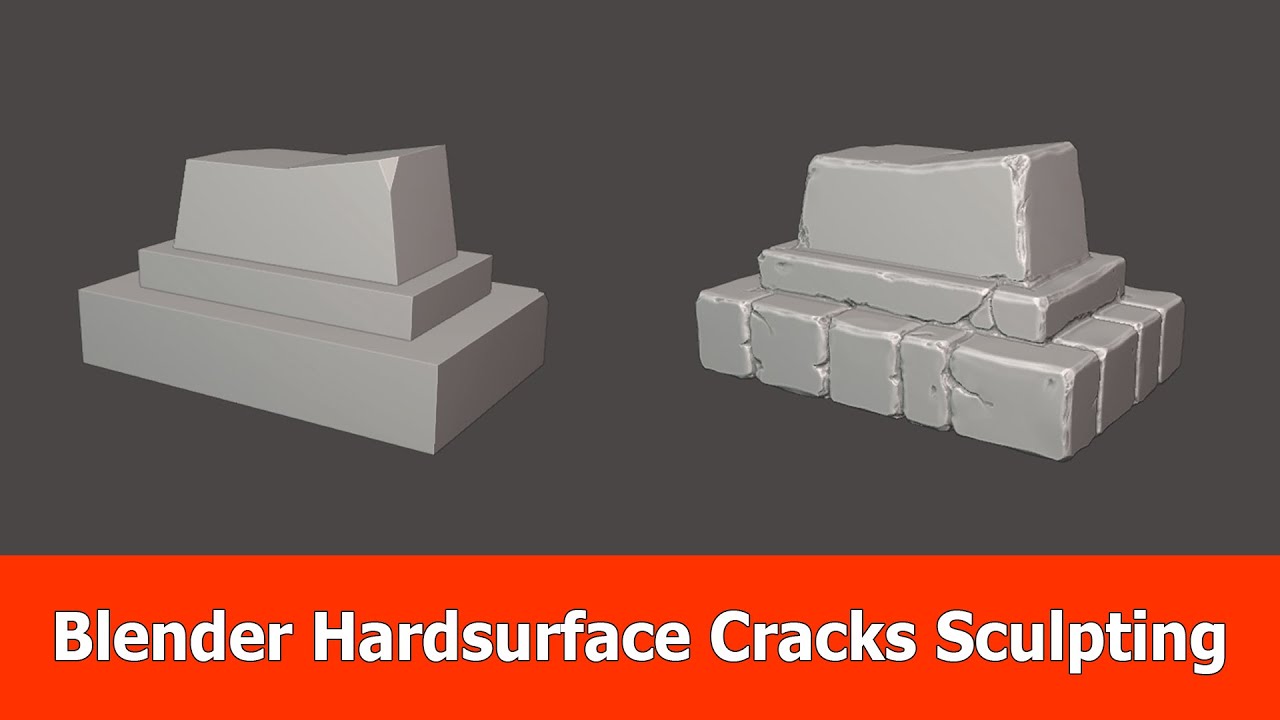
We'll use a combination of brushes you're already familiar with, plus a couple of new ones, to achieve this effect.
Blender 2.91 Hardsurface Sculpting Cracks
The video 'Blender 2.91 Hardsurface Sculpting Cracks' by Jayanam provides a fantastic demonstration of this process. We'll watch the key parts where the artist adds damage to a hard-surface blockout.
Watch the following segments to learn the techniques: Brush Introduction (03:10 - 03:44): The artist introduces the key brushes for this task: Scrape, Draw Sharp, Clay Strips, and Pinch. Stylizing Edges (03:44 - 05:48): See how the Scrape brush is used to break up the perfectly straight edges and give them a more stylized, worn look. Don't worry about recreating this perfectly; just understand the concept. Drawing Cracks (05:48 - 08:30): This is a crucial section. Notice how the Draw Sharp brush is used to sketch the initial lines of the cracks, and then the Clay Strips brush (in subtract mode) is used to carve out larger, deeper areas of damage. Refining Details (08:30 - 10:14): Finally, see how the Pinch brush is used to tighten the cracks and the Grab brush is used to introduce subtle, large-scale irregularities.
Practical Exercise: Adding Damage to Your Crate
- Open your sci-fi crate project file and go into Sculpt Mode.
- Make sure your mesh has enough resolution to hold these details. If your sculpt looks blocky or pixelated, use the Remesh tool (
Ctrl+R) with a smaller voxel size. - Using the techniques from the video, start adding some wear and tear to your model.
- Use the Scrape brush on some of the hard edges to make them look worn down.
- Use the Draw Sharp brush (with a small radius) to draw a few fine cracks emanating from a corner or an edge.
- Switch to the Clay Strips brush (hold
Ctrlto subtract) and carve out some chips and deeper damage around the cracks. - Remember to use Face Sets! Enable Auto-Masking for Face Sets in the header to ensure your damage doesn't accidentally spill onto an adjacent panel.
3. Using Alphas for Manufactured Details
While cracks and wear add history, you can also add fine manufactured details like vents, grilles, seams, and bolt heads. Sculpting these by hand would be incredibly tedious. Instead, we use Alpha Textures.
An alpha is a grayscale image that tells the brush how to shape the surface. White areas push the surface out, black areas are left alone, and gray areas have an intermediate effect. This is analogous to pressing a patterned stamp into a sheet of clay.

Blender Secrets - Hard Surface Sculpting Tips
The 'Blender Secrets - Hard Surface Sculpting Tips' video has a great section that explains how to use alphas effectively.
Please watch these two clips: Using Alpha Textures (05:07 - 07:11): This is the core of the technique. Pay close attention to these settings: Stroke Method: Drag Dot lets you place and scale the detail precisely. Texture Properties: Creating a new brush texture and loading your alpha image. Mapping: Setting it to Area Plane is crucial for preventing distortion. Controls: F for radius, Shift+F for strength, and Ctrl+F for rotation. Radial Array (07:11 - 08:15): This is a bonus tip showing how you can combine alphas with radial symmetry to create circular patterns, like bolts around a hatch.
Practical Exercise: Applying Alpha Details
- First, you need some alpha textures. You can find many free hard-surface alpha packs on websites like ArtStation, Gumroad, or by searching online for "free hard surface alphas".
- On one of the flat panels of your crate, try adding a detail using an alpha texture.
- Select the Draw brush. In the Texture properties panel, create a new texture and load one of your downloaded alpha images.
- Set the Stroke Method to Drag Dot and the texture Mapping to Area Plane.
- Click and drag on your model to place the detail. Experiment with the strength (
Shift+F) and rotation (Ctrl+F). Again, use Face Set Auto-Masking to keep the detail contained to a single panel.
4. A Preview of Material-Based Imperfections
So far, all the details we've added have been actual changes to the geometry of the mesh. However, many real-world imperfections are too small to be sculpted efficiently. Think of micro-scratches, smudges, fingerprints, or thin layers of dust.
These details are typically created at the material and rendering stage using special textures. While we will cover this in depth in the next module, it's important to understand the concept now.
- Normal or Bump Maps: These are textures that fake the appearance of fine geometric detail (like the grain of leather or tiny scratches) by telling the render engine how light should bounce off the surface, without adding any actual polygons.
- Roughness Maps: These textures control how glossy or matte a surface is. A fingerprint on glass, for example, is just a change in roughness. By using a texture with fingerprint smudges, you can create this effect realistically.
Realistic Dust, Hair & Imperfections In Blender | 3D Easy Guide
Let's read a short article that introduces these concepts. This will give you a head start for our next module on materials.
Read the sections: 'How do I add micro surface imperfections like scratches and smudges in Blender?' 'What texture maps help add realism in Blender?' Focus on understanding the purpose of Normal/Bump Maps and Roughness Maps. Don't worry about the node setups for now; just grasp the idea that these textures control light and reflectivity to create the illusion of fine detail.
Conclusion
Fantastic work today. You've moved beyond just creating a clean shape and have started to imbue your model with a story and a sense of realism. This is where digital sculpting truly becomes an art form.
Key Takeaways:
- Realistic imperfections are guided by logic and storytelling—think about an object's history before adding detail.
- Organic damage like cracks and worn edges can be sculpted using brushes like Draw Sharp, Clay Strips, and Scrape.
- Manufactured details like vents and bolts are added efficiently using Alpha Textures with the Drag Dot stroke method.
- The finest details, like micro-scratches and smudges, are often handled with material textures (Normal and Roughness maps), a topic we will explore fully in the next module.
Next Steps
You are now very close to finishing the sculpting phase of this hard-surface project. In our final lesson for this module, we will learn how to combine Edit Mode tools and sculpting to refine hard-surface shapes. This hybrid approach is extremely powerful for creating ultra-clean lines, insets, and other features that can be challenging to achieve with brushes alone.