Introduction
Welcome back! In our last session, you did an excellent job transforming the soft, remeshed blockout of your sci-fi crate by using the Crease and Pinch brushes to re-establish sharp, defined edges. Your model now has its primary lines carved out, but the large surfaces between those lines are likely still a bit uneven from the sculpting process.
In this lesson, we'll address those surfaces directly. Your goal is to apply the Trim and Scrape brushes to create clean planar surfaces and sharp intersections. Think of this as the step where you move from chiseling lines to planing and sanding the large faces of your object, giving it the clean, machined quality essential for hard-surface design.
We'll explore two families of tools:
- Scrape Brushes: These are for refining and polishing surfaces to make them perfectly flat.
- Trim Tools: These are for making large, precise cuts, almost like using a saw to slice through your digital clay.
Let's begin by learning how to polish surfaces flat with the Scrape brush.
1. Planar Sculpting with the Scrape Brush
The standard Scrape brush is useful, but by default, it can produce wavy, uneven results. For hard-surface work, we need more control. We can configure the Scrape brush to emulate two famous brushes from other sculpting software, hPolish and Planar, which are industry standards for creating clean surfaces.
hPolish-style: This setup is for "polishing" or flattening an existing surface while respecting the surrounding edges.Planar-style: This setup is for creating a new, perfectly flat plane at a specific angle, cutting into the mesh.
The following video provides an excellent demonstration of what these brushes do and how to configure Blender's Scrape brush to achieve the same effects.
hPolish and Planar sculpting brushes in Blender
The video 'hPolish and Planar sculpting brushes in Blender' by Armored Colony will be our guide. It first demonstrates the target behavior in ZBrush and then shows us exactly how to replicate it in Blender.
Please watch the following sections: The Goal (hPolish): Watch from 00:24 to 01:25 to understand how the hPolish brush works to clean surfaces and preserve edges. The Goal (Planar): Continue from 01:25 to 03:03 to see how the Planar brush makes deep, flat cuts. Recreating hPolish in Blender: Watch from 05:19 to 08:41. Pay close attention to the settings he adjusts: creating a new brush preset, and changing Plane Trim and Normal Radius. Recreating Planar in Blender: Finally, watch from 08:41 to 10:59. Focus on the key settings he enables under Use Original: Normal and Plane. Also note how he uses right-click to access Plane Offset to control the cutting depth.
Hands-On: Flattening a Panel
Now, let's apply this to your sci-fi crate. Open your project file and enter Sculpt Mode.
Practice 1: hPolish Style (Polishing)
- Select the Scrape brush. In the Tool Settings (Properties Panel on the right), click the icon with two pages to duplicate the brush and create a new preset. Name it
H_Polish. - Locate a large, relatively flat panel on your crate that looks a bit lumpy.
- Following the video's instructions, go to the brush settings and enable
Plane Trim. Start with a value around0.2. - Try reducing the
Normal Radiusas well, perhaps to0.2or0.3. - Now, sculpt on the lumpy panel. Use broad, even strokes. You should see the surface becoming much flatter and cleaner, while the edges you defined in the last lesson are mostly preserved.

Practice 2: Planar Style (Cutting)
- Duplicate the default Scrape brush again and name this one
Planar_Cut. - In the brush settings, find the
Use Originaldropdown. Enable bothNormalandPlane. - Find an area where you want to create a perfectly flat, inset panel.
- Click and start your stroke on the surface to "lock" the plane's angle and depth. As you drag, the brush will cut everything down to that locked plane.
- To cut deeper, Right-Click in the viewport while the brush is active to bring up the brush menu and increase the
Plane Offset. A value of0.1or0.2is a good starting point.
Experiment with these two setups. The hPolish style is for refinement, while the Planar_Cut style is for aggressive shaping.
2. Creating Sharp Intersections
Now that you can create flat planes, the next step is to ensure the intersections between those planes are sharp and clean. You can achieve this with a specialized brush or by configuring the Scrape brush differently.
The Multiplane Scrape Brush
Blender has a brush specifically for this purpose. It acts like a V-shaped chisel, sharpening the valley between two planes.
10 Improvements in Blender's Sculpt mode
Let's read a quick description of the Multiplane Scrape brush from Diego Verger's article, '10 Improvements in Blender's Sculpt mode'.
Read the short section titled 'Multiplane Scrape'. Notice how it's described as a V-shape angled chisel that adapts to any angle.
This brush is excellent for cleaning up the corner where two of your newly flattened planes meet. Simply select the Multiplane Scrape brush from the toolbar and trace along the intersection.
The Scrape Brush for Chamfering
You can also create clean, beveled intersections (chamfers) using a specifically configured Scrape brush. This technique gives you very crisp, machine-like edges.
AWESOME brush for HARD SURFACE sculpting in Blender
The video 'AWESOME brush for HARD SURFACE sculpting in Blender' by Ryuu - Blender Bros shows exactly how to set this up.
Watch from 00:28 to 02:41. The key is to create a new Scrape brush preset and, under the 'Advanced' settings, enable Normals and Plane. This is a different setting from the 'Use Original' options we used for the Planar brush.
Try this technique on one of the 90-degree edges of your crate to carve a clean 45-degree chamfer. This is a classic hard-surface detail.
3. Definitive Cuts with the Trim Tools
While Scrape brushes are for refining and shaping, Trim tools are for making large, destructive cuts. They use Boolean operations to slice away geometry, leaving a perfectly clean, planar surface. This is the most direct way to establish the primary forms of your model.
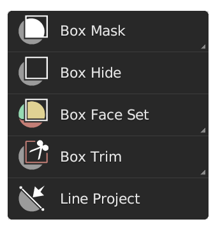
The Blender Manual provides a concise overview of how these tools work.
Trim Gesture Tools - Blender 5.2 LTS Manual
Let's consult the official 'Trim Gesture Tools' page from the Blender Manual to understand the fundamentals.
First, read the introduction to understand that Trim tools use Booleans and create new Face Sets (we'll cover Face Sets in the next lesson!). Next, skim the 'Box Trim' and 'Lasso Trim' sections to see what they do. Finally, look at the 'Tool Settings', focusing on the Trim Mode. For our purposes, we will almost always use Difference to cut geometry away.
Hands-On: Making a Major Cut
This is a powerful and satisfying tool. Let's use it to make a significant change to your crate.
- Select the Box Trim tool from the toolbar (it might be nested under the Box Mask tool).
- In the header bar at the top, ensure the
Trim Modeis set toDifference. - Position your view so you're looking at one corner of your crate.
- Click and drag a box that covers the corner of the mesh you want to slice off.
- Release the mouse button. Blender will process for a moment and then slice the corner off, leaving a perfectly flat surface.
This is an incredibly effective way to create large chamfers, define silhouettes, or clean up an entire side of your model in one go. If a part of your sculpt is messy beyond repair with the Scrape brush, simply slice it off with a Trim tool and start fresh on the new, clean surface.
Conclusion
Great job! You've just added the most important hard-surface shaping tools to your skillset. You've gone beyond just defining edges and can now create the clean, flat planes and sharp intersections that are the hallmark of machined objects.
Key Takeaways:
- The Scrape brush is versatile. It can be configured to polish surfaces flat (
hPolishstyle) or make controlled planar cuts (Planarstyle). - The Multiplane Scrape brush is a specialized tool for sharpening the intersections between existing planes.
- Trim tools (like Box Trim) use Boolean operations to make large, precise cuts, perfect for defining major forms and creating perfectly clean surfaces instantly.
- The workflow often involves using Trim tools for big shapes, then refining those shapes and their intersections with the various Scrape brush setups.
Next Steps
When you used the Trim tool, you may have noticed that the new surface was created with a different color. This is a Face Set, a feature Blender uses to help organize a mesh. In the next lesson, we will dive deep into this concept and learn how to use Face Sets to organize and isolate different regions of a hard-surface sculpt, making it much easier to work on complex models without affecting other parts.