Welcome to the final lesson of your course on becoming a Financial Planning and Analyst! This is an exciting milestone.
In our previous lesson, we brought all your data modeling and DAX work to life by building a professional, interactive FP&A dashboard in Power BI Desktop. You learned to use KPI cards, variance charts, and waterfall charts to tell a compelling story with financial data.
However, a dashboard living on your personal computer has no impact. The final, critical step is to deliver these insights to the business leaders who need them. Today, we will focus on exactly that. Our learning outcome is to publish and share Power BI reports for consumption by business stakeholders. This lesson bridges the gap between development and delivery, which is the final link in the business intelligence value chain.
1. From Your Desktop to the Cloud: The Power BI Workflow
So far, all our work has been in Power BI Desktop, which is the authoring tool for developers. To share your work, you need to move it to the Power BI Service, a cloud-based platform designed for sharing, collaboration, and consumption of reports.
This workflow is the standard process for any BI professional.

The first step in this process is publishing. Within Power BI Desktop, once your report is ready, you use the "Publish" button to upload it to the Power BI Service.
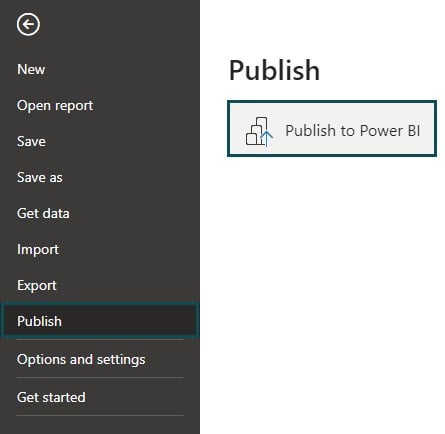
2. Publishing Your Report
Let's walk through the practical steps of publishing your report and explore the Power BI Service environment.
AFP Power BI Course - Exercise 1.4
The following exercise from a Power BI training manual provides a clear, step-by-step guide to publishing your report. It also introduces you to the Power BI service interface.
Please read and follow the steps in 'Exercise 1.4: Publish a Report to Power BI Service'. Start from step 1 ('Start by clicking the “Publish” button...') and go through to step 5. This will show you how to publish the report and locate it in 'My Workspace' within the Power BI Service.
As you've seen, publishing is straightforward. You select the "Publish" button, choose a destination, and Power BI handles the rest. The destination you choose is a Workspace.
3. Sharing and Collaboration Strategies
Once your report is in the Power BI Service, you have several ways to share it. The method you choose depends on your audience and your goal (collaboration vs. consumption).
Workspaces: The Collaborative Hub
Workspaces are the primary containers for content in the Power BI Service. Think of them as shared folders for BI projects.
- My Workspace: Your personal sandbox. It's for your own reports and should not be used for sharing business-critical content with teams.
- App Workspaces: These are collaborative spaces where teams can co-author, test, and manage a collection of related reports, dashboards, and datasets. In a corporate environment, you would typically have separate workspaces for different stages, such as
FP&A - Development,FP&A - Test, andFP&A - Production, to ensure a controlled and reliable reporting process.
Two Core Ways to Distribute Your Report
There are two primary models for getting your content to users: publishing an App or direct sharing.
Collaborate and share Power BI reports and dashboards
The official Microsoft documentation provides an excellent overview of the different ways to collaborate and share. This will clarify when to use each method.
Please read the sections 'Ways to collaborate and share' and 'Publish apps'. Pay close attention to the distinction between sharing a link to specific people versus packaging content into an App for broader distribution.
Let's summarize the key differences:
| Feature | Direct Sharing (in a Workspace) | Publishing an App |
|---|---|---|
| Primary Use | Collaboration among a small team of creators/editors (e.g., your FP&A team). | Distribution to a large group of consumers (e.g., the entire sales department). |
| User Experience | Users see the entire workspace and can potentially edit if given the right role. | Users get a polished, branded, read-only experience. The underlying workspace is hidden. |
| Content | Shares individual items (one report, one dashboard). | Bundles a collection of related reports and dashboards into a single package. |
| Updates | Changes are visible to users immediately. | Changes are only visible to users after you update and republish the App. |
For an FP&A analyst, a typical workflow would be:
- Collaborate with a few colleagues on the financial model and reports within an App Workspace.
- Once finalized, publish an App from that workspace for the wider business (e.g., department heads, executives) to consume.
4. Managing Access, Permissions, and Security
As an FP&A analyst, you handle sensitive data. Controlling who sees what is non-negotiable.
Licensing Requirements
Sharing in Power BI is governed by licenses. Understanding this is crucial for ensuring your stakeholders can access your reports.
Collaborate and share Power BI reports and dashboards
Let's review the license requirements for sharing content. This is a practical consideration you will encounter immediately in a business setting.
Read the 'Prerequisites' and 'Considerations and limitations' sections. Focus on understanding which license types (Pro, PPU) are needed for both the person sharing and the person receiving.
In short:
- To share content, you generally need a Power BI Pro or Premium Per User (PPU) license.
- For others to view your shared content, they also generally need a Pro or PPU license.
- The main exception is if your company has Power BI Premium Capacity. In that case, users with a Free license can view content that is stored in that Premium capacity.
Managing Permissions and Sharing with External Users
When you share, you control what the recipient can do. You can grant access to specific individuals (including external guests) or to entire groups.
Collaborate and share Power BI reports and dashboards
This document also details how to manage permissions for content you've already shared and how to securely share with people outside your organization.
Read the sections 'Share outside your organization' and 'Manage permissions'. This will show you how to control access and review who can see your reports.
A key takeaway is that you can always go to the Manage permissions pane for any report to see exactly who has access and to revoke it if necessary. When sharing with external users (like consultants or auditors), using Microsoft Entra B2B is the recommended secure method.
Test your understanding!
You have created the final quarterly performance report in Power BI.
- The CFO needs to be able to review and work with you on the report before it's finalized.
- The 15 department heads need to view the final report, but they should only see the data for their own department. They should not be able to edit the report.
What is the most effective and secure sharing strategy?
Show answer
Here is an effective strategy:
- For the CFO: Add the CFO as a Member or Contributor to the collaborative App Workspace where the report is being developed. This allows for direct collaboration.
- For the Department Heads:
- First, ensure Row-Level Security (RLS) is implemented in your data model to restrict data by department.
- Do not add them to the workspace. Instead, publish a Power BI App from the workspace.
- Grant the 15 department heads access to the App. They will get a clean, read-only view of the report, and RLS will automatically filter the data so they each see only their own department's numbers.
This approach correctly separates the collaborative environment (the workspace) from the consumption environment (the App).
5. Conclusion and Your Path Forward
Congratulations on completing the final lesson! You have now followed the entire FP&A process from end to end—from understanding accounting principles and building Excel models to creating and distributing powerful BI dashboards.
Key Takeaways from this Lesson:
- Power BI reports are built in Power BI Desktop and shared via the Power BI Service.
- Workspaces are for team collaboration, while Apps are for distributing polished reports to a wide audience of consumers.
- Always be mindful of licensing requirements (Pro vs. Premium) when sharing content.
- Use the Manage Permissions panel to control and monitor who has access to your sensitive financial data.
Your Journey as an FP&A Analyst:
You embarked on this course to transition from your civil engineering background into a career in Financial Planning and Analysis. Over these 12 modules, you have built a formidable technical foundation that rivals what is taught in top-tier programs.
You started with advanced Excel, the bedrock of any finance role. You then mastered the language of business by diving deep into the three financial statements. You learned to build sophisticated, driver-based forecasts and construct a fully integrated three-statement financial model from scratch. We moved on to budgeting, variance analysis, valuation (DCF and Comps), and finally, brought it all together with business intelligence and dashboarding in Power BI.
You now possess the hands-on, practical skills that employers are looking for. Your goal of being competitive for high-level FP&A roles is within reach.
The path forward is about applying these skills. Continue to practice. Build a portfolio of personal projects—analyze the financials of a public company you're interested in, build a forecast model for a startup idea. This will solidify your knowledge and give you tangible examples to discuss in interviews.
You have the tools and the roadmap. The next chapter is yours to write. Well done, and best of luck in your new career