Welcome to the beginning of your journey to becoming a Go backend developer! This first lesson is a crucial one, as it lays the foundation for everything that follows. Our goal is to get your computer set up with all the necessary tools and have you successfully write and run your very first Go program.
By the end of this session, you will have a professional Go development environment configured. This setup is not just for learning; it's the same environment you'll use to build complex backend services. Your background in Python will be helpful, as you're already familiar with general programming concepts, but we will approach Go's unique features, like its compilation process and project structure, from the ground up.
Let's get started.
1. Setting Up Your Development Environment
Before we can write any code, we need to install the necessary tools. This involves two main components: the Go compiler, which understands and builds your code, and a code editor, which is a specialized tool for writing it.
Installing the Go Language
First, you need to install the Go compiler and its associated tools. While you can experiment with Go in online "playgrounds," for real-world development and to follow this course, you must have it installed locally on your machine.
The following video provides an excellent walkthrough of the entire process, from downloading Go to preparing your project folder.
Golang installation and hello world
Watch the video "Golang installation and hello world" by Hitesh Choudhary. It will guide you through the installation and initial setup.
Focus on these two parts of the video: Downloading and Installing Go: Watch from the beginning until the installation completes. The instructor explains where to download Go and walks through the installation process. Setting up a Project Folder: The section from "move on to one step" shows how to create a dedicated folder for your Go projects. This is a good practice for keeping your work organized.
After following the video, you should have Go installed. You can verify this by opening your terminal (or Command Prompt on Windows) and typing go version. You should see output indicating the installed version, like go version go1.21.5 windows/amd64.
Installing Your Code Editor: Visual Studio Code
Next, you need a code editor. We will use Visual Studio Code (VS Code), a popular, free, and powerful editor that has excellent support for Go. A good code editor provides features like syntax highlighting, code completion, and debugging tools that make development much faster and easier.
The following guide from Microsoft provides clear, step-by-step instructions for installing VS Code and the essential Go extension.
Install and configure Visual Studio Code for Go development
This guide walks you through installing VS Code, adding the official Go extension, and ensuring all the necessary Go development tools are up to date.
Please read and follow the instructions in these sections: Section 2: Install Visual Studio Code: Follow the steps under this heading to download and install VS Code. Section 3: Install the Go extension: Once VS Code is open, follow the instructions to find and install the official Go extension. This extension is what makes VS Code "understand" the Go language. Section 4: Update the Go tools: This is a crucial final step. The Go extension relies on several command-line tools for features like code formatting and analysis. Follow the instructions to install or update these tools. You will likely see a prompt at the bottom-right of your VS Code window; be sure to click "Install All".
With these steps completed, your professional Go development environment is ready.
2. Your First Go Program: "Hello, World!"
Now that your tools are set up, it's time to write and run your first program. The "Hello, World!" program is a classic tradition in programming. It's a simple program that prints the text "Hello, World!" to the screen, confirming that your setup is working correctly.
Go Modules and Project Initialization
Modern Go projects are organized into modules. A module is a collection of Go packages that are released together. You can think of a module's go.mod file as being conceptually similar to Python's requirements.txt or pyproject.toml files; it defines the module's path and tracks its dependencies.
Every new project you start should begin by creating a directory and initializing it as a Go module.
Let's create our project:
- Open your terminal.
- Create a new directory for your project and navigate into it:
mkdir hello-world cd hello-world - Initialize the Go module. We'll give our module the simple name
example/hello.go mod init example/hello
This command creates a file named go.mod in your directory. You'll see it contains two lines: one declaring the module name and another specifying the Go version.
Writing the Code
Now, open this hello-world folder in VS Code. Create a new file named main.go and add the following code:
package main

import "fmt"

func main() {
    fmt.Println("Hello, World!")
}
Let's break this down line by line:
package main: Every Go file belongs to a package. Themainpackage is special; it tells the Go compiler that this is an executable program (an application you can run), rather than a library of code to be used by other programs.import "fmt": This line imports thefmtpackage from Go's standard library.fmt(short for format) contains functions for formatted I/O, including printing text to the console. This is similar toimportin Python.func main(): This defines themainfunction. Just like themainpackage, themainfunction is special. It serves as the entry point for your application. When you run the program, the code inside this function is what gets executed first. Unlike a simple Python script which can run code from top to bottom, a Go application must have amainfunction to start.fmt.Println("Hello, World!"): This line calls thePrintln(Print Line) function from thefmtpackage. It prints the string "Hello, World!" to the terminal, followed by a new line.
For more details tailored to your Python background, the following article provides a concise summary of this initial setup.
A Gentle Introduction to Go for Python Programmers
This article provides a quick summary of setting up a Go project and explains the first program, making useful comparisons to Python.
Read the section "Getting Started with Go". Pay close attention to the explanation of the go.mod file and the breakdown of the main.go file's contents.
3. Running Your Program
With the code written, the final step is to run it. Go provides a simple command for this. In your terminal, while inside the hello-world directory, execute the following command:
go run main.go
The go run command compiles and runs the specified file. If everything is correct, you will see the following output in your terminal:
Hello, World!
The following image shows a complete terminal session, including initializing the module and running the program. Your terminal might look different, but the commands and output will be the same.
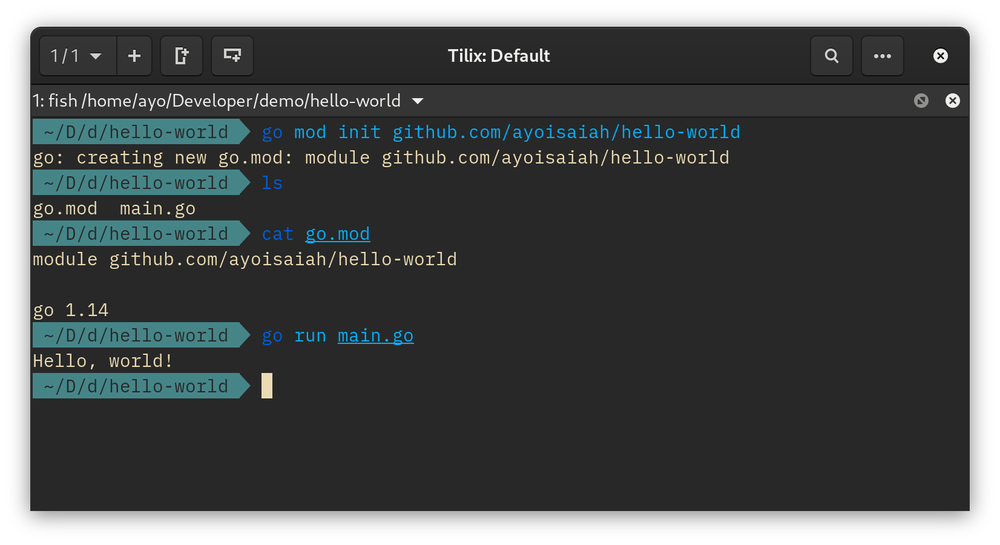
Congratulations! You have successfully set up your Go development environment, written your first program, and run it.
Conclusion
In this lesson, you accomplished the foundational first step of your Go journey. You now have a complete, professional toolchain installed and have verified that it works by compiling and running a "Hello, World!" program.
Here are the key takeaways:
- Go Environment: A local Go installation consists of the compiler toolchain and a code editor like VS Code with the Go extension.
- Go Modules: Modern Go projects are structured as modules, initialized with
go mod init <module-name>. This creates ago.modfile to manage project properties and dependencies. - Basic Program Structure: An executable Go program must be in
package mainand have afunc main()which serves as the entry point. - Running Code: The
go runcommand is a convenient way to compile and execute a Go source file.
You've built the launchpad. In our next lesson, we will start exploring the Go language itself by learning how to declare and initialize variables, the fundamental building blocks for storing and manipulating data in any program.