Hello! In our last lesson, we established the "big picture" of web development, understanding how HTML, CSS, and JavaScript work together. We learned that HTML provides the fundamental structure of a webpage, much like a skeleton provides structure to a body.
Today, we're going to zoom in and examine the "bones" of that skeleton. You'll learn how to identify the anatomy of an HTML element—the basic building block of every webpage. We'll dissect what makes up an element, including its tags, the content it holds, and the special attributes that give it more power. This is your first major step into writing the actual code that builds the web.
The Anatomy of an HTML Element
At its heart, an HTML document is just a collection of elements. An element tells the browser something about the information that sits between its opening and closing tags.
Let's look at a complete example. This diagram breaks down a standard paragraph element, which is created using the <p> tag.
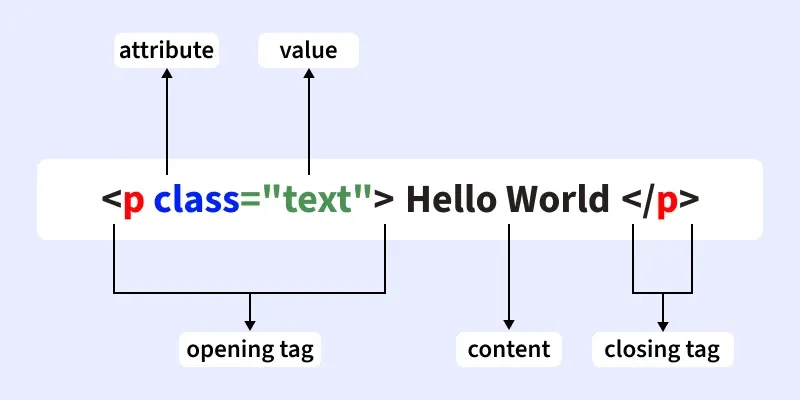
As you can see, a typical element is made up of several parts:
- Opening Tag: This consists of the element's name (in this case,
p) wrapped in angle brackets. It marks the beginning of the element. - Closing Tag: This is the same as the opening tag, but with a forward slash (
/) before the element's name. It marks the end of the element. Forgetting the closing tag is a very common beginner mistake! - Content: This is the information that the element contains. Here, it's the simple text "Hello World".
- Attribute: This provides extra information about the element that you don't want to appear in the content. Attributes are always placed in the opening tag. The example shows the
classattribute. - Value: This is the value assigned to an attribute, usually enclosed in quotes. Here, the value of the
classattribute is"text".
Together, the opening tag, the closing tag, and the content form the element.
Standard Elements and Nesting
Most HTML elements follow the pattern we just saw. To get a more formal definition and see how elements can be placed inside one another, we'll turn to the excellent documentation provided by the Mozilla Developer Network (MDN).
Basic HTML syntax - Learn web development | MDN
This article from MDN provides a technical breakdown of HTML syntax. We'll focus on the core definitions of an element and how elements are nested.
Please read the following two sections from the article: Start with "Anatomy of an HTML element". This section formally defines the opening tag, content, and closing tag. Next, read the section on "Nesting elements". This is a crucial concept. It explains that you can put elements inside other elements, but you must follow the proper order for opening and closing them.
The concept of nesting is fundamental to HTML. By nesting elements, you create a hierarchy of content. For example, you might have a <p> (paragraph) element that contains a <strong> element to make a specific word appear important.
Correct nesting: <p>This is <strong>very</strong> important.</p>
Incorrect nesting: <p>This is <strong>very important.</p></strong>
In the incorrect example, the tags overlap. The browser will try its best to render this, but it can lead to unpredictable behavior. Always close the most recently opened tag first.
Void Elements: The Exception to the Rule
While most elements have an opening tag, content, and a closing tag, some don't. These are called void elements (or sometimes "empty elements"). They consist of a single tag and are used to insert something into the document at that position.
A classic example is the line break element, <br>. It simply creates a line break and has no content to wrap. Another very common void element is the image tag, <img>.
Let's return to the MDN article to see the formal definition.
Basic HTML syntax - Learn web development | MDN
This short section of the same MDN article explains the concept of void elements.
Read the section titled "Void elements". It defines void elements and provides the <br> element as an example.
The <img> tag is perhaps the most important void element you'll use. Since it has no content, it must use attributes to do its job, which brings us to our next topic.
Adding More Information with Attributes
Attributes are the key to making elements do more than just hold text. They are name-value pairs that provide additional data about an element. As we saw in the first diagram, they always go inside the opening tag.
The <img> element is a perfect case study for attributes because it's useless without them. At a minimum, it needs a src attribute to tell it which image to display.
To see this in a practical context, let's watch a short video segment where a developer adds an image to a webpage. Pay close attention to the different attributes he adds to the <img> tag and the role each one plays.
This clip from Kevin Stratvert's "HTML Tutorial for Beginners" provides a clear, hands-on demonstration of adding an image with its essential attributes.
Watch the segment on embedding an image, from this part of the video. The instructor explains four key attributes for the <img> tag: src: The source of the image file. width and height: The dimensions of the image. alt: The alternative text that describes the image for screen readers or if the image fails to load.
The alt attribute is especially important. While not always visually apparent, it's crucial for web accessibility, allowing visually impaired users to understand the content of an image.
You also heard the instructor mention the class attribute earlier in the lesson. This attribute, along with id, will become your primary way of connecting your HTML structure to your CSS styles and JavaScript interactivity, directly supporting your goal of integrating all three technologies.
Conclusion
In this lesson, we've broken down the atom of a webpage: the HTML element. You now have the vocabulary and understanding to identify and describe the components that build the web's structure.
Key Takeaways:
- A standard HTML element is composed of an opening tag, content, and a closing tag.
- Elements can be nested inside one another to create a hierarchy, but they must be closed in the correct order.
- Void elements, like
<img>and<br>, are single tags that don't have content or a closing tag. - Attributes are
name="value"pairs inside the opening tag that provide extra information about the element. They are essential for tasks like defining an image source (src) or providing accessible descriptions (alt).
Now that you understand the anatomy of a single element, you're ready to see how these individual pieces are assembled to form a complete and valid HTML document. In our next lesson, we will construct a minimal webpage from scratch, introducing the essential container elements—<!DOCTYPE html>, <html>, <head>, and <body>—that every single HTML page must have.