Welcome back! In our last lesson, you built a crucial component for a production-ready system: a robust health check endpoint. Your Django application can now report its readiness to serve traffic by verifying its connection to the database. This little /health/ endpoint is the key that unlocks the next major step in our architecture.
This lesson is all about putting that health check to work. We will introduce an AWS Application Load Balancer (ALB) to act as the single, intelligent entry point to your application. This directly addresses the Infilect job description's requirement to have experience "scaling backend with load balancers." You'll configure the ALB to distribute traffic and use your health check to ensure requests only go to healthy instances, transforming your single-server setup into a scalable and fault-tolerant architecture.
By the end of this lesson, you will have configured an AWS Application Load Balancer to successfully distribute traffic to your Django application instance, laying the groundwork for high availability.
1. Understanding Application Load Balancers
Before we jump into the AWS console, let's solidify our understanding of what a load balancer does and what its components are. At its core, a load balancer distributes incoming application traffic across multiple targets, such as EC2 instances. This increases the availability and fault tolerance of your application.
The following video provides an excellent introduction to Elastic Load Balancing in AWS.
AWS Elastic Load Balancing Introduction
This video from Stephane Maarek's renowned AWS course clearly explains the fundamental concepts of load balancing, the different types available on AWS, and how they use health checks.
Please watch the following segments: Why use a load balancer? This section covers the core purpose: spreading load, handling failures, and providing a single point of access. Types of load balancers. Pay attention to the distinction between Classic, Application (ALB), and Network (NLB). We'll be using an ALB because it operates at the HTTP level (Layer 7), which is perfect for web applications. Health Checks. This part directly connects to our previous lesson, explaining how the load balancer uses the endpoint you built. ALBs and Target Groups. This is the most critical section. It introduces the key components we are about to build: Listeners and Target Groups.
As the video explained, an Application Load Balancer operates with three main components:
- Listeners: A listener checks for connection requests from clients, using the protocol and port that you configure. The rule we will create is simple: "if you get traffic on port 80 (HTTP), do this..."
- Rules: Each listener has rules to determine how to route requests. The action for our rule will be to forward the request to a target group.
- Target Groups: A target group is used to route requests to one or more registered targets, such as EC2 instances. The load balancer uses the health check you configure for the target group to send traffic only to the healthy instances.
This diagram illustrates the relationship between these components:

2. Hands-On: Configuring the Application Load Balancer
It's time to build this in the AWS console. The following video provides a complete walkthrough of this process. While the video creates new EC2 instances, you will use your existing instance. I will guide you through the specific steps and settings for our project. You can follow my instructions and use the video as a visual aid.
Create an Application Load Balancer (ALB) in AWS | AWS Elastic Load Balancing Tutorial for Beginners
This tutorial provides a clear, step-by-step visual guide to creating an Application Load Balancer and its associated components in the AWS console.
We will perform the same steps shown in the video from creating the load balancer. Follow my detailed instructions below, and refer to the video if you get lost in the console UI.
Let's begin.
Task 1: Create a Target Group
The target group defines our collection of application servers and, most importantly, how to check their health.
- Navigate to the EC2 Dashboard in the AWS Console.
- On the left-hand navigation pane, scroll down to Load Balancing and click on Target Groups.
- Click Create target group.
- For "Choose a target type," select Instances.
- Target group name: Enter something descriptive, like
infilytics-app-tg. - Protocol & Port: Set this to HTTP and 8000. This is the port your Gunicorn server is listening on inside the EC2 instance.
- VPC: Ensure your project's VPC is selected.
- Health checks: This is where we connect to our last lesson's work.
- Protocol: HTTP
- Health check path: Enter
/health/. This is the endpoint you created. - Expand Advanced health check settings.
- Success codes: This should be
200.
- Click Next.
- On the "Register targets" page, select your running
infilytics-projectEC2 instance and click Include as pending below. - Finally, click Create target group.
You've now told AWS where to send traffic (your instance on port 8000) and how to know if it's healthy (/health/ must return a 200 status code).
Task 2: Create the Application Load Balancer
Now, let's create the load balancer itself.
- In the left navigation pane, under Load Balancing, click Load Balancers.
- Click Create Load Balancer.
- Under Application Load Balancer, click Create.
- Load balancer name: Enter
infilytics-alb. - Scheme: Keep this as Internet-facing.
- Network mapping: Select your VPC. In the Mappings section, select at least two availability zones. For each one, choose a public subnet. This ensures your load balancer is highly available.
- Security groups: We need a new security group for the ALB that allows web traffic from the internet.
- Click Create new security group. A new tab will open.
- Security group name:
infilytics-alb-sg - Description:
Allow HTTP from anywhere for ALB - Inbound rules: Click Add rule.
- Type:
HTTP - Source:
Anywhere-IPv4(0.0.0.0/0)
- Type:
- Click Create security group.
- Go back to the load balancer creation tab. Click the refresh icon next to the security group dropdown, and select your new
infilytics-alb-sg. Remove thedefaultsecurity group.
- Listeners and routing: This is where we connect the listener to the target group.
- The default listener should be for HTTP on port 80.
- In the "Forward to" column, select the target group you created:
infilytics-app-tg.
- Scroll to the bottom and click Create load balancer.
After a minute or two, your ALB's state will change from "provisioning" to "active".
Task 3: Final Security Configuration
This is a critical step for a secure production environment. Right now, your EC2 instance accepts traffic on port 8000 from anywhere. We need to lock this down so it only accepts traffic from our load balancer.
- Navigate back to the EC2 Dashboard.
- Go to Instances and select your
infilytics-projectinstance. - Click on the Security tab and then click on the security group associated with it (this should be the one you configured to allow SSH and port 8000).
- In the security group view, select the Inbound rules tab and click Edit inbound rules.
- Find the rule for port 8000. Under the Source column, delete
0.0.0.0/0. - In its place, start typing the name of the ALB's security group,
infilytics-alb-sg. Select it from the list. - Click Save rules.
Your EC2 instance is now properly firewalled. The only path for web traffic to your application is through the load balancer.
Task 4: Test Everything
- Go back to Load Balancers, select your
infilytics-alb. - In the Details tab, copy the DNS name.
- Paste this DNS name into a new browser tab. Your Django application should load!
- Now, go to Target Groups, select
infilytics-app-tg, and click the Targets tab. The status of your instance should be healthy. This confirms that the ALB is successfully using your/health/endpoint.
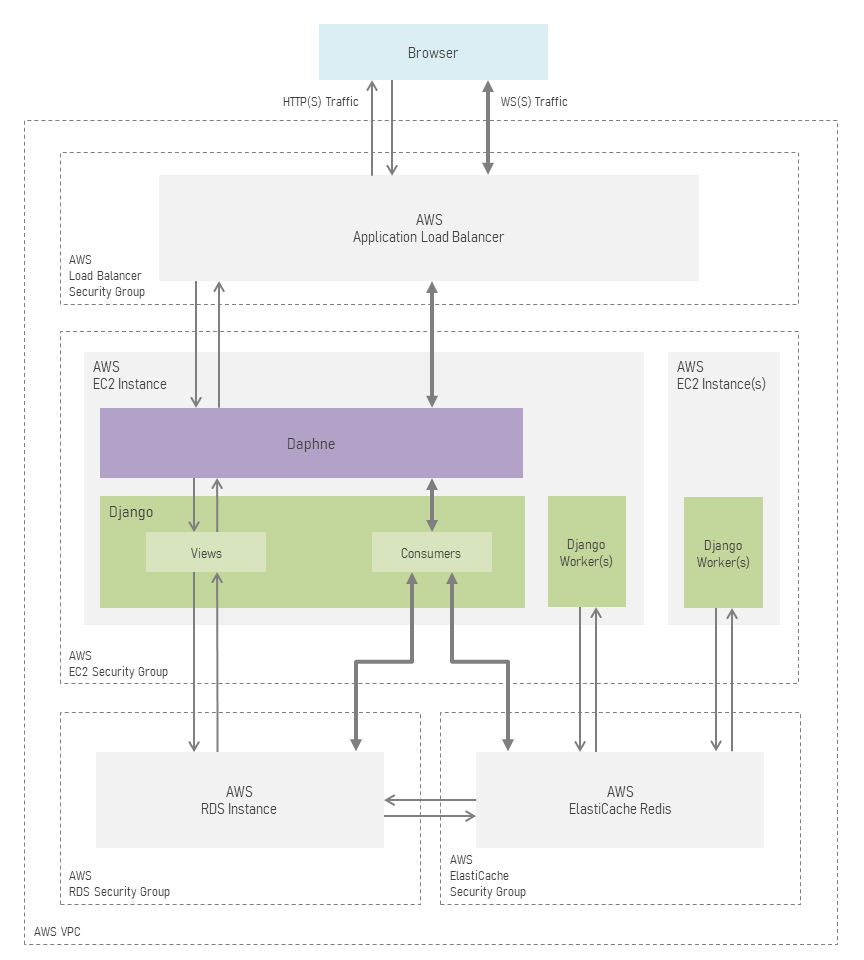
This is what your architecture now looks like. You have successfully implemented a core pattern for building scalable cloud applications.
Conclusion
In this lesson, you have taken a massive leap forward in building a professional-grade backend system. You moved from a single, vulnerable server to a scalable and resilient architecture fronted by a load balancer.
You have learned:
- The role of an Application Load Balancer and its core components: Listeners, Rules, and Target Groups.
- How to create and configure a Target Group that uses a custom health check endpoint.
- How to provision an internet-facing Application Load Balancer in the AWS console.
- The critical security practice of restricting direct traffic to your application instances, forcing all requests through the load balancer.
Your application is now highly available. If the instance were to fail its health check, the ALB would stop sending it traffic. And if you needed to handle more users, you could simply launch another identical EC2 instance and add it to the same target group.
Manually launching and adding instances, however, is not a truly "elastic" or automated process. In our next lesson, we will explore AWS Auto Scaling Groups, which will automatically manage the number of running instances based on demand, completing the foundation for a truly scalable backend.