Welcome back! In the previous lesson, you stepped into the role of a tech lead, translating the high-level vision for our capstone project into a concrete, actionable plan with epics and user stories. This planning phase is critical, and you now have a clear roadmap for what needs to be built.
Now, it's time to switch back to your backend engineer hat and bring that plan to life. This lesson is all about execution. We will take the first, most fundamental user story you planned—"As a data operator, I want to upload a shelf image so it can be queued for analysis"—and implement it from end to end. You'll be leveraging many of the skills you've acquired throughout this course, combining Django, DRF, Celery, and your AWS knowledge into a single, cohesive workflow.
By the end of this lesson, you will have built the core ingestion point for the "Retail Shelf Intelligence Backend," a system that can accept image uploads and kick off a simulated ML processing task in the background.
1. The Core Architecture
Before we write any code, let's revisit the architecture we're building. The workflow for our image upload and processing directly maps to the producer-consumer pattern you learned about in Module 7.
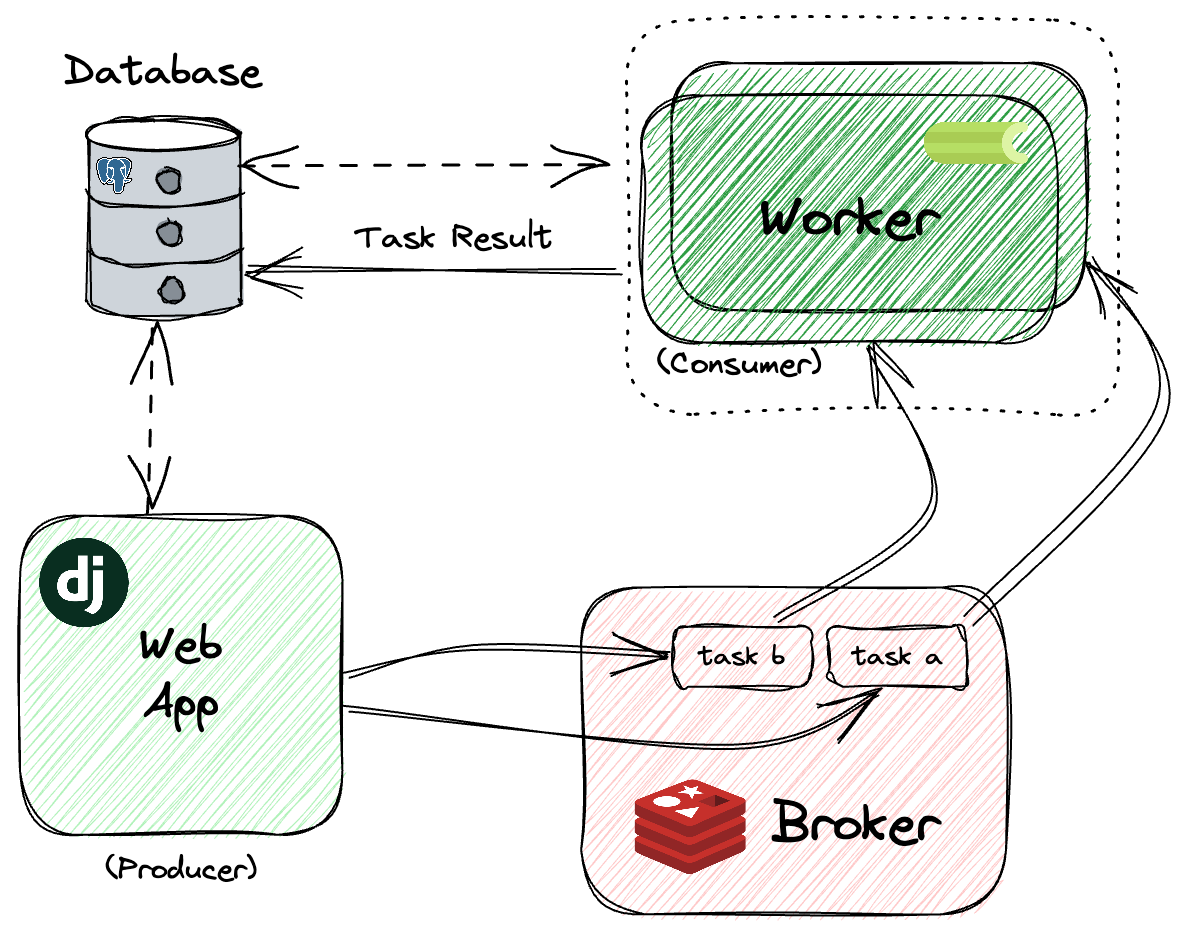
In this lesson, we will implement this exact flow:
- Producer (Django Web App): We'll build a DRF API endpoint that accepts an image file.
- Task Creation: Upon successful upload, the Django app will create a task and send it to the message...
- Broker (Redis): ...which will hold the task message until a worker is available.
- Consumer (Celery Worker): Our worker process will pick up the task, simulate ML processing, and update the database with the result.
This architecture is fundamental to building scalable backend systems, especially for ML-heavy applications like Infilect's, as it prevents long-running tasks from blocking the main web server and degrading user experience.
2. Capstone Project and Model Setup
First, let's set up the new environment for our capstone project.
- Create a new Django project. Let's call it
capstone_backend. - Inside, create a new app called
api. - Add
rest_framework,storages, and your newapiapp toINSTALLED_APPSinsettings.py. - Configure your
settings.pyto use AWS S3 for media storage, just as you did in Module 10. Remember to set yourAWS_STORAGE_BUCKET_NAME,AWS_S3_ACCESS_KEY_ID, etc., in your environment variables. - Ensure your
CELERY_BROKER_URLis also configured to point to your Redis instance.
With the project set up, let's define the central model for this workflow. In api/models.py, create a ShelfImage model. This model will store the uploaded image and track its processing status.
# api/models.py
from django.db import models

class ShelfImage(models.Model):
    class Status(models.TextChoices):
        PENDING = 'PENDING', 'Pending'
        PROCESSING = 'PROCESSING', 'Processing'
        COMPLETED = 'COMPLETED', 'Completed'
        FAILED = 'FAILED', 'Failed'


    # The uploaded image file, will be stored in S3
    image = models.ImageField(upload_to='shelf_images/')


    # The current status of the processing task
    status = models.CharField(
        max_length=20,
        choices=Status.choices,
        default=Status.PENDING
    )


    # Timestamps
    uploaded_at = models.DateTimeField(auto_now_add=True)
    processed_at = models.DateTimeField(null=True, blank=True)

    def __str__(self):
        return f"Image {self.id} - {self.status}"
This model includes a status field that acts as a simple state machine. This is crucial for tracking the lifecycle of the image as it moves through our asynchronous pipeline.
After defining the model, create and run the migrations:
python manage.py makemigrations
python manage.py migrate
3. Building the Image Upload API
Next, we'll create the DRF API endpoint to handle the file upload. This requires a serializer to validate the data and a view to orchestrate the logic.
The following video provides an excellent walkthrough of creating file upload endpoints with DRF. While you've done this before, a focused refresher is always valuable.
File Uploads - with Django REST Framework!
This BugBytes video, "File Uploads - with Django REST Framework!", covers all the necessary components for building our endpoint.
Pay close attention to these key concepts as you watch: Model and Serializer: Watch how a FileField (or ImageField in our case) in a model is represented in a ModelSerializer. See this in the sections on model setup and serializer creation. API View: Observe how an APIView's post method is structured to handle the incoming request, validate data with the serializer, and save the instance. This is covered from creating the view. Parsers: This is a critical and often-missed piece. Understand why we need to explicitly add MultiPartParser and FormParser to our view to handle file uploads, which don't use JSON payloads. This is explained clearly from the parsers section.
Now, let's apply those concepts.
1. Create the Serializer
In a new file, api/serializers.py, define a serializer for our ShelfImage model. We'll make most fields read-only since they will be set by the system, not the user.
# api/serializers.py
from rest_framework import serializers
from .models import ShelfImage

class ShelfImageSerializer(serializers.ModelSerializer):
    class Meta:
        model = ShelfImage
        fields = ['id', 'image', 'status', 'uploaded_at', 'processed_at']
        read_only_fields = ['id', 'status', 'uploaded_at', 'processed_at']
2. Create the View
In api/views.py, create the APIView that will use this serializer.
# api/views.py
from rest_framework.views import APIView
from rest_framework.response import Response
from rest_framework import status
from rest_framework.parsers import MultiPartParser, FormParser

from .serializers import ShelfImageSerializer

class ShelfImageUploadView(APIView):
    parser_classes = (MultiPartParser, FormParser)

    def post(self, request, *args, **kwargs):


        # We pass request.data to the serializer
        serializer = ShelfImageSerializer(data=request.data)

        if serializer.is_valid():


            # If valid, serializer.save() will create a new ShelfImage instance
            saved_instance = serializer.save()


            # TODO: Trigger the async task here!


            # Return the data of the created instance
            return Response(serializer.data, status=status.HTTP_201_CREATED)
        else:


            # If invalid, return the errors
            return Response(serializer.errors, status=status.HTTP_400_BAD_REQUEST)
Notice the parser_classes attribute. As the video explained, this tells DRF to expect multipart/form-data, which is the standard for requests containing files.
3. Wire up the URL
Finally, create api/urls.py and connect it to your project's main urls.py file.
# api/urls.py
from django.urls import path
from .views import ShelfImageUploadView

urlpatterns = [
    path('images/upload/', ShelfImageUploadView.as_view(), name='image-upload'),
]


# In capstone_backend/urls.py
from django.urls import path, include

urlpatterns = [


    # ... other urls
    path('api/', include('api.urls')),
]
At this point, you have a working API endpoint. If you were to test it, it would accept an image, save a ShelfImage record to your database, upload the file to S3, and return a 201 Created response. But we're missing the final piece: the asynchronous task.
4. Implementing the Asynchronous ML Simulation Task
Why can't we just run the ML model inside the post method of our view? The following article explains the core challenges of running ML models in a synchronous web request flow.
Designing and Deploying a Machine Learning Python Application (Part 2) | Towards Data Science
This article from Towards Data Science perfectly frames the problem we're solving with Celery.
Please read the entire high-level design section. As you read, focus on the three key problems the author identifies: Memory, Time, and Scale. These are the exact reasons why the Infilect job description emphasizes experience with asynchronous processing.
Now that you're clear on the "why," let's implement the "how." We'll create a Celery task to simulate the ML processing.
In a new file, api/tasks.py, define your task.
# api/tasks.py
import time
from celery import shared_task
from django.utils import timezone
from .models import ShelfImage

@shared_task
def process_shelf_image(image_id):
    """
    Simulates a long-running ML process on a shelf image.
    """
    try:


        # Fetch the image instance from the database
        image_instance = ShelfImage.objects.get(id=image_id)


        # 1. Update status to PROCESSING
        image_instance.status = ShelfImage.Status.PROCESSING
        image_instance.save()


        # Simulate the ML model running (e.g., object detection)
        print(f"Processing image {image_id}... This will take a moment.")
        time.sleep(10)  # Simulate a 10-second process


        # 2. Update status to COMPLETED
        image_instance.status = ShelfImage.Status.COMPLETED
        image_instance.processed_at = timezone.now()
        image_instance.save()

        print(f"Image {image_id} processed successfully.")

    except ShelfImage.DoesNotExist:
        print(f"Error: ShelfImage with id={image_id} not found.")
    except Exception as e:


        # Handle potential errors during processing
        if 'image_instance' in locals():
            image_instance.status = ShelfImage.Status.FAILED
            image_instance.save()
        print(f"Error processing image {image_id}: {e}")
This task follows a robust pattern:
- It accepts a simple, serializable identifier (
image_id). - It fetches the full object from the database itself.
- It updates the object's status to provide real-time feedback on its progress.
- It includes basic error handling.
5. Triggering the Task
The final step is to connect the API view to the Celery task. We'll use the .delay() method, which you've seen before, to send the task to the Redis broker immediately after the image is saved.
Let's update api/views.py to trigger the task.
# api/views.py (updated)
from rest_framework.views import APIView
from rest_framework.response import Response
from rest_framework import status
from rest_framework.parsers import MultiPartParser, FormParser

from .serializers import ShelfImageSerializer
from .tasks import process_shelf_image  # Import the task

class ShelfImageUploadView(APIView):
    parser_classes = (MultiPartParser, FormParser)

    def post(self, request, *args, **kwargs):
        serializer = ShelfImageSerializer(data=request.data)

        if serializer.is_valid():
            saved_instance = serializer.save()


            # *** Trigger the async task here! ***
            process_shelf_image.delay(saved_instance.id)

            return Response(serializer.data, status=status.HTTP_201_CREATED)
        else:
            return Response(serializer.errors, status=status.HTTP_400_BAD_REQUEST)
And that's it! With this one line, you've connected the synchronous web world to the asynchronous worker world. The API can now return a response to the user in milliseconds, while the 10-second processing task runs completely in the background.
This pattern—saving the model and passing its ID to a Celery task—is a clean, effective, and widely-used approach for offloading work in a web application.
6. Hands-On Task: Implementation and Testing
You now have all the pieces. Your task is to implement the entire workflow in your capstone_backend project.
Checklist:
- Set up the Django project,
apiapp, and configuresettings.py. - Define the
ShelfImagemodel and run migrations. - Create
ShelfImageSerializer. - Create
api/tasks.pyand define theprocess_shelf_imagetask. - Create
ShelfImageUploadViewand wire it up inurls.py. Remember to import and call your task! - Ensure your Celery
__init__.pyandcelery.pyfiles are set up correctly in your project directory (as covered in Module 7).
Testing Your Implementation:
- In one terminal, start your Django development server and Celery worker using
docker-compose up. Make sure you have services forbackend,worker,db, andcache(ormq). - Open a tool like Postman or Insomnia.
- Create a new
POSTrequest to your endpoint (e.g.,http://localhost:8000/api/images/upload/). - Set the body type to "Multipart Form".
- Add a field named
imageand set its type to "File". Select an image from your computer. - Send the request.
Expected Outcome:
- You should get an immediate
201 Createdresponse with the JSON data of the newShelfImageinstance, withstatus: "PENDING". - In your terminal, the Celery worker logs should show that it received and started processing the task
api.tasks.process_shelf_image. - After 10 seconds, the worker logs should print "Image X processed successfully."
- If you check your S3 bucket, the image file should be there.
- If you inspect the database (e.g., via the Django admin), the status of the
ShelfImageobject will have changed fromPENDINGtoCOMPLETED, andprocessed_atwill be populated.
Conclusion
Congratulations! You have successfully built the foundational feature of your capstone project. You've created a robust API endpoint that ingests data, stores it securely, and kicks off a long-running background process without blocking the user. This single workflow demonstrates your ability to integrate multiple core backend technologies (Django, DRF, Celery, Redis, S3) to solve a real-world problem.
Key Takeaways:
- Producer-Consumer Pattern: You implemented this pattern with Django as the producer and Celery as the consumer.
- Asynchronous Triggering: You learned to use
task.delay(object_id)to offload work from the web thread, passing a simple ID instead of a large object. - State Management: You used a
statusfield in your model to track the progress of a background job, which is essential for providing feedback to users or other systems.
In the next lesson, we will build upon this foundation. You will create the APIs needed to manage the annotation workflow, implementing the state machine you designed and building endpoints for analysts to retrieve and update annotation data.