Welcome back. In the previous lesson, we established the theoretical foundation for asynchronous processing. You learned about the producer-consumer pattern and the critical role of a message queue in building scalable and responsive backend systems. We answered the why. Now, it's time to answer the how.
This lesson is entirely hands-on. We will take the concepts of producers, consumers, and queues and implement them using industry-standard tools. You will integrate Celery, a powerful distributed task queue, into our Django project. To manage the queue itself, we will use Redis, a high-performance, in-memory data store that will serve as our message broker. This directly addresses the Infilect job requirement to "handle automation, asynchronous processing".
By the end of this lesson, you will have successfully integrated Celery into your Django project, configured it to use Redis as the message broker, and verified that all components of your asynchronous task system are correctly communicating with each other.
1. The Django + Celery + Redis Architecture
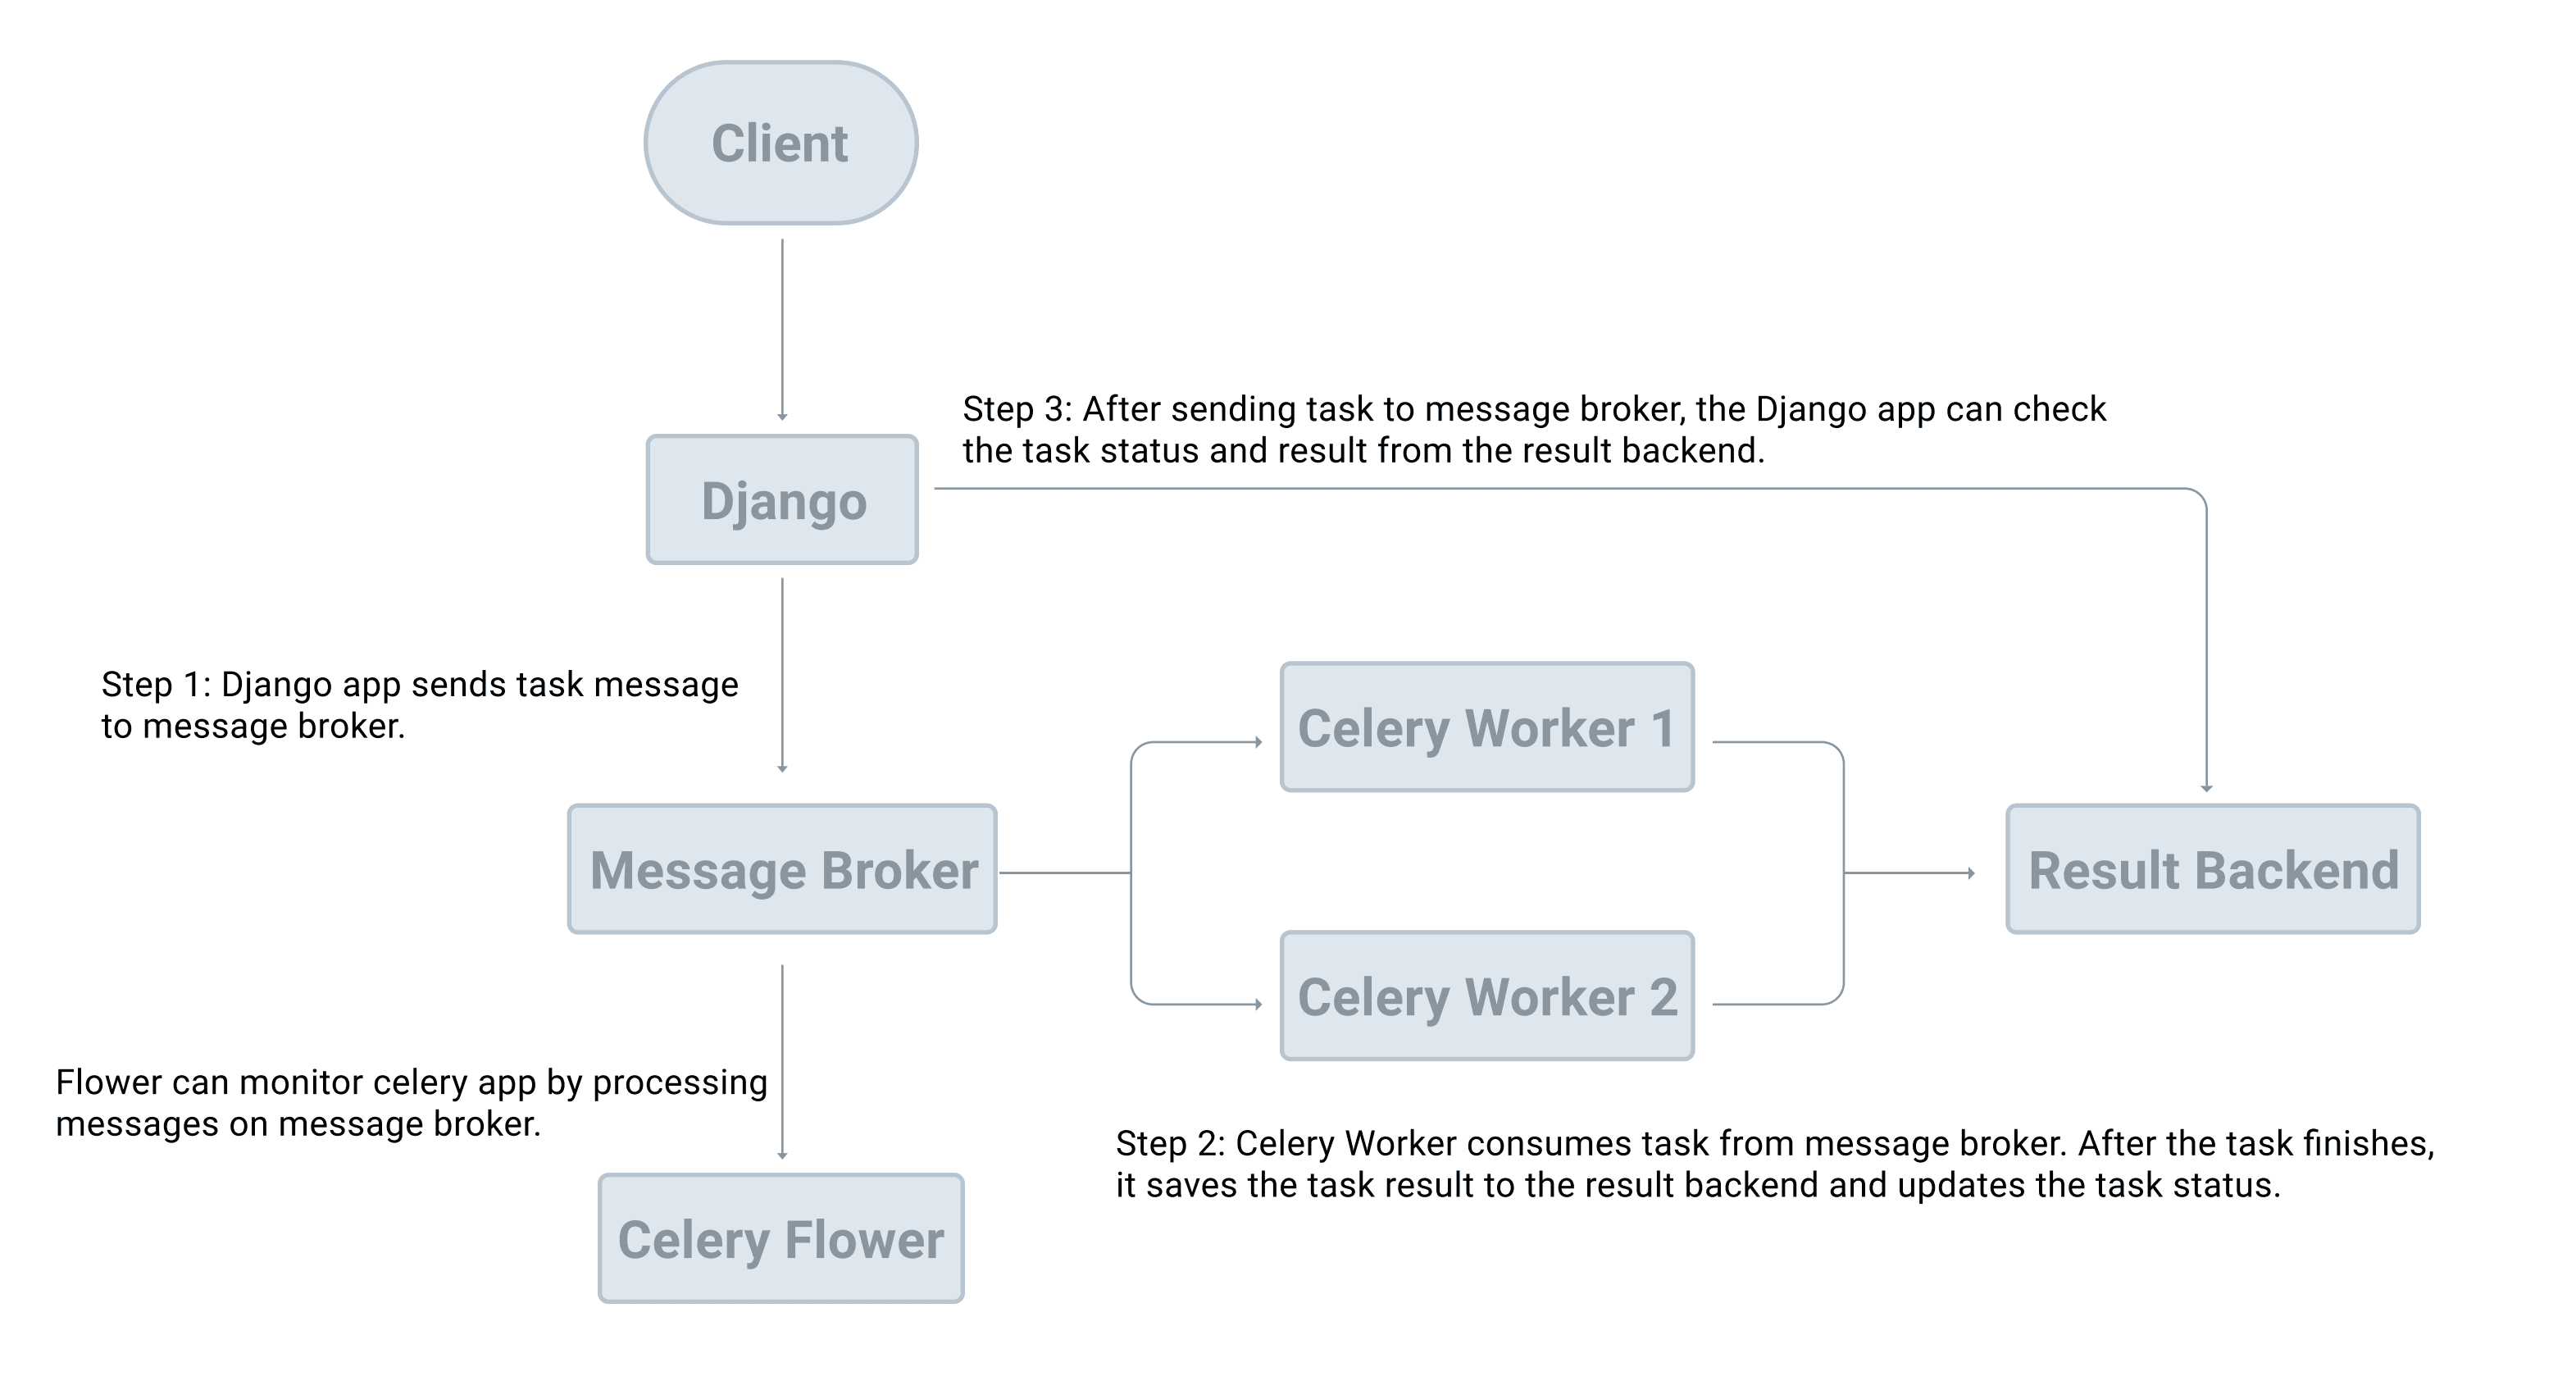
Before we write any code, let's visualize how these components work together. In the previous lesson, we discussed producers and consumers in abstract terms. Here is how they map to our specific tools:
- Producer: Our Django application. When a user performs a long-running action (like uploading an image), a Django view will create a task message and send it to the message broker.
- Message Broker: Our Redis server. This is the intermediary that receives task messages from Django and holds them in a queue.
- Consumer: A Celery worker. This is a separate Python process that continuously monitors the Redis queue. When a new task message appears, the worker picks it up and executes the corresponding code.
- Result Backend: We will also use Redis for this. After a worker finishes a task, it can store the result (e.g., success, failure, or a return value) in the result backend. This allows our Django application to later check on the status of a task.
The following diagram illustrates this entire workflow.
2. Preparing the Environment: Installing Redis
Celery needs a message broker to function, and Redis is a popular, lightweight, and fast choice. Unlike a Python library, Redis is a separate server program that must be installed and running on your system.
The following video and article provide detailed steps for installing Redis on various operating systems.
How to set up Celery and Redis - Django Background Tasks - Part 2
This video from the channel Andreas Jud provides a clear, visual walkthrough of installing and running Redis.
Watch the section from the beginning up to the point where the Django configuration starts. Focus on the installation for your operating system (Mac/Linux/Windows with WSL) and the verification step. Specifically, watch from installing and starting Redis.
Your Task: Install and Run Redis
- Follow the instructions in the video (or use the appropriate package manager for your OS, like
sudo apt install redis-serveron Ubuntu orbrew install redison macOS) to install Redis. - Once installed, start the Redis server. The video shows how to start it as a background service (
brew services start redis), which is convenient. Alternatively, you can run it directly in a dedicated terminal window with the commandredis-server. - Verify the installation: Open a new terminal window and run
redis-cli. This opens the Redis Command Line Interface. Typepingand press Enter. You should seePONGas a response. This confirms the Redis server is running and ready to accept connections. You can then exit the CLI withCtrl+C.
Keep the terminal with the redis-server running if you are not running it as a background service. You will need it for the rest of the course.
3. Integrating Celery into Django
With Redis running, we can now install the necessary Python packages and configure our Django project to use them. The Real Python article below is an excellent, comprehensive guide for this process. We will follow its structure closely.
Asynchronous Tasks With Django and Celery
This article by Real Python is a definitive guide to integrating Celery. We'll use it to install the packages and configure our project files.
First, read the brief introductory sections Python Celery Basics and Why Use Celery? for a quick recap. Next, carefully follow the step-by-step instructions under the main heading "Integrate Celery With Django". You can skip the "Set Up the Feedback App" subsection as we are using our own project. Focus on these parts: Install Celery in your virtual environment. The section Install Redis explains installing the redis Python client library, which you should also do. The most important section is Add Celery to Your Django Project, which guides you through creating and modifying the three crucial files for integration.
Let's break down the configuration into three key steps, as outlined in the article.
Step 3.1: Install Python Packages
First, ensure your project's virtual environment is activated. Then, install Celery and the Python client for Redis.
(venv) $ pip install celery redis
Don't forget to update your requirements.txt file:
(venv) $ pip freeze > requirements.txt
Step 3.2: Configure settings.py
Celery needs to know where to find the message broker (Redis) and where to store task results. We add this configuration to your project's main settings.py file.
Open your_project_name/settings.py and add the following lines at the bottom:
# your_project_name/settings.py


# ... existing settings ...


# Celery Configuration Options
CELERY_BROKER_URL = "redis://localhost:6379"
CELERY_RESULT_BACKEND = "redis://localhost:6379"
CELERY_ACCEPT_CONTENT = ['application/json']
CELERY_TASK_SERIALIZER = 'json'
CELERY_RESULT_SERIALIZER = 'json'
CELERY_BROKER_URL: This tells Celery to use Redis running on your local machine as the message broker.CELERY_RESULT_BACKEND: This also points to Redis. It configures Celery to store the status and results of tasks in the same Redis database.- The
SERIALIZERsettings ensure that the data passed in messages is in a standard, secure format (JSON).
Step 3.3: Create celery.py
Next, you need to create a file to define the Celery "application" instance. This is the entry point for Celery within your Django project.
In your main project directory (the one containing settings.py), create a new file named celery.py.
your_project_name/your_project_name/celery.py
Add the following code to this new file. Remember to replace 'your_project_name' with the actual name of your Django project.
# your_project_name/celery.py
import os
from celery import Celery


# Set the default Django settings module for the 'celery' program.
os.environ.setdefault('DJANGO_SETTINGS_MODULE', 'your_project_name.settings')

app = Celery('your_project_name')


# Using a string here means the worker doesn't have to serialize
# the configuration object to child processes.
# - namespace='CELERY' means all celery-related configuration keys
#   should have a `CELERY_` prefix.
app.config_from_object('django.conf:settings', namespace='CELERY')


# Load task modules from all registered Django apps.
app.autodiscover_tasks()
This file does three things:
- It ensures the Celery command-line tool knows about your Django project's settings.
- It creates an instance of the Celery application.
app.autodiscover_tasks()tells Celery to automatically look for files namedtasks.pyinside each of your Django apps to find background task definitions (which we will create in the next lesson).
Step 3.4: Update __init__.py
Finally, we need to make sure our Celery app instance is loaded whenever Django starts. This ensures that the decorators we'll use for tasks work correctly.
Open the __init__.py file located in the same directory as your settings.py and celery.py.
your_project_name/your_project_name/__init__.py
Add the following two lines to it:
# your_project_name/__init__.py


# This will make sure the app is always imported when
# Django starts so that shared_task will use this app.
from .celery import app as celery_app

__all__ = ('celery_app',)
And that's it! The integration is now complete.
4. Running and Verifying the System
You've now configured a distributed system. To test it, you need to run three separate processes concurrently. It's best to open three separate terminal windows for this.
-
Terminal 1: Redis Server
If you didn't start it as a background service, make sure your Redis server is running.$ redis-server -
Terminal 2: Django Development Server
In your project directory with the virtual environment activated, run the Django server as usual.(venv) $ python manage.py runserver -
Terminal 3: Celery Worker
This is the new part. In your project directory with the virtual environment activated, start a Celery worker. Again, replace'your_project_name'with your project's name.(venv) $ celery -A your_project_name worker -l info
When you run the worker command, you should see a startup banner. The most important part to check is the line that says connected to redis://localhost:6379//.
If you see this and the worker starts without any connection errors, you have successfully integrated Celery and Redis into your Django project! You might also see a list under [tasks], which will be empty for now. That's expected, as we haven't defined any tasks yet.
Conclusion
In this lesson, you moved from theory to a full-fledged implementation. You have successfully set up the "plumbing" for a robust asynchronous task processing system. You installed Redis as a message broker, integrated the Celery library into your Django project, and configured them to communicate with each other. By running the Redis server, Django server, and a Celery worker simultaneously, you have brought your distributed backend system to life.
Key Takeaways:
- Celery integration in Django requires three main configuration touchpoints:
settings.py, a newcelery.pyfile, and__init__.py. CELERY_BROKER_URLis the critical setting that points Celery to your message broker (Redis).- A complete local development setup involves running three processes: the Redis server, the Django development server, and at least one Celery worker.
- The
celery workercommand starts the consumer process that listens for tasks on the message queue.
Your system is now ready to do some real work. In our next lesson, we will define our first background task and learn how to trigger it from a Django view, finally offloading a long-running process from the main request-response cycle.