Welcome back! In our previous lesson, you successfully configured the entire "plumbing" of our asynchronous processing system. You now have a Django application that knows how to talk to a Celery worker via a Redis message broker. With the infrastructure in place, it's time to make it do some actual work.
This lesson focuses on the core of asynchronous processing: defining and executing background tasks. You will learn how to create a Python function that can be run by a Celery worker, and how to trigger that function from your Django application without blocking the main web request. We will simulate a long-running process, specifically a simplified image processing job, which directly aligns with the kind of work done at Infilect and addresses the job requirement to "handle automation, asynchronous processing".
By the end of this lesson, you will be able to:
- Define a custom Celery task using the
@shared_taskdecorator. - Trigger this task from a Django view using the
.delay()method. - Simulate a long-running operation within a task.
- Verify task execution by observing the Celery worker logs.
1. The Anatomy of a Celery Task
Let's revisit the workflow. Our goal is to offload work from the Django Web App to the Celery Worker.
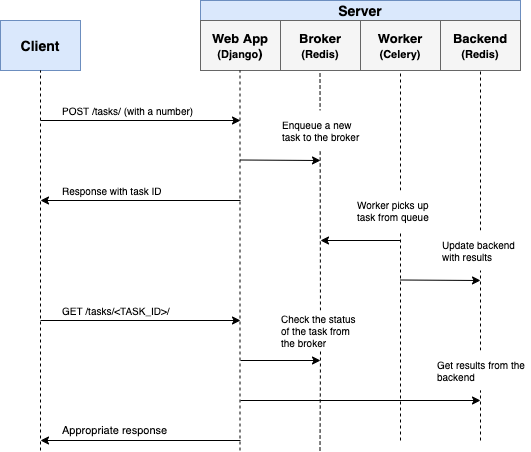
This sequence diagram shows the client making a request, Django enqueuing a task, and the worker processing it in the background. Our focus today is on the interaction between the Django app and the worker.
To make this happen, we need to do two things:
- Define a Task: This is a regular Python function that we "decorate" to make Celery aware of it.
- Call the Task: From our Django code (e.g., a view), we need to call this function in a special way that sends it to the message queue instead of running it immediately.
The Real Python article you used for setup has an excellent section that explains exactly how to refactor a regular synchronous function into an asynchronous Celery task.
Asynchronous Tasks With Django and Celery
This guide clearly demonstrates the process of converting a function into a Celery task. It uses an email-sending example, but the principles are universal.
Read the section titled Handle Workloads Asynchronously. Pay special attention to these three key concepts: The creation of a tasks.py file to house the task function. The use of the @shared_task decorator to register the function with Celery. Calling the task with .delay() from the original function to execute it asynchronously.
2. Hands-On: Your First Background Task
Let's apply these concepts. You'll now create your first task. To keep things aligned with our long-term project goals, we'll create a task that simulates processing a retail shelf image.
Step 2.1: Create tasks.py
In your Django project, locate the primary app you are working in (the one where you've been adding your models and views). Inside that app's directory, create a new file named tasks.py.
Celery's autodiscover_tasks() function, which you configured in your_project_name/celery.py, is specifically designed to find files with this name inside your installed apps.
Step 2.2: Define the Task
Open your new tasks.py file and add the following code:
# your_app_name/tasks.py
import time
from celery import shared_task

@shared_task
def simulate_image_processing(image_id):
    """
    A mock task that simulates processing an image file.
    """
    print(f"Starting processing for image_id: {image_id}...")

    # Simulate a long-running operation, e.g., 5 seconds.
    time.sleep(5)

    result = {
        "image_id": image_id,
        "status": "PROCESSED_SUCCESSFULLY",
        "processed_at": time.time()
    }

    print(f"Finished processing for image_id: {image_id}. Result: {result}")
    return result
Let's break this down:
import timeandfrom celery import shared_task: We import the necessary modules.@shared_task: This decorator is the magic ingredient. It transforms our plain Python function into a Celery task without tying it to any specific Celery application instance, making our app more modular and reusable.simulate_image_processing(image_id): This is a standard Python function. It takes animage_idas an argument, which we can imagine would be the primary key of an image record in our database.time.sleep(5): This is crucial. It pauses the execution of this task for 5 seconds. This simulates a time-consuming operation like running a machine learning model or resizing a large image, without blocking our web server.return result: The task returns a Python dictionary. In a future lesson, we'll see how our Django application can retrieve this result.
3. Triggering the Task from a View
Now that you have a task, you need a way to call it. Let's create a simple Django view for this purpose.
Step 3.1: Create a Test View
Open the views.py file in your app and add the following:
# your_app_name/views.py
from django.http import HttpResponse
from .tasks import simulate_image_processing
import random

def trigger_task(request):
    # Generate a random image ID for demonstration
    image_id = random.randint(1000, 9999)

    # Call the task asynchronously
    simulate_image_processing.delay(image_id)

    return HttpResponse(f"Task for image_id {image_id} has been triggered!")
The key line here is simulate_image_processing.delay(image_id).
- If we had called
simulate_image_processing(image_id)directly, the view would freeze for 5 seconds before returning a response. - By appending
.delay(), we are not executing the function here. Instead, we are sending a message to Redis containing the function name (simulate_image_processing) and its argument (image_id). The view immediately continues and returns theHttpResponse. The Celery worker will see this message, pick it up, and execute the function in the background.
Step 3.2: Create a URL for the View
Create or open the urls.py for your app and wire up this new view:
# your_app_name/urls.py
from django.urls import path
from . import views

urlpatterns = [
    # ... your other urls
    path('trigger-task/', views.trigger_task, name='trigger_task'),
]
Make sure these app-level URLs are included in your project's main urls.py.
4. Verification: Watch it Run
This is the most satisfying part. You need to have your three processes running concurrently.
-
Terminal 1: Redis Server (should already be running from the last lesson)
redis-server -
Terminal 2: Django Development Server
(venv) $ python manage.py runserver -
Terminal 3: Celery Worker
Important: Since you've added a new task intasks.py, you must stop and restart your Celery worker. The worker only discovers tasks on startup. PressCtrl+Cin the worker terminal, then run the start command again.# (In your project root directory) (venv) $ celery -A your_project_name worker -l infoWhen the worker starts, you should see your new task
your_app_name.tasks.simulate_image_processinglisted in the[tasks]section of the startup banner.
Now, open your web browser and navigate to http://127.0.0.1:8000/trigger-task/.
Observe what happens:
- In your browser: You should immediately see the message "Task for image_id XXXX has been triggered!". There is no 5-second delay.
- In the Django server terminal (Terminal 2): You'll see the
GET /trigger-task/request log, showing it completed with a status code 200, also immediately. - In the Celery worker terminal (Terminal 3): This is where the action is. Almost as soon as you load the page, you'll see a log line that says
Task your_app_name.tasks.simulate_image_processing[...] received. Then, you'll see yourprintstatement:Starting processing for image_id: XXXX.... The terminal will pause for 5 seconds. Finally, you will seeFinished processing...and a final log from Celery stating the tasksucceeded in 5.00...s.
This confirms your setup is working perfectly. You have successfully offloaded a long-running task from the web request cycle to a background worker.
A More Complete Example
The simple task you built is great for understanding the mechanics. For a more realistic scenario involving file handling, the Stack Abuse article provides an excellent walkthrough of a thumbnail generation task. You don't need to code this part now, but reading through it will solidify your understanding.
Asynchronous Tasks in Django with Redis and Celery
This article implements a more complex, practical example that is very close to what you'll build in your projects.
Read the section Creating Image Thumbnails. As you read, focus on these patterns: The make_thumbnails task in tasks.py accepts a file path and performs operations on it. The post method in the HomeView class first handles the file upload (a synchronous action) and then kicks off the asynchronous make_thumbnails task using .delay(). This is a very common and powerful pattern.
Conclusion
In this lesson, you took the crucial step from infrastructure to execution. You've learned the fundamental pattern for building responsive, scalable applications with Django and Celery.
Key Takeaways:
- Celery tasks are Python functions defined in
tasks.pyfiles within your Django apps. - The
@shared_taskdecorator registers a function as a discoverable task. - You trigger a task asynchronously using the
.delay()method, which immediately returns control to your application. - The Celery worker executes the task in the background, which you can monitor via its logs.
- Any changes to task code require a restart of the Celery worker to take effect.
You can now trigger a task, but your Django app is fire-and-forget. It has no idea if the task succeeded, failed, or what the result was. In our next lesson, we will close this loop by learning how to check a task's status and retrieve its return value.