Welcome to the final lesson of Module 10. In our previous session, you took a massive step in securing your cloud deployment by moving your application's credentials from a vulnerable .env file into AWS Secrets Manager. Your application now fetches its secrets dynamically and securely at runtime, a hallmark of professional cloud development.
However, there's one remaining security gap in our file handling. While our Django app is secure, the files it uploads to S3 are, by default, publicly accessible. Anyone with the URL can access them. This is unacceptable for the kind of sensitive data processed by companies like Infilect, from user-uploaded content to proprietary ML datasets.
This lesson will close that gap. You will learn how to configure your S3 bucket to be private by default and then grant secure, temporary access to individual files using pre-signed URLs. This technique is fundamental to building scalable and secure systems that handle large files, directly addressing the Infilect job description's requirements for experience with public cloud services and building robust backend applications.
By the end of this 60-minute lesson, you will be able to:
- Configure an S3 bucket for private access.
- Implement secure file downloads by generating pre-signed GET URLs.
- Design an API endpoint for secure, direct-to-S3 file uploads using pre-signed POST URLs.
- Explain the benefits of offloading file transfers from your application server.
Part 1: The Challenge of Private Files
When you store files on S3, you face a dilemma. If the bucket is public, your files are insecure. If the bucket is private, no one can access them, including your legitimate users.
A naive solution might be to have your Django application download the private file from S3 and then stream it to the user. This is highly inefficient—it consumes your server's bandwidth and ties up a worker process for the entire duration of the download, preventing it from handling other requests.
The elegant solution provided by AWS is the pre-signed URL. Your application, which has the credentials to access the private S3 bucket, generates a special, time-limited URL for a specific file. The user's browser then uses this temporary URL to download the file directly from S3, completely bypassing your server.
This workflow is illustrated below.
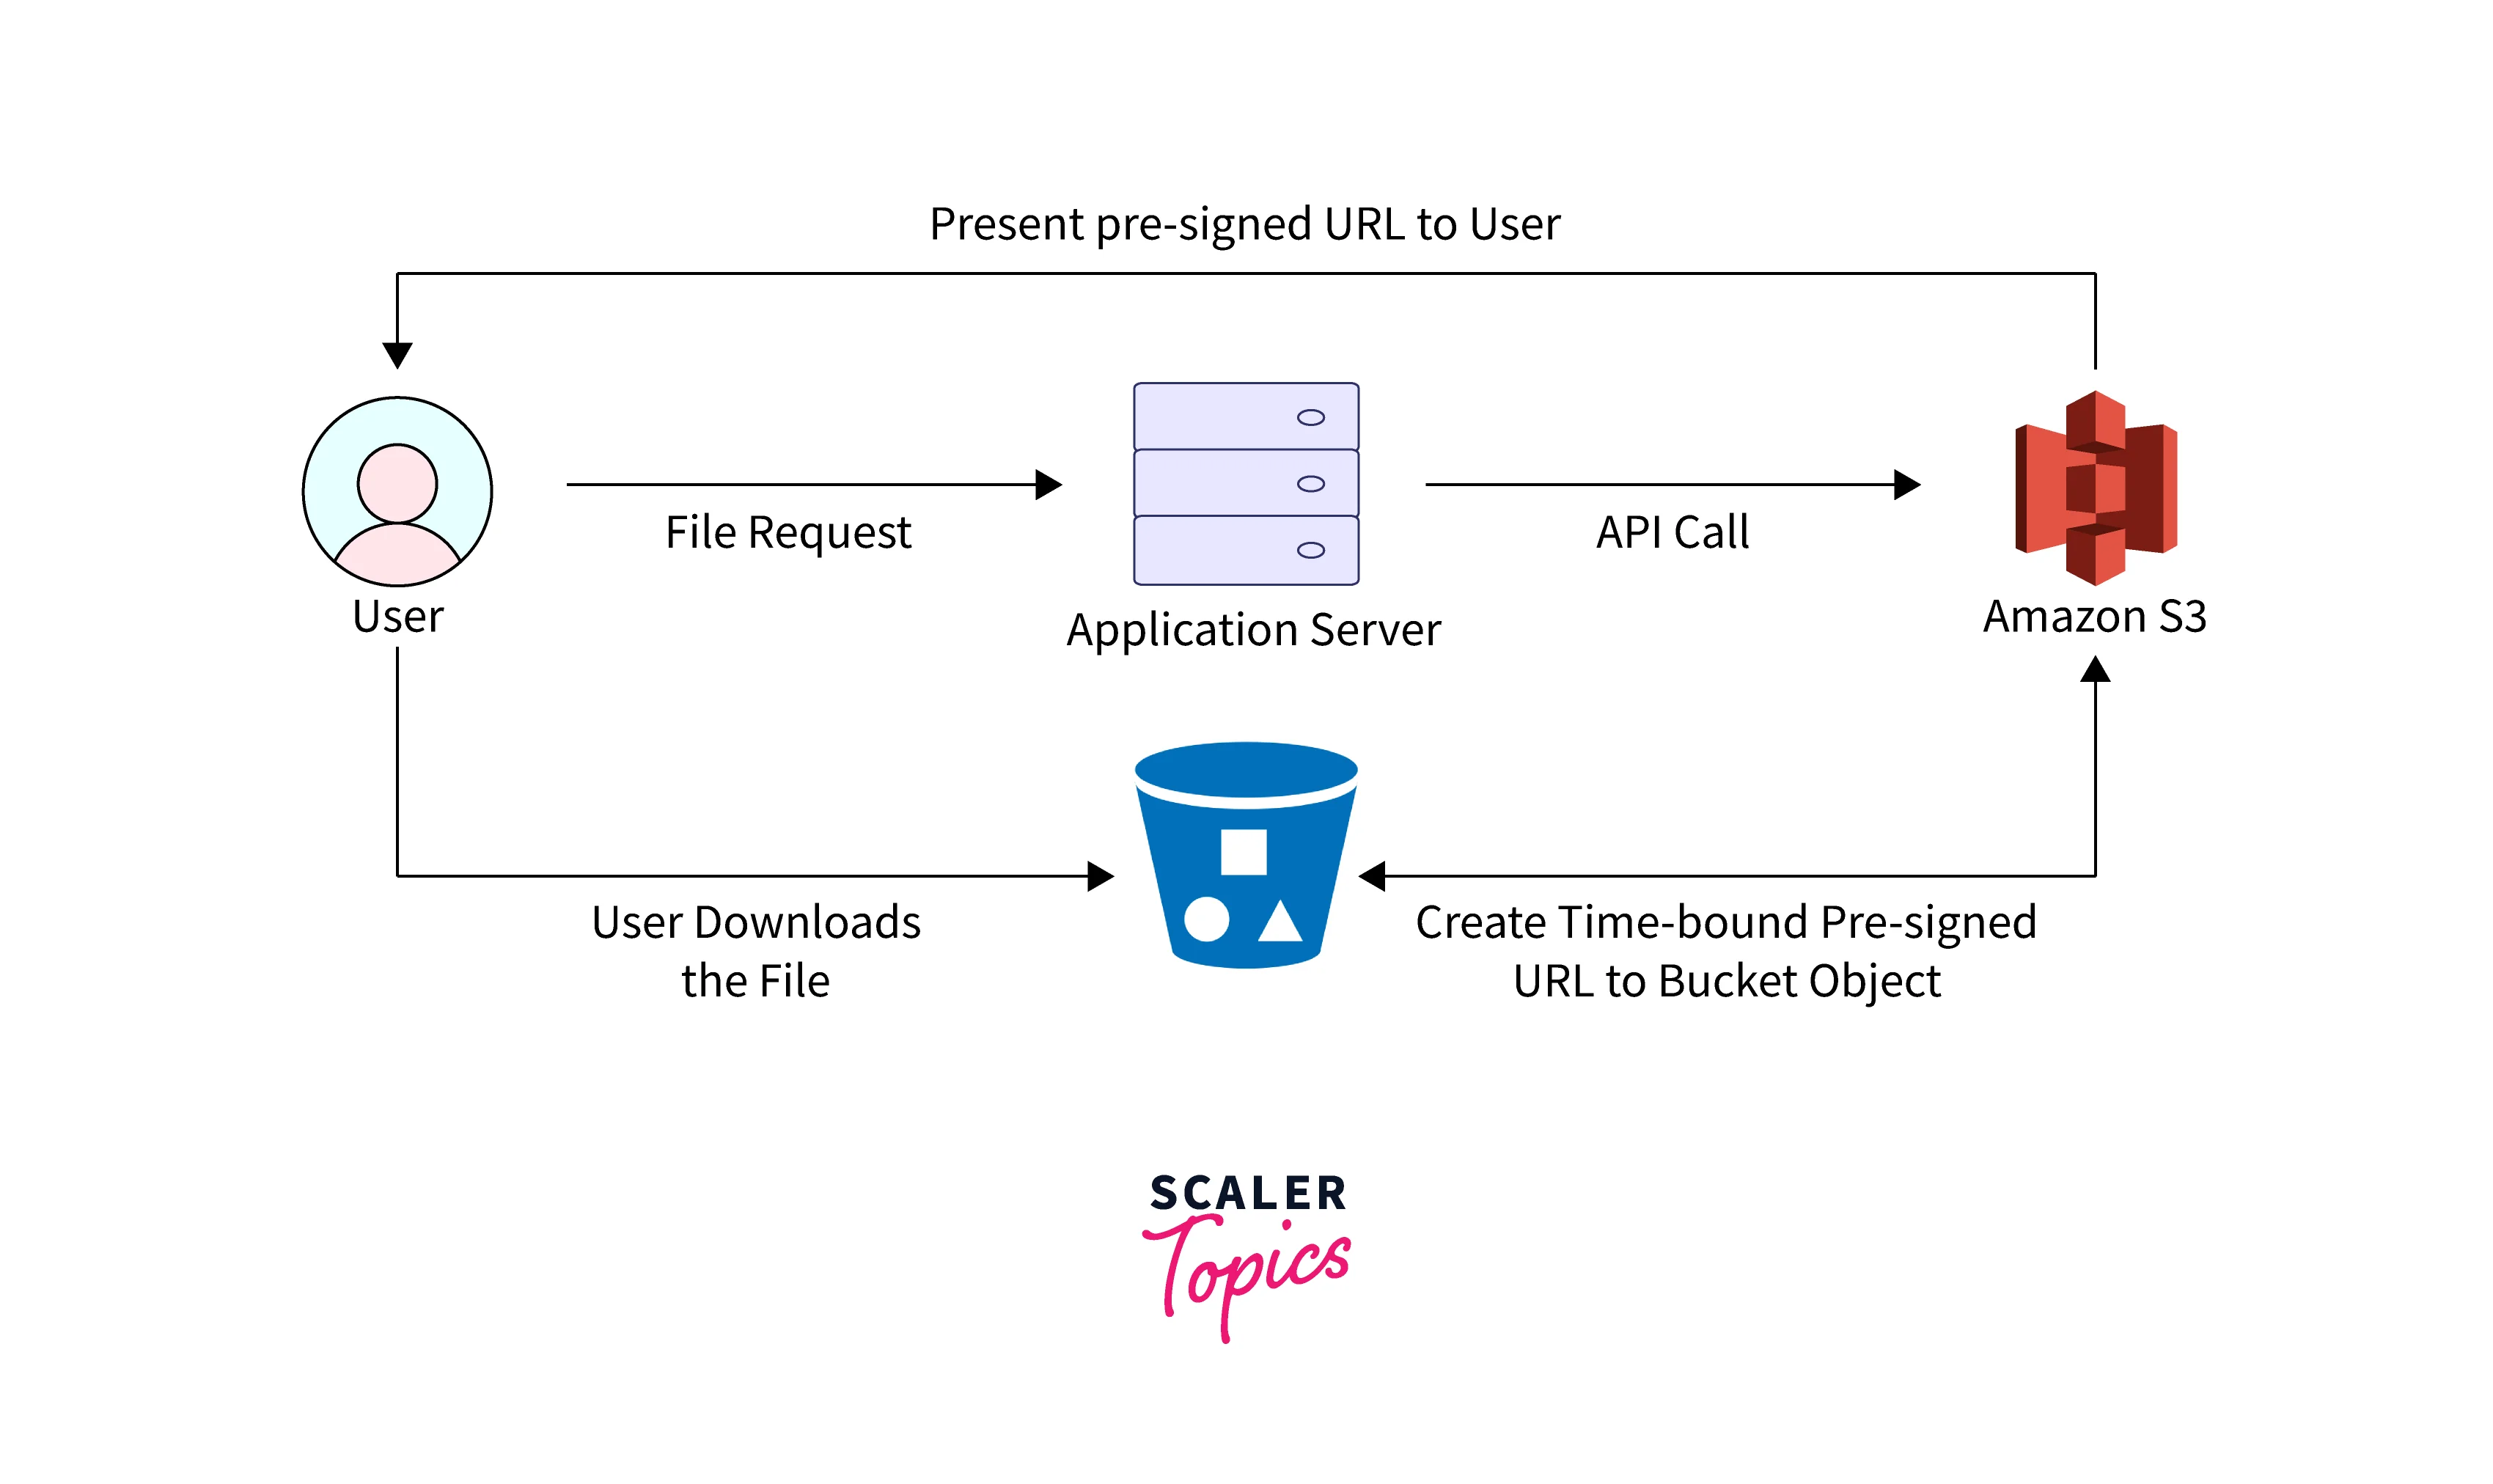
To see this concept in action, the following video provides a clear, non-code demonstration of how pre-signed URLs work directly from the AWS console.
How to Share Amazon S3 Files/Objects with External Users Using Presigned URLs | Python SDK Example
The "Tiny Technical Tutorials" channel explains the problem of accessing private S3 objects and demonstrates how pre-signed URLs solve it.
Watch from the beginning to see the "Access Denied" error on a private object (the problem), and then watch the demonstration of creating and using a pre-signed URL from the AWS console (the solution).
Part 2: Implementing Secure Downloads with django-storages
Now, let's implement this for our Infilytics application. You'll reconfigure your S3 bucket to be private and then use a feature of the django-storages library to automatically generate pre-signed URLs for downloads.
Your Task: Secure Your File Downloads
-
Make Your S3 Bucket Private:
- Navigate to the Amazon S3 service in your AWS Console.
- Select the bucket you created for this project.
- Go to the "Permissions" tab.
- Click "Edit" in the "Block public access (bucket settings)" section.
- Check the box for "Block all public access" and save the changes.
- Confirm your action. Now, if you try to access any of your previously uploaded files via their direct S3 URL, you should get an "Access Denied" XML error.
-
Create a Custom Private Storage Backend:
Thedjango-storageslibrary makes generating pre-signed URLs incredibly simple. You just need to create a custom storage class that enables this feature. The Lincoln Loop blog provides an excellent walkthrough of this process.
Serving Private Files with Django and S3 | Lincoln Loop
This article explains how to create and use a custom storage class in Django to serve files from a private S3 bucket.
First, read the section on creating the storage class. You will create a new file, storage.py, in your app and add the S3PrivateStorage class. The key setting here is querystring_auth = True. Next, read how to use this storage in your models. You'll modify your Image model to use this new storage backend.
*   Based on the article, create a new file `core/storage.py` (or wherever your models live).
*   Add the `S3PrivateStorage` class as described.
*   In your `models.py`, import this storage and modify your `Image` model's `image` field to use it:
    ```python
    from .storage import private_storage

    class Image(models.Model):


        # ... other fields
        image = models.ImageField(upload_to='images/', storage=private_storage)


        # ...
    ```
*   **Important:** Since you are changing the storage backend for an existing model field, you'll need to generate and run migrations.
    ```bash
    python manage.py makemigrations
    python manage.py migrate
    ```
3. Deploy and Verify:
* Commit and push your changes to GitHub.
* SSH into your EC2 instance, pull the latest code, and rebuild your Docker containers:bash git pull docker-compose up -d --build
* Now, test the new behavior:
* Log into your application and upload a new image.
* Navigate to the page that displays the image. It should still be visible.
* Right-click the image and "Copy Image Address" or "Open Image in New Tab".
* Examine the URL. It should now be a long, complex URL containing AWSAccessKeyId, Signature, and Expires parameters. This is your pre-signed URL! django-storages generated it automatically when you accessed .url in the template.
The beauty of this approach is that your view and template code doesn't need to change. Your view already ensures only authenticated users can see the page, and the {{ image.image.url }} tag in your template now transparently generates a secure, temporary link.
Part 3: Secure Direct Uploads with Pre-signed POSTs
We've secured downloads, but what about uploads? Currently, when a user uploads a large image, the data flows through our Django server, which then streams it to S3. This consumes server resources and can be a bottleneck. For an application like Infilect's, which ingests countless images, this is not scalable.
The solution is a pre-signed POST URL. The workflow is slightly different:
- The client (e.g., a web browser) tells your backend, "I want to upload a file named
example.jpg." - Your Django backend generates a special pre-signed POST URL and a set of required form fields.
- The client receives this URL and data, and then performs an HTTP POST request directly to S3, including the file and the required fields.
This offloads the entire upload process from your server.

Part 4: Implementing a Direct Upload API Endpoint
While django-storages is great for downloads, implementing the pre-signed POST logic is best done using boto3 directly within a DRF endpoint. This gives you more control over the process. We will create a new API endpoint that provides clients with the necessary credentials to perform a direct upload.
Your Task: Build the Pre-signed Upload API
We will use the excellent guide from Tushar Sarang's blog as a reference for building our DRF endpoint. We won't build a corresponding frontend, but you will implement the backend API that a frontend would consume.
Using Presigned URLs in Django Rest Framework - Tushar Sarang
This article details how to build a DRF endpoint to generate pre-signed POST URLs for direct-to-S3 uploads.
First, study the S3Client class provided in the article under "Step 2: Implementing the Backend Logic". This class encapsulates the boto3 logic for generating the presigned POST. You will create a similar helper file in your project. Next, review the DRF code for the FileUpload model, serializer, and ViewSet. This shows how to structure the API endpoint that uses the S3Client.
-
Create an
S3ClientHelper:
Create a new file, for example,core/s3.py. Based on the article, implement a class or function that usesboto3.client('s3').generate_presigned_post(...). This function will take a file name and return the dictionary containing theurlandfieldsneeded for the upload. -
Create a New Model for Uploaded Files:
You need a model to track the files that will be uploaded. Let's create a simple one inmodels.py:class DirectUpload(models.Model): id = models.UUIDField(primary_key=True, default=uuid.uuid4, editable=False) file_name = models.CharField(max_length=255) file_key = models.CharField(max_length=255, unique=True) # The final path in S3 created_at = models.DateTimeField(auto_now_add=True) # You might add a status field, user foreign key, etc.Don't forget to run
makemigrationsandmigrate. -
Build the DRF ViewSet and Serializer:
- Create a
DirectUploadSerializerthat validates the incomingfile_name. - Create a
DirectUploadViewSet. Itscreatemethod will be the core of this feature. - Inside the
createmethod:- Validate the incoming
file_name. - Generate a unique
file_keyfor S3 (e.g., usinguuid). - Call your
S3Clienthelper to generate the presigned POST data using the bucket name and the generatedfile_key. - Create a
DirectUploadmodel instance to record the transaction. - Return the presigned POST data (
urlandfields) to the client in the API response.
- Validate the incoming
- Create a
-
Add the URL to
urls.py:
Register your newDirectUploadViewSetwith a DRF router to expose it under a path like/api/uploads/. -
Deploy and Test with a Tool like
curlor Postman:
After deploying, send a POST request to your new/api/uploads/endpoint with a JSON body like{"file_name": "my-test-image.jpg"}. Your API should respond with a JSON object containingurlandfields. This confirms your backend is ready to support direct client uploads.
Conclusion
Congratulations! You have now mastered two professional-grade techniques for handling files securely and efficiently in a cloud-native application. These patterns are essential for building scalable backend systems, especially those that handle large volumes of data like images for ML pipelines.
In this lesson, you:
- Secured your S3 bucket by blocking all public access.
- Used
django-storagesandquerystring_auth=Trueto automatically generate pre-signed GET URLs for secure downloads. - Understood the performance benefits of offloading file transfers from your application server.
- Designed and built a DRF API endpoint that generates pre-signed POST data, enabling clients to upload files directly and securely to S3.
You have now completed the core lessons on deploying and configuring your application in the cloud. In the next module, we'll shift our focus to production readiness and scalability. Our first lesson will cover serving your Django application professionally using a WSGI server like Gunicorn, preparing it to handle real-world traffic.