Welcome to the next lesson in our journey to build a robust backend system. In our last session, you streamlined API development by using ViewSets and Routers to create a full set of CRUD endpoints for your tasks. However, that API is currently open to the world, which is a major security risk.
Today, we will fix that by implementing a modern, standard method for securing APIs: token-based authentication using JSON Web Tokens (JWT). This is a critical skill for any backend engineer, as it allows your server to verify a client's identity in a stateless manner—perfect for applications where the frontend (like a web or mobile app) is separate from the backend.
By the end of this lesson, you will be able to:
- Explain the concept of JWT and the roles of access and refresh tokens.
- Install and configure the
djangorestframework-simplejwtlibrary. - Generate API endpoints for users to obtain and refresh tokens.
- Secure your
TaskViewSetso that only authenticated users can access it. - Test the complete authentication flow using your API.
This directly addresses the job description requirement to "Design and develop REST APIs for frontend and backend," adding the crucial layer of security that any production system needs.
1. Understanding the JWT Authentication Flow
Before we write any code, let's understand the process. When a user wants to access a protected resource, they can't just make a request. They first need to prove who they are.
In a traditional web application, this is often handled with sessions stored on the server. But for APIs, a stateless approach is better. This is where JWT comes in.
A JWT is a compact, digitally signed "passport" that a client receives after successfully logging in. The client then includes this passport (the token) in the header of every subsequent request to a protected endpoint. The server can quickly verify the passport's signature without needing to look up session information in a database, making the process fast and scalable.
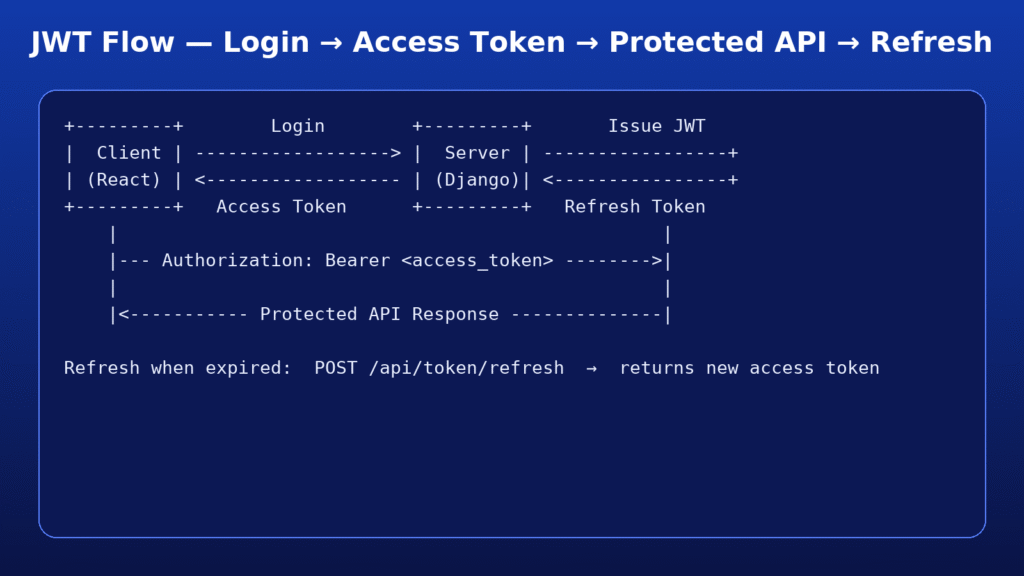
The typical flow looks like this:

This flow usually involves two types of tokens:
- Access Token: A short-lived token (e.g., 5-15 minutes) sent with every API request to access protected resources. Its short lifespan minimizes the damage if it's ever stolen.
- Refresh Token: A long-lived token (e.g., hours or days) used only to get a new access token when the old one expires.
The following diagram illustrates this complete cycle, including the refresh mechanism.
To learn more about the structure of a JWT and its benefits, take a moment to read the first two sections of this excellent article from freeCodeCamp.
How to Create a JSON Web Token in the Django Rest Framework
This article provides a clear and concise explanation of what a JWT is and why it is a great choice for securing Django REST Framework applications.
Please read the sections What is a JWT? and Why Use JWT. Focus on understanding the three parts of a token (Header, Payload, Signature) and the benefits of stateless authentication.
2. Implementing JWT with djangorestframework-simplejwt
Now let's get our hands dirty and implement this in our TaskMaster project. We'll use a popular and well-maintained library called djangorestframework-simplejwt.
Step 1: Install the Library
First, stop your development server and install the package using pip.
pip install djangorestframework-simplejwt
This library provides all the necessary components to generate, verify, and refresh JWTs within our DRF project.
Step 2: Configure Django Settings
Next, we need to tell Django REST Framework to use JWT for authentication. Open your myproject/settings.py file and add a REST_FRAMEWORK configuration dictionary.
The video below from the BugBytes channel provides a clear walkthrough of this process. We'll follow the same logic.
Django REST Framework - JWT Authentication with djangorestframework-simplejwt
This video clearly demonstrates how to configure DRF to use JWT authentication while keeping session authentication for the browsable API.
Watch from as the presenter adds the REST_FRAMEWORK setting. Then, watch from to see how they add the JWT authentication class and why they keep SessionAuthentication.
Following the video's example, add this to the bottom of myproject/settings.py:
# myproject/settings.py


# ... (at the end of the file)

REST_FRAMEWORK = {
    'DEFAULT_AUTHENTICATION_CLASSES': (
        'rest_framework_simplejwt.authentication.JWTAuthentication',
        'rest_framework.authentication.SessionAuthentication', # Optional: for browsable API
    ),
}
By setting JWTAuthentication as the primary method, DRF will check for a JWT in the Authorization header of incoming requests. We keep SessionAuthentication so that we can still use the browsable API and log into the Django admin panel conveniently during development.
Step 3: Add Token Endpoints to URLs
The simplejwt library comes with built-in views that handle token creation and refreshing. We just need to wire them up. Open your main myproject/urls.py file and add the paths for these views.
The GeeksForGeeks article provides a clear example of this.
JWT Authentication with Django REST Framework
This guide shows exactly how to add the necessary JWT authentication routes to your project's URL configuration.
Follow the instructions in the section Configuration in urls.py. You will need to add two new imports and two new path entries to your urlpatterns.
Based on the guide, your myproject/urls.py should look something like this:
# myproject/urls.py

from django.contrib import admin
from django.urls import path, include


# Add these imports
from rest_framework_simplejwt.views import (
    TokenObtainPairView,
    TokenRefreshView,
)

urlpatterns = [
    path('admin/', admin.site.urls),


    # Add these new paths for token management
    path('api/token/', TokenObtainPairView.as_view(), name='token_obtain_pair'),
    path('api/token/refresh/', TokenRefreshView.as_view(), name='token_refresh'),

    path('api/', include('tasks.api_urls')),
    path('', include('tasks.urls')),
]
Now, you have two new endpoints:
/api/token/: Users will send theirusernameandpasswordhere via aPOSTrequest to receive their access and refresh tokens./api/token/refresh/: When an access token expires, clients willPOSTtheir refresh token here to get a new access token.
3. Securing and Testing Your API
With the configuration complete, our final step is to lock down the TaskViewSet and test the entire flow.
Step 1: Protect the ViewSet
Open tasks/views.py. We need to tell this view that it requires authentication. We do this by adding a permission_classes attribute.
# tasks/views.py

from .models import Task
from .serializers import TaskSerializer
from rest_framework import viewsets


# Add this import
from rest_framework.permissions import IsAuthenticated

class TaskViewSet(viewsets.ModelViewSet):
    """
    This viewset automatically provides `list`, `create`, `retrieve`,
    `update` and `destroy` actions.
    """
    queryset = Task.objects.all()
    serializer_class = TaskSerializer


    # Add this line to protect the viewset
    permission_classes = [IsAuthenticated]
The IsAuthenticated permission class ensures that only requests with valid authentication credentials (in our case, a valid JWT) will be allowed access.
Step 2: Test the Authentication Flow
Let's verify that our security measures are working. Make sure you have created a superuser, as you'll need its credentials.
Start your development server:python manage.py runserver
-
Try to Access the Protected Endpoint (and fail):
Navigate tohttp://127.0.0.1:8000/api/tasks/. You should now see a401 Unauthorizederror message. This is great! It means our endpoint is no longer open to the public.{ "detail": "Authentication credentials were not provided." } -
Obtain Your Tokens:
Navigate tohttp://127.0.0.1:8000/api/token/. This is the browsable API for theTokenObtainPairView. At the bottom of the page, enter theusernameandpasswordfor your superuser and click "POST".You will receive a response containing your
accessandrefreshtokens.{ "refresh": "eyJhbGciOiJIUzI1NiIsInR5cCI6IkpXVCJ9...", "access": "eyJhbGciOiJIUzI1NiIsInR5cCI6IkpXVCJ9..." }The
accesstoken is your key to the protected endpoints. -
Access the Protected Endpoint (and succeed):
Now, go back tohttp://127.0.0.1:8000/api/tasks/. In the top-right corner of the browsable API, you'll see an "Authorize" button. Click it.A modal will pop up. In the "Value" field, type
Bearerfollowed by a space, and then paste your entire access token. For example:Bearer eyJhbGciOiJIUzI1NiIsInR5cCI6IkpXVCJ9...Click "Authorize". Now, refresh the page. You should see your list of tasks! You have successfully authenticated and accessed a protected resource.
The following video segment demonstrates this exact testing process using a dedicated REST client, which is how a real frontend application would interact with your API.
Django REST Framework - JWT Authentication with djangorestframework-simplejwt
This part of the video shows how to use a REST client to first obtain tokens and then use the access token to make an authenticated request to a protected endpoint.
First, watch to see how to send a POST request to the token endpoint with credentials to get the access and refresh tokens. Then, skip to to see how the access token is added to the Authorization: Bearer <token> header to successfully access a protected API endpoint.
Conclusion
Congratulations! You have successfully implemented a robust, token-based authentication system for your API. This is a fundamental building block for any modern web service and a skill that is highly valued in backend roles.
Key Takeaways:
- JWT (JSON Web Tokens) provide a stateless method for authenticating API requests.
- The access token is a short-lived credential for accessing resources, while the refresh token is a long-lived credential used to get a new access token.
- The
djangorestframework-simplejwtlibrary makes it easy to add JWT authentication to a DRF project. - The implementation involves three main steps: installing the library, configuring
settings.pyandurls.py, and protecting views with permission classes likeIsAuthenticated. - Always use HTTPS in production to prevent tokens from being intercepted.
In our next lesson, we'll build upon our secure API by adding features to handle large amounts of data gracefully. We will explore pagination, filtering, and searching, allowing clients to consume your API's data much more efficiently.