Hello! In our previous lesson, we learned how to simplify resistor networks by calculating their series and parallel equivalent resistances. This is a vital skill, but as we noted, it can't be used on every circuit. Now, we'll introduce a more fundamental and powerful principle that applies to any closed circuit path: Kirchhoff's Voltage Law (KVL).
This lesson will show you that KVL is not just an arbitrary rule, but a direct consequence of the law of conservation of energy—a concept from physics that you may already be familiar with. By the end of this lesson, you will be able to apply KVL to analyze circuit loops, a universal tool that will become indispensable as we tackle more complex electronics for your robotics and IoT projects.
The Foundation of KVL: Conservation of Energy
At its heart, Kirchhoff's Voltage Law is a statement about energy. Imagine you're hiking on a mountain. You start at a certain altitude, go up and down various hills, and eventually return to your exact starting point. No matter what path you took, your net change in altitude is zero. Since gravitational potential energy depends on altitude, your net change in potential energy is also zero.
In an electric circuit, voltage is analogous to altitude—it's a measure of electric potential energy per unit charge. A charge carrier moving around a closed loop in a circuit is like that hiker. As it moves through components like batteries, it gains energy (goes "uphill"). As it moves through components like resistors, it loses energy (goes "downhill"). When the charge returns to its starting point, the total energy gained must equal the total energy lost. This means the sum of all the voltage changes (rises and drops) around any closed loop must be zero.

This principle of path independence for potential is a hallmark of conservative fields in physics. Just as gravity is a conservative field, so is the electrostatic field that drives DC circuits. This means the "work done" (energy change) in moving a charge between two points is independent of the path taken, and the net work done in a closed loop is always zero.
Let's ground this analogy in the context of an actual circuit.
[PDF] Kirchhoff's Voltage Law - Ibiblio
This tutorial provides an excellent, intuitive explanation of KVL using the mountain hiker analogy and then immediately applies it to an example circuit.
Please read the "Simplified Tutorial" chapter. Start at the beginning with the explanation of the hiker analogy. Then, follow how this concept is applied to electricity. Finally, study the example circuit to see how the voltage rises from the sources are perfectly balanced by the voltage drops across the resistors, making the total sum zero.
Applying KVL: The Importance of Sign Conventions
To use KVL effectively, we need a systematic way to handle the signs (+ or -) of the voltage rises and drops. A clear, consistent procedure is essential, much like following a specific algorithm to guarantee a correct result in software.
Here is the most common convention, which we will use throughout this course:
- Assume Current Direction: For each loop, guess the direction of the current (e.g., clockwise). Don't worry if you're wrong; the math will work out, and you'll simply get a negative value for the current, indicating it flows the other way.
- Assign Resistor Polarity: Based on your assumed current direction, label the polarity of the voltage drop across each resistor. Current always flows from a higher potential (+) to a lower potential (-) through a resistor.
- Trace the Loop: Pick a starting point and a direction to travel around the loop (clockwise or counter-clockwise—this can be different from your assumed current direction).
- Sum the Voltages: As you "walk" the loop and cross each component, add its voltage to your sum according to these rules:
- Voltage Source: If you move from the negative (-) terminal to the positive (+) terminal, it's a voltage rise. Add a positive value (e.g.,
+V). If you move from + to -, it's a voltage drop; add a negative value (-V). - Resistor: If you move across the resistor in the same direction as the current (from + to -), it's a voltage drop. Add a negative value (
-IR). If you move against the current (from - to +), it's a voltage rise; add a positive value (+IR).
- Voltage Source: If you move from the negative (-) terminal to the positive (+) terminal, it's a voltage rise. Add a positive value (e.g.,
- Set the Sum to Zero: Once you've completed the loop, the algebraic sum of all the voltages you've written down must equal zero.
The following video provides an excellent walkthrough of two common sign conventions and shows that they are mathematically equivalent. Understanding this will give you confidence that the choice of convention is just a matter of bookkeeping.
This video from Neso Academy clearly demonstrates how to apply sign conventions when writing a KVL equation.
Watch the segment that explains and compares the first convention (rise in potential is positive), and then watch the explanation of the second convention (rise in potential is negative). Notice how both lead to the exact same final equation. We will stick to the first convention.
A Worked Example
Now let's see this procedure in action. The following video analyzes a series circuit with two batteries that oppose each other. This is a great example because it forces us to carefully consider the direction of current and the signs of each voltage.
KVL Explained (Kirchhoff's Voltage Law)
This video from Voltverse provides a clear, step-by-step application of KVL to a practical circuit.
Please watch the main analysis segment from "armed with our insights" to the final calculation of voltage drops. Pay close attention to how the presenter: Determines the dominant direction of current flow. Traverses the loop clockwise. Assigns a sign to each component's voltage based on the convention. Sets up and solves the final KVL equation for the current I.
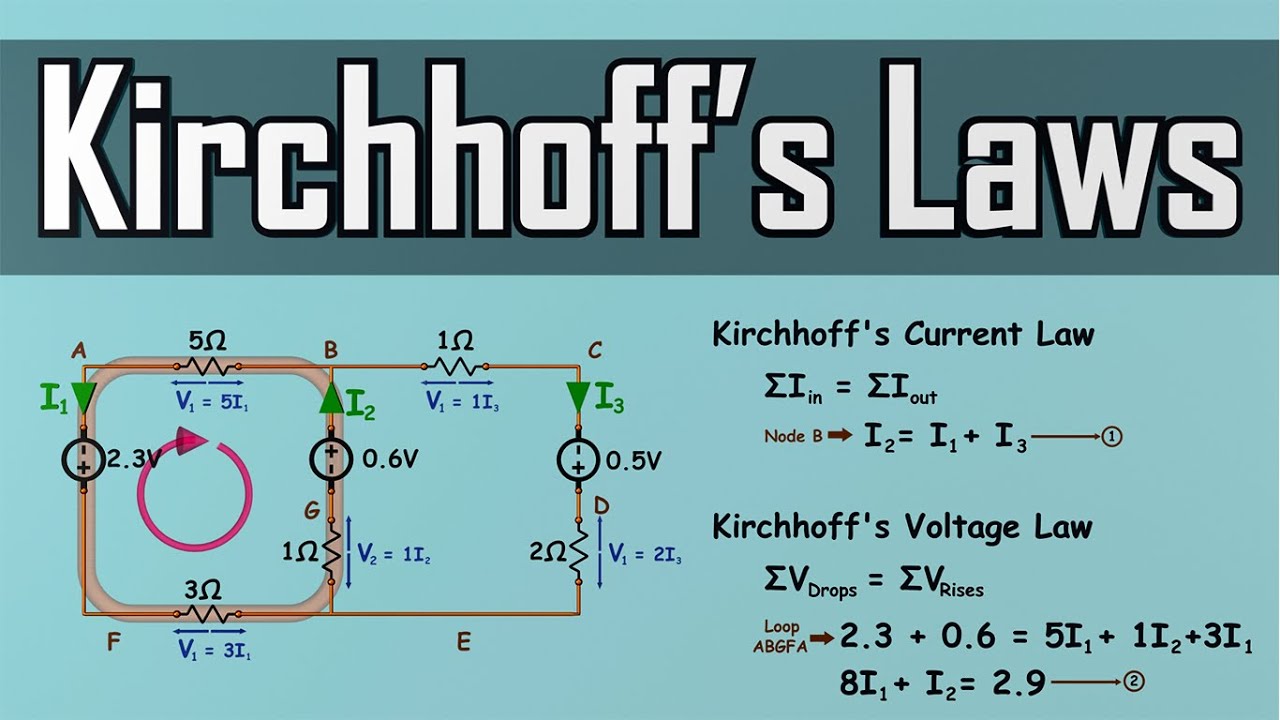
Here is a circuit similar to the one in the video, illustrating how the KVL equation is formed. The equation represents a clockwise traversal of the loop.
A Powerful Application: Finding Voltage Between Any Two Points
KVL isn't just for finding the current in a loop. It can also be used to find the voltage difference between any two points in a circuit, even if they aren't directly connected. This is an extremely powerful analytical technique.
The method is a slight variation of the KVL procedure:
- Start at your reference point (let's call it A) and write down its potential, .
- "Walk" along any path from point A to your measurement point (B).
- As you cross each component on the path, add or subtract its voltage change from your running total, using the same sign conventions as before.
- When you reach point B, equate your entire expression to the potential at point B, .
The resulting equation will look like this: . This can be rearranged to find the voltage difference .
This final segment from the Neso Academy video demonstrates this powerful technique for finding the potential difference between two points.
Watch the section from "How to deal with this kind of problem". The instructor shows how to write a KVL-style equation for a path (not a full loop) to find the voltage V_A - V_B. Notice how they then verify the result by taking a completely different path between the same two points, reinforcing the concept of path independence.
Practice Problem
Let's put your knowledge to the test. Consider the circuit below.
A series circuit with a 100V source and three resistors: R1=10kΩ, R2=60kΩ, R3=30kΩ.
- Analyze the Circuit: Using the methods from our last lesson, first calculate the total resistance . Then, use Ohm's Law to find the total current flowing out of the 100V source. Finally, calculate the individual voltage drops across R1, R2, and R3.
- Verify with KVL: Write the KVL equation for the loop starting at point D, moving clockwise through A, B, C, and back to D. Plug in your calculated voltage values. Does the sum equal zero? (It should, within any rounding tolerance).
- Find an Unknown Voltage: Use the "path" method to find the voltage at point B with respect to point D (). Trace the path D-A-B. Verify your answer by tracing the alternative path D-C-B. Do you get the same result?
Solution
- .
.
.
.
. - KVL equation (clockwise from D): .
. The law holds. - Path D-A-B: . So, .
Path D-C-B: . So, . Both paths give the same result.
Conclusion
Today you've learned one of the most fundamental laws in electronics. It provides a robust, algorithmic way to analyze any circuit, moving beyond the limitations of simple series/parallel reduction.
Key Takeaways:
- Kirchhoff's Voltage Law (KVL) is a direct application of the law of conservation of energy to electric circuits.
- The law states that the algebraic sum of all voltage rises and drops around any closed loop must equal zero.
- A consistent sign convention is crucial for correctly applying KVL. We define voltage drops (moving with current through a resistor, or from + to - through a source) as negative, and voltage rises as positive.
- KVL can be used not only to find unknown currents but also to calculate the voltage difference between any two points in a circuit by summing the voltage changes along a path connecting them.
In our next lesson, we will explore KVL's counterpart, Kirchhoff's Current Law (KCL). While KVL is based on the conservation of energy in a loop, KCL is based on the conservation of charge at a junction. Together, these two laws form the foundation for powerful analysis techniques that can solve virtually any DC circuit you will encounter.