Introduction
In our last session, you learned how to structure your draft questionnaire using skip logic and branching to create an adaptive, efficient client experience. You now have a technically sound framework for your intake instrument. However, a functional instrument is not necessarily a valid one. Before we test its real-world performance, we must ensure its content is conceptually sound.
This lesson addresses the learning outcome: Evaluate the draft instrument for content validity against your codified expertise framework. Content validity is a formal process to confirm that your questions are relevant, clear, and comprehensively cover the psychological and logistical constructs you aim to measure. For your practice, this is the critical step that bridges your tacit field experience and the creation of a rigorous, scientifically-grounded diagnostic tool. This process of objective evaluation is fundamental to psychometrics and shares its principles with the validation steps required in any experimental design.
1. Situating Content Validity in the Development Process
Content validity is the foundational layer of psychometric assessment. It ensures that the raw material of your instrument—the items themselves—is of high quality. Without it, any subsequent statistical analysis, no matter how sophisticated, rests on a weak foundation.
The diagram below illustrates a standard nine-step process for developing a psychometric scale. As you can see, content validity is the second crucial step, performed immediately after the initial item generation and before any larger-scale testing.
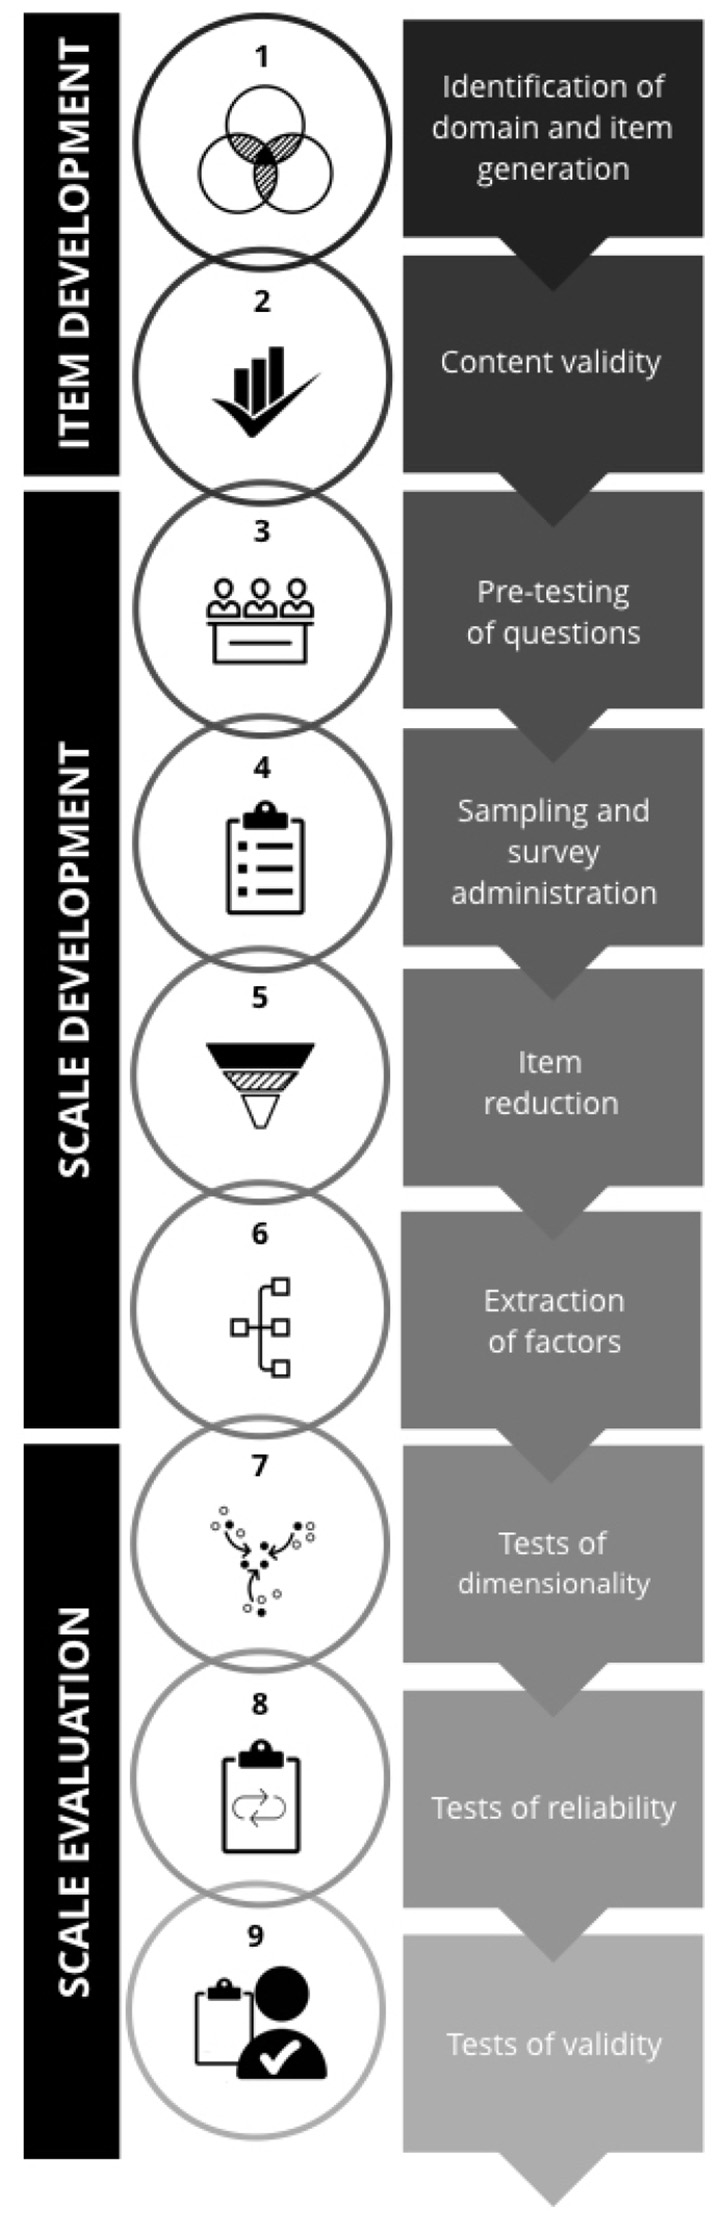
Essentially, a content validity study provides an objective, data-driven answer to the question: "Are these items measuring what I think they are measuring?"
2. The Systematic Process of Content Validation
Conducting a content validity study is not an informal review; it's a structured, replicable process. We will walk through the key stages, which you can use as a direct protocol for your own instrument.
Step 1: Formalize Your Test Blueprint
Before you can ask others to validate your instrument, you must be explicit about its design. The "codified expertise framework" you developed in Module 2 serves as the basis for this. We will formalize it into a Test Blueprint, also known as a Table of Specifications (TOS). This document maps your high-level constructs to your specific questionnaire items.
TABLE OF SPECIFICATION (TOS) | Definition, Importance, and Preparation | #TestBluePrint
This video from Tantan HD explains the concept of a Table of Specifications (TOS) in an educational context, but the principles are directly transferable to instrument design. It provides a clear analogy of a blueprint for construction.
Please watch the following segments to understand the concept and its construction: What is a TOS?: Focus on the definition of the TOS as a "test blueprint" that ensures a test measures what it intends to measure. The Importance of a TOS: Note the key benefits: ensuring fair and representative questions and providing evidence of content validity. How to Construct a TOS: Pay close attention to the mechanics. Where the video uses "number of hours taught," you will substitute a measure of "importance" or "weight" for each construct in your client diagnosis. This is analogous to a proportional allocation strategy.
Your test blueprint should be a simple table with the following columns:
- Construct/Domain: The key area you're measuring (e.g., "Jealousy Management," "Time Allocation," "Communication Protocols").
- Dimension/Indicator: Sub-components of the construct (e.g., for "Jealousy," dimensions could be "Emotional Reactivity," "Compersion," "Communication during Jealousy").
- Item Number(s): The specific question numbers from your draft instrument that are intended to measure each dimension.
- Weight/Importance (%): Your expert estimation of how important this construct is to a typical client diagnosis. This helps ensure your questionnaire's focus is appropriately balanced.
This blueprint becomes a core part of the materials you provide to your expert reviewers.
Step 2: Assemble Your Panel of Experts
The evaluation of content is performed by a panel of judges. The credibility of your validation process depends on the quality of this panel. The literature distinguishes between two essential types of experts.
[PDF] Conducting a content validity study in social work research
This paper by Rubio et al. provides a clear, practical guide on conducting a content validity study. This section focuses on the expert panel.
Please read the section titled Select a Panel of Experts. Pay attention to the distinction between "content experts" and "lay experts" and the recommendations on panel size.
As the reading suggests, you will need two groups:
- Content Experts: These are professionals with expertise in your domain. This could include other relationship coaches, therapists specializing in non-monogamy, or academic researchers. They evaluate the items against theory and professional knowledge.
- Lay Experts: These are representatives of your target population—in your case, individuals or couples actively living the cuckold/hotwife lifestyle. They are essential for evaluating the clarity, phrasing, and real-world relevance of your questions.
For a specialized instrument like yours, a panel of 5 to 10 experts is generally recommended. A good starting point would be to aim for 2-3 content experts and 3-5 lay experts.
Step 3: Prepare and Administer the Evaluation Packet
You will send each expert a packet containing everything they need to perform the evaluation. A professional and clear presentation is key to getting high-quality feedback.
The packet should include:
- A cover letter: Explaining the purpose of your research, why you chose them as an expert, and clear instructions for the evaluation.
- Your Test Blueprint: To provide context on what you intend to measure.
- The draft questionnaire itself.
- A Content Validity Rating Form: This is where the experts will provide their quantitative and qualitative judgments for each item.
The image below shows a standard template for such a rating form.

Your rating form should ask experts to evaluate each item on two primary criteria, typically using a 4-point scale.
[PDF] Content Validity - TPM Vol
This paper by Roebianto et al. offers a detailed look at the procedure and criteria for content validation.
Read the section on Questionnaire Administration. Focus on the recommended criteria for evaluation, specifically representativeness (relevancy) and clarity. Note the suggested 4-point scale anchors (e.g., 1 = not relevant, 4 = very relevant).
Based on the resources, your rating form for each item should capture:
- Relevance: How relevant is this item to the construct it's intended to measure?
- 1 = Not relevant
- 2 = Somewhat relevant (needs major revision)
- 3 = Quite relevant (needs minor revision)
- 4 = Highly relevant
- Clarity: How clearly is this item worded?
- 1 = Not clear
- 2 = Needs major revision to be clear
- 3 = Clear, but needs minor revision
- 4 = Very clear
- Comments/Suggestions: An open-ended space for qualitative feedback.
3. Quantifying Expert Judgment: The Content Validity Index (CVI)
Once you receive the completed rating forms, the next step is to aggregate the expert judgments into quantitative metrics. This allows for an objective, data-driven evaluation of your instrument. The most common metric is the Content Validity Index (CVI).
The following video provides a very clear, step-by-step tutorial on how to calculate the CVI for each item (I-CVI) and for the overall scale (S-CVI).
How to validate a survey questionnaire for research paper, thesis and dissertation
This tutorial from Renz Online Academy is an excellent practical guide to the necessary calculations.
Watch these segments carefully to understand the calculation process: Tabulation and I-CVI Calculation: This shows how to tabulate expert scores and calculate the Item-Content Validity Index (I-CVI). The key concept is counting the number of experts who rated an item as a 3 or 4 ("experts in agreement"). S-CVI Calculation: This demonstrates three methods for calculating the Scale-Content Validity Index (S-CVI), which gives an overall validity score for your instrument. The S-CVI/Average (average of all I-CVI scores) is the most commonly used. Interpreting the Scores: This section provides the decision rules. A CVI of 0.80 or higher is generally considered acceptable.
To summarize the key calculations:
1. Item-Content Validity Index (I-CVI):
This is calculated for each item separately for both relevance and clarity.
An item with an I-CVI below 0.80 should be flagged for revision or removal.
2. Scale-Content Validity Index (S-CVI):
This provides a score for the entire instrument. The most practical method is the S-CVI/Ave.
An S-CVI/Ave of 0.90 or higher is desirable for a new instrument, indicating excellent overall content validity.
Given your statistical background, you may also find other methods discussed in the academic paper by Roebianto et al. of interest, such as the Content Validity Ratio (CVR) and Aiken's V, which offer slightly different sensitivities to rater agreement.
[PDF] Content Validity - TPM Vol
This resource dives deep into the statistical methods for analyzing content validity data.
Review the sections on Data Analysis and Results. You don't need to master all the formulas, but appreciate the different approaches available, such as Aiken's V (which is more sensitive to the full rating scale) and Content Validity Ratio (CVR) (based on 'essential' ratings). The Results section demonstrates how these different indices can be used together to make decisions about which items to retain, revise, or remove.
4. From Analysis to Action: Revising Your Instrument
The final and most important step is to use your analysis to improve the instrument.
- Keep: Items with high I-CVI scores (e.g., > 0.80) for both relevance and clarity, and positive qualitative comments.
- Revise: Items with acceptable I-CVI scores but with specific, actionable suggestions for rewording from the experts. Pay special attention to items with high relevance but low clarity—these are valuable concepts that just need better phrasing.
- Discard: Items with low I-CVI scores (< 0.80). These items are likely not measuring the intended construct and should be removed or completely rethought.
This data-driven revision process is what transforms a simple draft into a content-validated instrument, ready for the next stage of testing.
Conclusion
In this lesson, we have established a rigorous, systematic protocol for evaluating the content validity of your diagnostic instrument. By moving beyond subjective opinion to a structured, quantitative evaluation, you ensure that your tool is built on a solid conceptual foundation.
Key Takeaways:
- Content validity is a crucial first step in psychometric testing, ensuring your instrument's items are relevant, clear, and comprehensive.
- The process involves creating a Test Blueprint, assembling a panel of both content and lay experts, and using a structured rating form to gather feedback.
- Expert judgments are quantified using the Content Validity Index (CVI), with an I-CVI of ≥ 0.80 for individual items and an S-CVI of ≥ 0.90 for the overall scale being common targets.
- The results of the CVI analysis, combined with qualitative feedback, provide a data-driven basis for keeping, revising, or discarding items.
You now have a complete framework to evaluate your draft instrument. In our next lesson, we will address designing a pilot test to assess the instrument's reliability. Having established what your instrument measures, we will then focus on how consistently it measures it, looking at metrics like test-retest reliability and Cronbach's alpha.