Introduction
In our last session, we explored how to probe external networks and hosts using essential tools like ping, traceroute, and nslookup. This gave us a way to "look out" at the internet to gather information. Today, we shift our focus inward to examine the network activity on our own local machine. This is a critical skill for understanding what services are running, who they are talking to, and identifying any unusual or unauthorized connections.
Our goal is to master the netstat (network statistics) command. By the end of this lesson, you will be able to use netstat on your Windows machine to view all active connections, identify which ports are open and listening for new connections, and, most importantly, pinpoint the exact program responsible for each network activity.
Understanding Your Connections with netstat
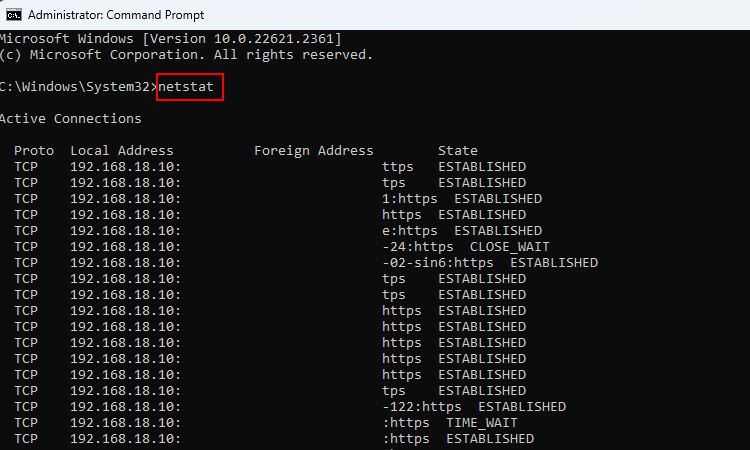
The netstat command is a powerful, built-in utility that provides a snapshot of all network connections to and from your computer. At its most basic, it shows which protocols are in use, the local and remote addresses involved, and the current state of each connection.
Let's begin with a video that clearly explains the fundamentals of netstat and its output on a Windows system.
This animated video from PowerCert Animated Videos offers an excellent introduction to the netstat command.
Please watch the first two segments of the video: The introduction will give you a high-level overview of what netstat is for. The next section demonstrates the basic command and explains the columns in its output. Pay close attention to the meaning of "Local Address," "Foreign Address," and "State."
As the video showed, the output from a simple netstat command is organized into several key columns:
- Proto: The protocol being used for the connection, almost always TCP or UDP.
- Local Address: Your computer's IP address and the port number used for that specific connection. The port number is the number after the colon (e.g.,
192.168.1.10:51342). - Foreign Address: The IP address and port number of the remote computer you are connected to.
- State: The status of the connection. The two most common states you'll see are:
- ESTABLISHED: An active, ongoing connection between your machine and a remote one. This is what you see when you're browsing a website or connected to a game server.
- LISTENING: A service or application on your computer is "listening" on a port, waiting for other devices to initiate a connection with it. For example, a web server listens on port 80 or 443 for incoming browser connections.
Enhancing netstat with Switches
The real power of netstat comes from using "switches" (also called options or flags) to modify its behavior and get more detailed information. These are letters preceded by a hyphen that you add after the command.
Let's look at the most important ones for our purposes:
-a(all): Displays all active connections and all the listening ports. Without this,netstatonly shows established connections.-n(numeric): Displays IP addresses and port numbers numerically. By default,netstattries to resolve IPs and ports to friendly names (e.g.,https-instead of443). Using-nmakes the command run much faster because it skips this name resolution step.-o(owner): This is one of the most useful switches for security analysis. It adds a column to the output showing the Process ID (PID) of the program that "owns" each connection.
Let's return to the PowerCert video to see some of these switches in action.
Continue watching from where you left off: First, see how the -n switch works and why it's faster: numeric output. Then, understand what the -a switch adds to the output: all connections.
(Note: The video also mentions the -b switch, which tries to show the executable name directly. While useful, it can be slow and requires administrator privileges. The -o switch is often more efficient for analysis, as we'll see next.)
Your Turn: From Connection to Process
Now it's time to put this all together in a practical workflow. The command netstat -ano is a favorite among system administrators and security professionals because it combines the most useful switches: show all connections, in numeric form, with the owner PID.
Once you have the PID, you can use the Windows Task Manager to find the exact program associated with it. This is how you can investigate a suspicious connection and determine if it's coming from a legitimate application (like your web browser) or something malicious.
This document provides a step-by-step guide for doing exactly that.
[PDF] Windows Command Line Tools Introduction - CybersecurityHoy
This guide from CybersecurityHoy provides a detailed, practical exercise on using netstat and the Task Manager together on a Windows system.
Please read and follow the instructions in Task 1. Focus on these steps: First, run netstat on its own as shown in Step 1. Next, run netstat -a as shown in Step 2 and notice the new LISTENING entries. Now, run the combined command netstat -ano as described in the end of Step 3. Finally, perform the crucial step of linking a PID to a process using the Task Manager, as detailed in Step 4. Try this with a PID from your own netstat -ano output.
By completing this exercise, you've performed a fundamental security analysis task: you've identified a network connection and traced it back to its source application on your computer.

Conclusion
Today, you've added a vital tool for internal reconnaissance to your skillset. You now know how to inspect your own machine's network activity, a fundamental step in both securing a system and understanding how it communicates.
Key Takeaways:
netstatis a command-line tool for viewing your computer's network statistics, including active connections and listening ports.- Connection states like
ESTABLISHEDandLISTENINGtell you if a connection is active or if a service is waiting for one. - Switches like
-a(all),-n(numeric), and-o(owner PID) are essential for getting a complete and useful picture of network activity. - The
netstat -anocommand combined with the Windows Task Manager allows you to trace any network connection back to the specific program that created it.
So far, all the tools we've used—ping, tracert, nslookup, and netstat—are built into your Windows operating system. However, the world of professional ethical hacking relies heavily on specialized Linux distributions. In our next lesson, we will begin setting up your personal hacking lab by installing virtualization software, the first step toward running Kali Linux safely on your machine.