Hello! Welcome back to your course on Go.
In our last lesson, you learned how to structure a reusable, professional API client package. This is a foundational skill for building any serious tooling. We focused on organizing code into services, using functional options for configuration, and abstracting request logic into a helper method.
Today, we'll extend the capabilities of our HTTP client to handle one of the most common tasks in DevOps automation: file transfers. This lesson is all about how to handle file downloads and uploads over HTTP. Whether you're pulling build artifacts from a repository, uploading a configuration file to a service, or sending a diagnostics bundle to an analysis tool, the patterns you'll learn today are essential.
We will cover:
- Efficiently downloading large files by streaming data directly to disk.
- Understanding and implementing
multipart/form-datauploads. - Building both the client-side and server-side logic for file transfers using Go's standard library.
1. Efficient File Downloads
Let's start with the simpler case: downloading a file. A common mistake is to read the entire file into memory before writing it to disk. This can easily crash your application when dealing with large files, which is a frequent scenario in DevOps (e.g., downloading logs, database backups, or container images).
The idiomatic and memory-efficient way to handle this in Go is to stream the data. We'll use the io.Copy function, which reads from a source (io.Reader) and writes to a destination (io.Writer) in chunks, using a small, fixed-size buffer. This keeps memory usage low and constant, regardless of the file size.
The process is straightforward:
- Make an HTTP
GETrequest to the file's URL. - The response body,
resp.Body, is anio.Reader. - Create a local file using
os.Create. This file is anio.Writer. - Use
io.Copyto stream the contents fromresp.Bodydirectly into the file.
How can I efficiently download a large file using Go?
This Stack Overflow answer provides a concise and complete example of this pattern. It's a perfect illustration of Go's philosophy of composing simple interfaces.
Read the first two answers on the page. The first one shows the core io.Copy pattern, and the second one wraps it in a robust downloadFile function with error handling.
Here's the code from the resource, which is an excellent template for a download utility function:
package main

import (
    "fmt"
    "io"
    "net/http"
    "os"
)

func downloadFile(filepath string, url string) error {
    // Create the file
    out, err := os.Create(filepath)
    if err != nil {
        return err
    }
    defer out.Close()

    // Get the data
    resp, err := http.Get(url)
    if err != nil {
        return err
    }
    defer resp.Body.Close()

    // Check server response
    if resp.StatusCode != http.StatusOK {
        return fmt.Errorf("bad status: %s", resp.Status)
    }

    // Write the body to file
    _, err = io.Copy(out, resp.Body)
    if err != nil {
        return err
    }

    return nil
}
This function is a solid building block you can integrate into your API client. For example, you could add a DownloadReleaseAsset(assetID, destinationPath) method to a GitHubService that uses this logic.
Adding a Progress Indicator (Optional but Recommended)
For large downloads, providing feedback to the user is crucial. We can extend the streaming pattern to include a progress bar. This is achieved by wrapping the resp.Body reader in our own custom struct that updates a progress counter on every Read operation.
How can I efficiently download a large file using Go?
The third answer on the same Stack Overflow page demonstrates a very elegant way to implement a progress indicator. We'll focus on the second version presented in that answer.
Scroll down to the answer by 'tenxsoydev'. Read the second example, which defines a ProgressReader struct. Notice how it embeds an io.Reader and implements the Read method to track progress. This is a powerful composition pattern in Go.
This ProgressReader approach is clean and reusable, as you can wrap any io.Reader with it to monitor progress, not just HTTP response bodies.
2. File Uploads with Multipart Forms
Uploading files is more involved because the client is responsible for constructing the HTTP request body in a specific format: multipart/form-data.
This format allows a single HTTP request to carry multiple "parts," each with its own headers and content. This is how web forms can send both text fields (like a file description) and file data in one submission.
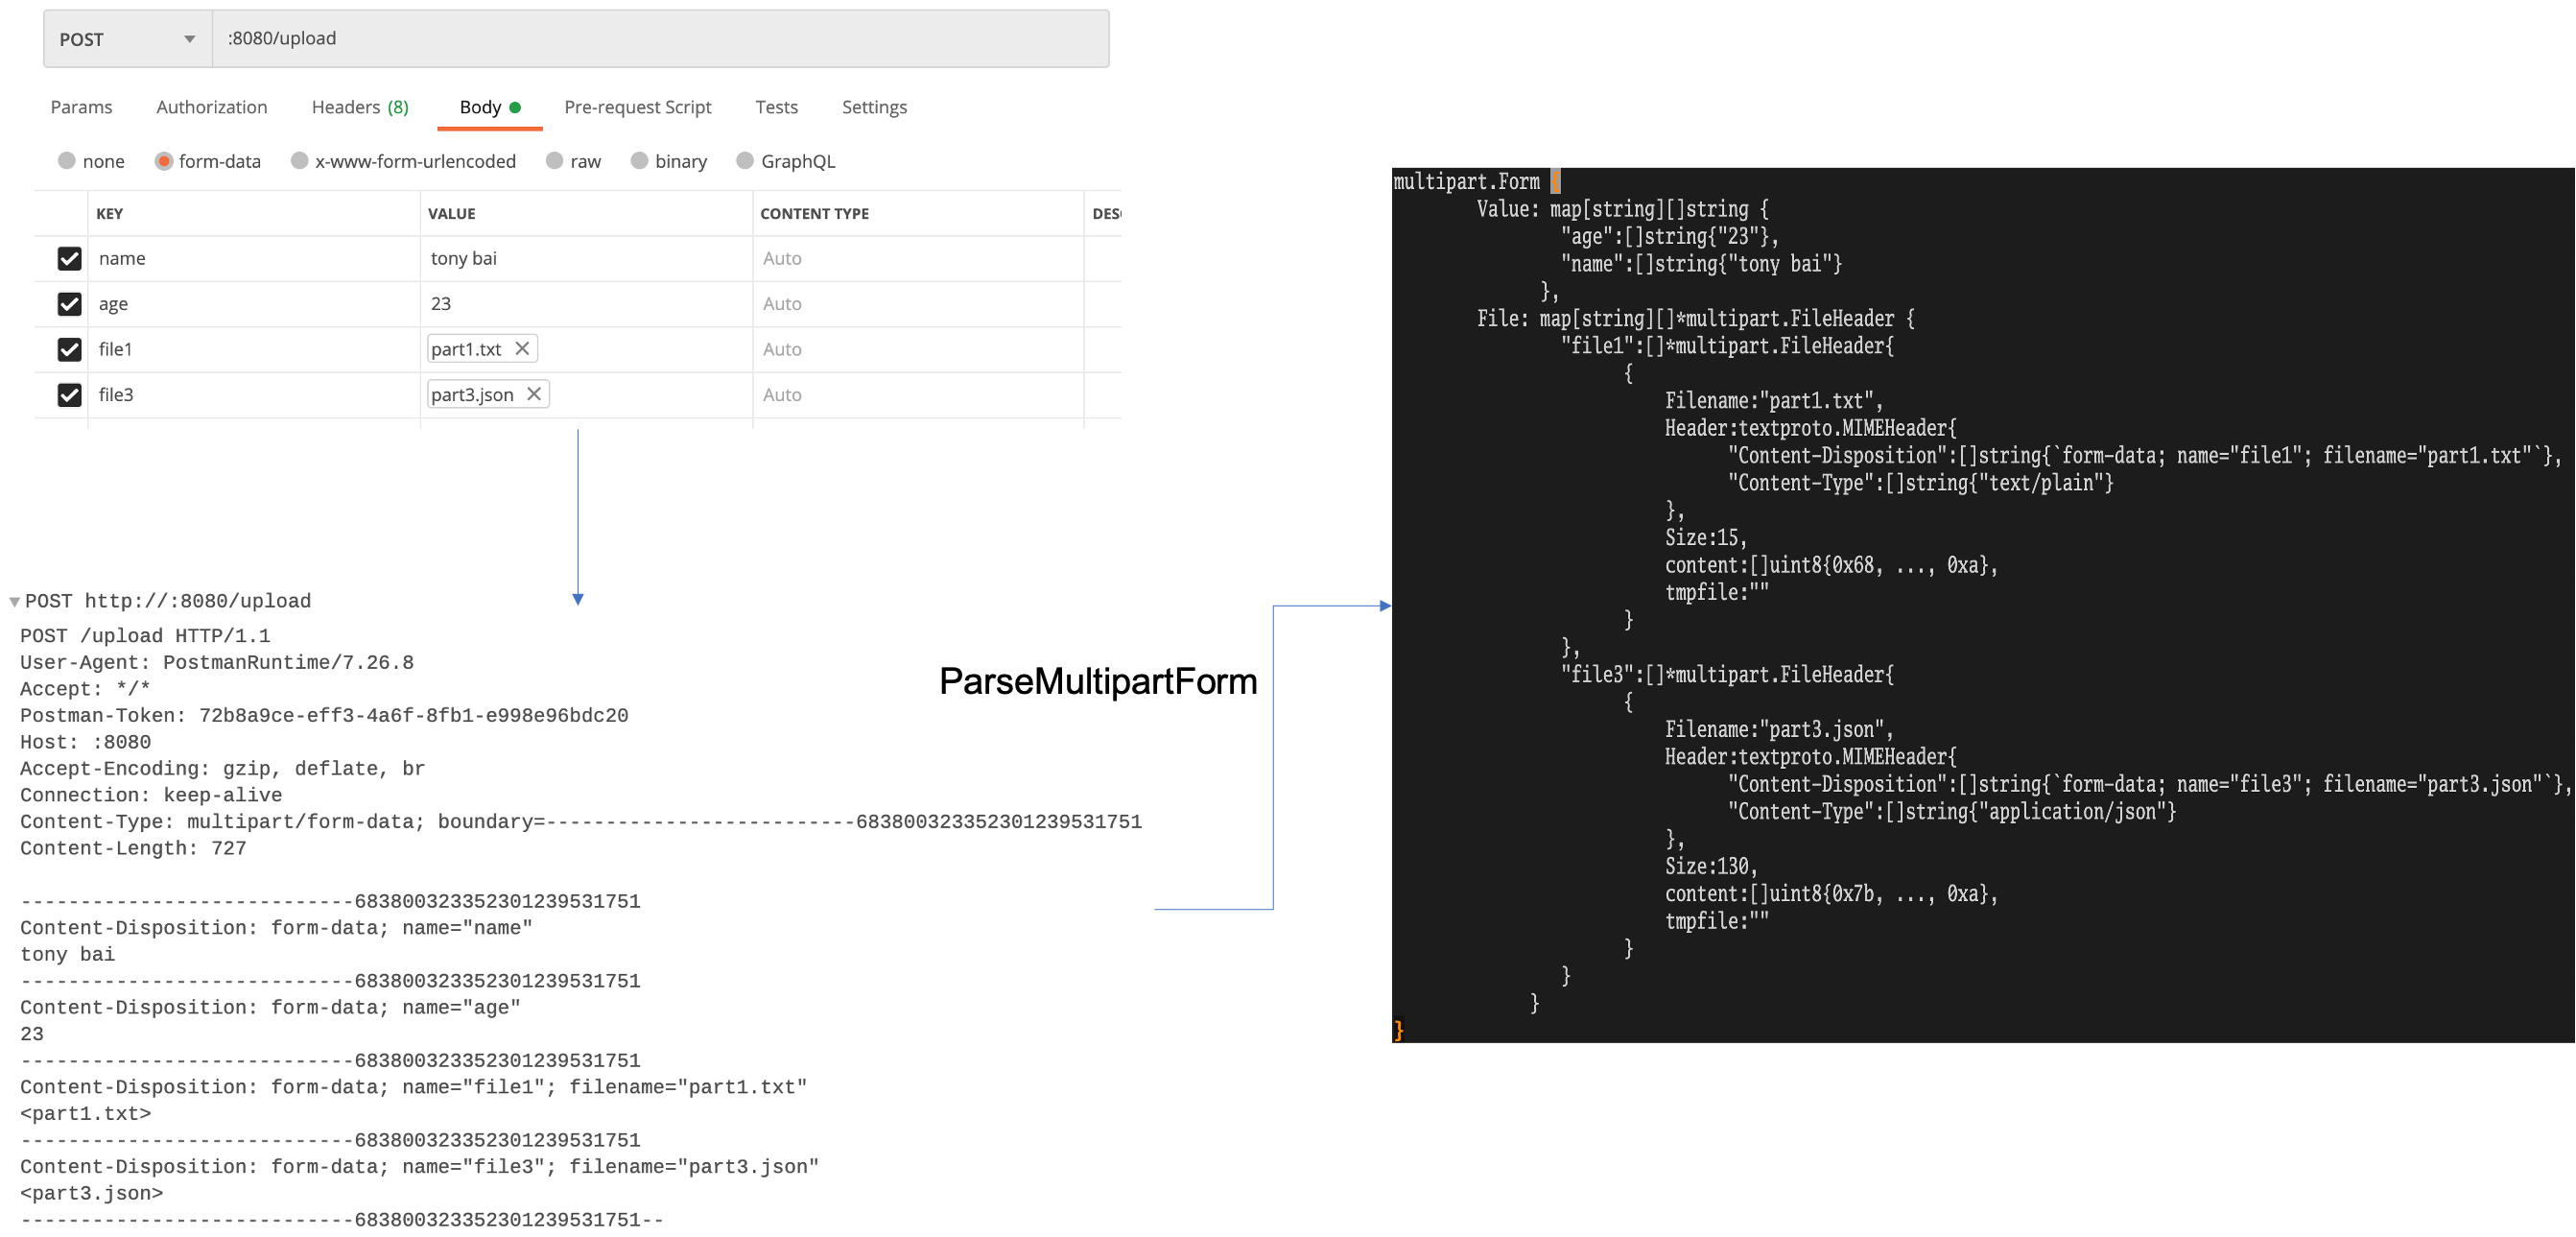
Go's standard library provides the mime/multipart package to handle the complexity of creating these requests for us.
Client-Side: Building the Upload Request
Let's build a function that creates a file upload request. The key steps are:
- Create a
bytes.Bufferwhich will act as our in-memory request body. - Create a
multipart.NewWriterthat writes to this buffer. This writer will generate the correct boundaries and headers for each part. - Use
writer.CreateFormFileto add a file part. This returns anio.Writer. io.Copythe contents of your local file into the file part writer.- Use
writer.WriteFieldto add any other regular form fields (e.g., metadata). - Close the
multipart.Writer. This is essential as it writes the final boundary marker to the buffer. - Create a new
http.Request, using the buffer as the request body. - Set the
Content-Typeheader on the request usingwriter.FormDataContentType(). This special function returns the content type string, including the unique boundary the writer generated.
golang multipart file upload example - Matt Aimonetti
This blog post by Matt Aimonetti provides a fantastic, self-contained example of a function that constructs a multipart file upload request. It's a perfect reference for client-side implementation.
Read the post, focusing on the newfileUploadRequest function and the explanations that follow. Pay close attention to: How multipart.NewWriter is initialized with a bytes.Buffer. The use of writer.CreateFormFile and io.Copy to add the file. How writer.WriteField is used for extra parameters. The crucial final steps: writer.Close() and setting the Content-Type header with writer.FormDataContentType().
This pattern is exactly what you would use to implement a method like UploadArtifact(buildID, filePath) in an API client for a CI/CD system.
Test your understanding!
In the newfileUploadRequest function from the blog post, why is it critical to call writer.Close() before creating the http.Request? And why is writer.FormDataContentType() used instead of just setting the header to "multipart/form-data"?
Show answer
-
writer.Close(): This function is responsible for writing the final boundary marker (--boundary--) to the underlying buffer. Without this marker, the server receiving the request wouldn't know where the request body ends, and the request would be considered malformed and incomplete. -
writer.FormDataContentType(): Themultipart/form-dataspecification requires aboundaryparameter in theContent-Typeheader to separate the different parts of the request. For example:Content-Type: multipart/form-data; boundary=--.... This boundary string must be unique and not appear in the content of the data itself. Themultipart.Writergenerates a random, unique boundary when it's created.writer.FormDataContentType()returns the full header value including this unique boundary, ensuring the server can correctly parse the request. Simply using"multipart/form-data"would be missing this essential boundary parameter.
Server-Side: Handling the Upload
While your main goal is building client tools, understanding how a server handles uploads completes the picture. This is also useful if you ever need to build a webhook receiver or a simple internal service that accepts files.
#64 Golang - Multipart Upload Using net/http
This video provides a clear, step-by-step guide to creating a Go server that handles multipart file uploads. Watching this will help you understand what happens on the other side of your client's request.
Watch the segment from 04:30 to 07:42. Focus on these key server-side functions: r.ParseMultipartForm(maxMemory): How the server parses the incoming form data and the role of the memory limit. r.FormFile("file"): How to access the uploaded file's data and metadata (like the filename). os.Create and io.Copy: The same streaming pattern we saw for downloads is used here to save the uploaded file to the server's disk.
As you saw in the video, the server-side logic mirrors the client-side logic. The server parses the multipart body that the client carefully constructed and uses the same efficient io.Copy technique to handle the file data.
Conclusion
You now have the tools to handle two of the most fundamental HTTP interactions for DevOps automation. By leveraging Go's standard library, particularly the io and mime/multipart packages, you can build robust and memory-efficient file transfer capabilities into your applications.
Key Takeaways:
- Stream, Don't Load: Always use
io.Copyto handle file transfers over HTTP. This keeps memory usage low and is essential for dealing with large files. - Downloading is
io.Copyfromresp.Bodyto a file. It's a simple, powerful pattern for getting data. - Uploading is
io.Copyfrom a file into amultipart.Writer. Themime/multipartpackage handles the complex formatting, but you need to orchestrate the process. - Content-Type is Key for Uploads: You must set the
Content-Typeheader usingwriter.FormDataContentType()to include the unique boundary string required for multipart requests.
Next Up
You've learned how to build reusable API clients and how to give them file-handling superpowers. But how does a user interact with this logic? In the next lesson, we will start building the user-facing part of our tools. You will learn how to parse command-line flags and arguments using the flag package, which is the first step in creating powerful and configurable command-line applications in Go.