Hello! Welcome back to your Go course.
In the last few lessons, we've focused on how Go applications act as clients to interact with web services. You learned how to build a reusable API client and how to use it to download and upload files—essential skills for any automation tool.
Today, we're flipping the script. Instead of being the client that makes requests, you'll learn how to build the server that receives and handles them. This lesson is dedicated to achieving the learning outcome: Create an HTTP server using the net/http package to handle incoming requests.
Building HTTP services is a cornerstone of modern backend and DevOps engineering. Whether you're creating a webhook receiver for CI/CD events, an endpoint to expose application metrics, or a simple API for an internal tool, the concepts you'll learn today are fundamental.
We'll cover:
- The core components of an HTTP server in Go.
- How to write a basic "Hello, World!" server from scratch.
- How to handle different HTTP methods (like GET and POST).
- How to configure a more robust, production-ready server.
1. The Anatomy of a Go Web Server
Before writing code, let's understand the main players involved in handling an HTTP request in Go. The standard library's net/http package is built on a few simple, composable concepts.
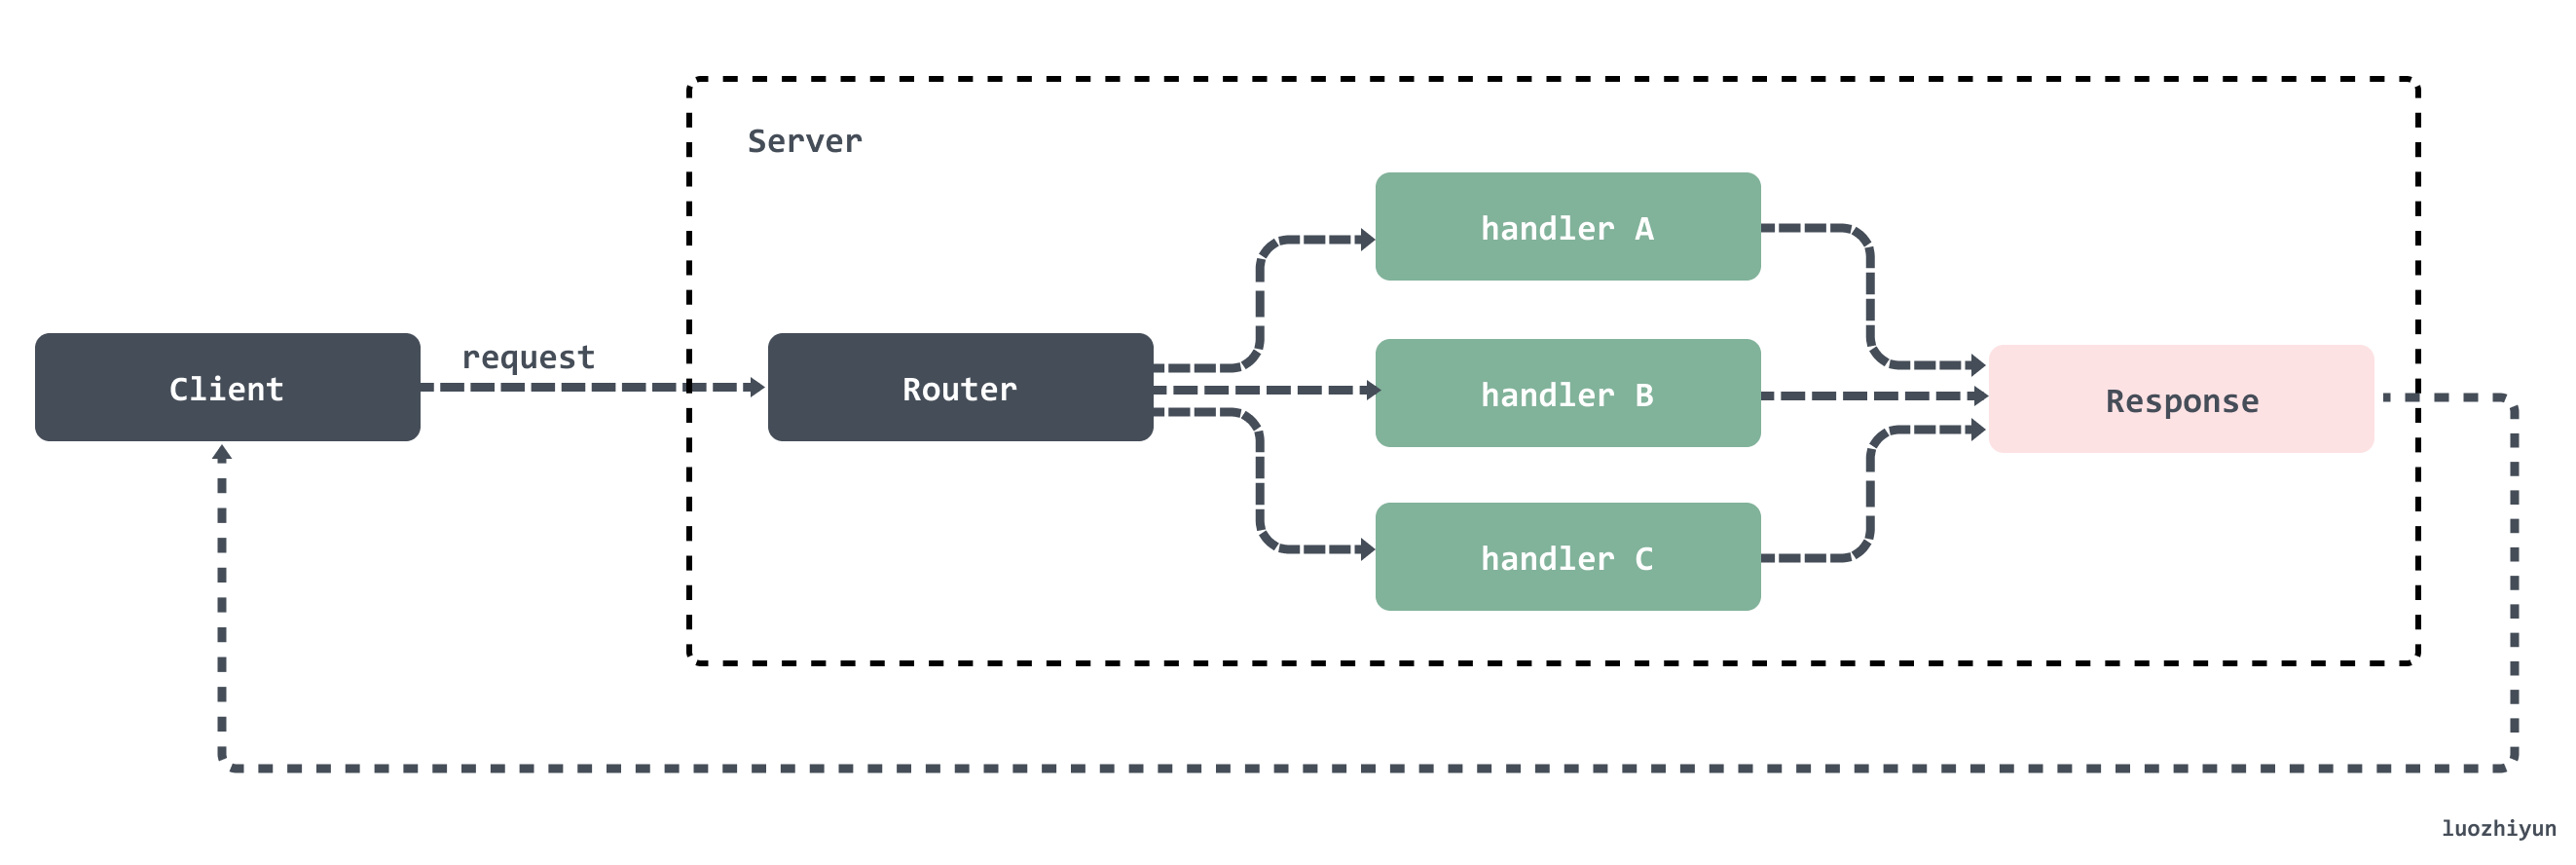
To start, let's get familiar with the key terminology.
Go Web Servers - Native net/http vs. Gin Framework
The article 'Go Web Servers - Native net/http vs. Gin Framework' by Leapcell provides an excellent summary of the core concepts. Understanding these terms is the first step.
Read the 'Core Concepts' section. Focus on the definitions of the HTTP Request/Response Cycle, Routing, and Middleware.
Based on that reading, here are the three primary components you'll be working with from the net/http package:
- Handler: A handler is a function responsible for processing a request and generating a response. In Go, any type that implements the
http.Handlerinterface (which has a single method,ServeHTTP(w http.ResponseWriter, r *http.Request)) is a handler.http.ResponseWriteris used to build and send the response, while*http.Requestcontains all the information about the incoming request. - ServeMux (Router): Often called a router or multiplexer,
ServeMuxis like a traffic cop. Its job is to look at the URL path of an incoming request and direct it to the correct handler. You register patterns (like/helloor/status) and associate them with specific handlers. - Server: This is the component that listens for incoming TCP connections on a specific network address (like
:8080) and passes the requests to theServeMux. The simplest way to start a server is with thehttp.ListenAndServefunction.
2. Building Your First HTTP Server
With the components understood, let's build a simple server that responds with "Hello, World!". This practical exercise will show you how the handler, mux, and server work together.
DIY Golang Web Server: No Dependencies Needed!
The video 'DIY Golang Web Server' by Flo Woelki provides a clear, from-scratch demonstration of building a basic server. It's a great way to see these concepts in action.
Watch the segment from 01:13 to 05:40. Pay close attention to these steps: Creating a ServeMux with http.NewServeMux(). Defining a handler function and understanding its parameters (w and r). Registering the handler with mux.HandleFunc(). Starting the server with http.ListenAndServe().
Let's consolidate what you just saw into a complete program. Create a new directory, run go mod init <your-module-name>, and create a main.go file with the following code.
package main

import (
	"fmt"
	"log"
	"net/http"
)

// helloHandler handles requests to the "/hello" path.
func helloHandler(w http.ResponseWriter, r *http.Request) {
	// r.URL.Path contains the path from the request.
	// We check it to make sure we don't accidentally handle other paths.
	if r.URL.Path != "/hello" {
		http.NotFound(w, r)
		return
	}
	// Fprintf writes a formatted string to a writer.
	// The http.ResponseWriter is an io.Writer.
	fmt.Fprintf(w, "Hello, World!")
}

func main() {
	// Create a new ServeMux (router).
	mux := http.NewServeMux()

	// Register the handler function for the "/hello" path.
	mux.HandleFunc("/hello", helloHandler)

	fmt.Println("Starting server on port 8080...")

	// Start the HTTP server on port 8080, using our mux as the handler.
	// ListenAndServe blocks until the server is stopped, so it's usually the last call in main.
	// It will return an error if the server fails to start (e.g., port is already in use).
	err := http.ListenAndServe(":8080", mux)
	if err != nil {
		log.Fatalf("Server failed to start: %v", err)
	}
}
Run this program with go run .. Now you can send a request to your server! Open a new terminal and use curl:
curl http://localhost:8080/hello
# Output: Hello, World!
You've just built and run your first Go web server!

3. Handling Specific HTTP Methods
Our current server responds to any HTTP method (GET, POST, etc.) at the /hello path. In real-world applications, you need to be more specific. For example, a GET /users request should list users, while a POST /users request should create a new one.
As of Go 1.22, the standard ServeMux makes this very easy by allowing you to specify the HTTP method directly in the path pattern.
The standard library now has all you need for advanced routing in Go.
The video 'The standard library now has all you need for advanced routing' by Dreams of Code explains this modern feature clearly.
Watch the section from 01:58 to 03:45. It demonstrates how to prefix a route pattern with an HTTP method like GET or POST to create method-specific handlers.
Let's modify our server to have different behavior for GET and POST requests on a /task endpoint.
package main

import (
	"fmt"
	"log"
	"net/http"
)

func getTaskHandler(w http.ResponseWriter, r *http.Request) {
	fmt.Fprintf(w, "Received a GET request for a task.")
}

func postTaskHandler(w http.ResponseWriter, r *http.Request) {
	fmt.Fprintf(w, "Received a POST request to create a task.")
}

func main() {
	mux := http.NewServeMux()

	// This handler only responds to GET requests at "/task".
	mux.HandleFunc("GET /task", getTaskHandler)

	// This handler only responds to POST requests at "/task".
	mux.HandleFunc("POST /task", postTaskHandler)

	fmt.Println("Starting server on port 8080...")
	err := http.ListenAndServe(":8080", mux)
	if err != nil {
		log.Fatalf("Server failed to start: %v", err)
	}
}
Run this new version and try making different requests with curl:
# Make a GET request
curl http://localhost:8080/task
# Output: Received a GET request for a task.

# Make a POST request
curl -X POST http://localhost:8080/task
# Output: Received a POST request to create a task.

# Try a different method, like PUT
curl -X PUT http://localhost:8080/task
# Output: Method Not Allowed
As you can see, the ServeMux automatically handles requests with un-registered methods by sending a 405 Method Not Allowed response. This is incredibly useful for building correct and secure APIs.
Test your understanding!
Imagine you have a single handler function, healthCheckHandler, that should respond to requests at /healthz. For compliance reasons, this endpoint must only accept GET requests. How would you register this handler with a ServeMux named mux?
Show answer
You would register it by prefixing the path with the GET method:
mux.HandleFunc("GET /healthz", healthCheckHandler)
This ensures that any other method (like POST, PUT, etc.) sent to /healthz will automatically receive a 405 Method Not Allowed error.
4. Creating a Production-Ready Server
The http.ListenAndServe function is convenient, but for production applications, you need more control. For example, you should always configure timeouts to prevent slow or malicious clients from hogging server resources.
To do this, you create an http.Server struct manually. This gives you fine-grained control over its behavior.
Building High-Performance HTTP Servers with Go's net/http
The article 'Building High-Performance HTTP Servers with Go's net/http' dives into these more advanced configurations. It's highly relevant to your work as a DevOps engineer building robust services.
Read the subsection 'Server Configuration: Fine-Tuning Performance'. Pay close attention to the purpose of ReadTimeout and WriteTimeout, and see the code example for setting up an http.Server struct.
Here's a practical example that applies these concepts. We'll configure our server with sensible timeouts.
package main

import (
	"fmt"
	"log"
	"net/http"
	"time"
)

func handler(w http.ResponseWriter, r *http.Request) {
	fmt.Fprintf(w, "Server is configured with timeouts!")
}

func main() {
	mux := http.NewServeMux()
	mux.HandleFunc("/", handler)

	// Manually configure the server for more control.
	server := &http.Server{
		Addr:    ":8080",
		Handler: mux,
		// Protects against slow clients reading the request body.
		ReadTimeout: 5 * time.Second,
		// Protects against slow clients accepting the response.
		WriteTimeout: 10 * time.Second,
		// Max time for the next request on a keep-alive connection.
		IdleTimeout: 120 * time.Second,
	}

	fmt.Println("Starting a configured server on port 8080...")

	// Call the ListenAndServe method on our configured server object.
	err := server.ListenAndServe()
	if err != nil {
		log.Fatalf("Server failed to start: %v", err)
	}
}
This configuration makes your server much more resilient. You've now moved from a simple example to a pattern that's suitable for production. The code from the resource also shows how to implement a graceful shutdown, which allows the server to finish handling active requests before it exits. We will explore the mechanisms behind that (channels and context) in more detail later in the course.
Conclusion
In this lesson, you took a major step from being a consumer of APIs to a producer of them. You learned how to build, run, and configure a robust HTTP server using only Go's powerful standard library.
Key Takeaways:
- A Go HTTP server is built from three core components: the Handler (logic), the ServeMux (router), and the Server (listener).
- You can create a basic server quickly with
http.ListenAndServe, which is great for simple tools and testing. - For production systems, you should manually configure an
http.Serverstruct to set crucial parameters likeReadTimeoutandWriteTimeout. - As of Go 1.22, you can easily create method-specific handlers (e.g.,
GET /path) directly with the standardServeMux.
Next Up
You now know how to create handlers for specific URL paths. However, real-world APIs often need more complex routing logic, like handling path parameters (e.g., /users/123) or grouping related routes together. In the next lesson, we will explore request routing in more depth, looking at advanced http.ServeMux patterns and when it might be time to use a popular third-party router.