Здравствуйте!
In our last lesson, you successfully mastered the full Russian cursive alphabet, learning how to connect letters to write complete words. This was a major step in developing your ability to produce written Russian by hand.
Today, we transition from the analog to the digital world. The goal of this lesson is to learn how to type in Russian using a standard phonetic or mnemonic keyboard layout. This is an essential skill for modern communication, whether you're chatting with friends, searching for information online, or even playing Russian video games. We'll cover how to set up your computer for Russian typing and then dive into some excellent tools for practice.
1. Understanding Russian Keyboard Layouts
When you add a Russian keyboard to your computer, you typically have two choices: the standard layout and the phonetic layout.
- Standard Layout (ЙЦУКЕН): This is the equivalent of the English QWERTY keyboard in Russia. The letters are arranged based on their frequency in the Russian language. It's efficient for native speakers but requires a lot of memorization for learners.
- Phonetic/Mnemonic Layout: This layout is designed for people who are already familiar with a QWERTY keyboard. It maps Russian letters to English keys that have a similar sound. For example, you press the 'D' key to get 'Д' (d), and the 'F' key to get 'Ф' (f).
For learning, the phonetic layout is by far the most practical and intuitive choice. It allows you to start typing immediately by leveraging your existing muscle memory.
Take a look at these two examples of phonetic layouts. The first is a general phonetic layout, and the second shows the specific "Mnemonic" layout option in Windows.

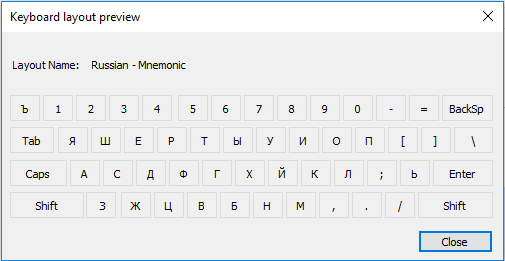
To get a bit more context on these different layouts, please read the following brief introduction.
Russian Keyboard: Cyrillic Layout and How It Works
This article from Remitly provides a great overview of the different Russian keyboard layouts and why a phonetic layout is a good starting point for learners.
Please read the first part of the article, from the beginning down to the table of Cyrillic and Latin letters (you can stop before the table). Focus on understanding the difference between the standard ЙЦУКЕН layout and the phonetic alternative.
2. Setting Up Your Russian Keyboard
Now, let's get your computer set up. The process involves adding the Russian language to your system's keyboard settings. The crucial step is to select the phonetic or mnemonic layout, not the standard one.
The article you just looked at also contains clear, step-by-step instructions for Windows, Mac, and Android.
Russian Keyboard: Cyrillic Layout and How It Works
It's time to install the keyboard. This next section of the Remitly article will guide you through the process for your specific device.
Follow the instructions in the section titled 'Adding a Russian Keyboard to Your Devices'. The table provides steps for Windows, Mac, and Android. When you add the Russian language, make sure to look for and select the 'Phonetic' or 'Mnemonic' layout option.
After adding the layout, you should see a language icon in your taskbar (Windows) or menu bar (Mac). You can click this to switch between English and Russian, or use the default shortcut (commonly Alt + Shift on Windows or Ctrl + Space on Mac).
3. Let's Start Typing!
With the keyboard installed, it's time for practice. At first, you might need to "hunt and peck" for a few letters whose positions aren't immediately obvious (like 'ж' for 'zh' or 'я' for 'ya'), but you'll build speed quickly.
Here are a few words to try typing. Notice how the phonetic mapping works.
- Привет (Privet - Hello):
P-r-i-v-e-t - Россия (Rossiya - Russia):
R-o-s-s-i-ya - Игра (Igra - Game):
I-g-r-a - Химия (Khimiya - Chemistry):
K-h-i-m-i-ya - Компьютер (Komp'yuter - Computer):
K-o-m-p-'-y-u-t-e-r(The soft sign 'ь' is often on the 'X' or
To build real typing fluency, you'll need consistent practice. Fortunately, there are some great free websites for this.
5 Handy Russian Typing Practice Sites
This article from FluentU reviews several excellent Russian typing practice sites. I've selected a few that I think you'll find most useful.
Read the descriptions for the first three sites: 10FastFingers: Great for quick, one-minute drills to track your words-per-minute (WPM) progress. Keybr: Excellent for beginners. It uses an algorithm to give you lessons that focus on the letters you struggle with most. Klavogonki: A fun, gamified option where you compete in typing races against others. Given your interest in video games, you might really enjoy this one! The site is entirely in Russian, which also provides a nice immersion challenge.
Your Practice Task:
- Go to Keybr.
- Click the settings icon (gear), go to "Keyboard Layout," and change the language to Russian.
- Spend about 10-15 minutes completing the lessons. The site will adapt to your performance and help you practice the specific letters you need to work on.
This initial practice will help solidify the key mappings in your mind and begin building the muscle memory for touch-typing in Russian.
Conclusion
Excellent work today! You've bridged the gap from handwritten script to digital text, a crucial step for using Russian in the modern world.
Key Takeaways:
- For learners, the phonetic/mnemonic keyboard layout is the most efficient way to start typing in Russian.
- You can easily add a Russian keyboard to any Windows, Mac, or mobile device through its language settings.
- Websites like Keybr, 10FastFingers, and Klavogonki offer powerful and engaging ways to practice your typing speed and accuracy.
In our next lesson, we will tackle the final core skill of this foundational module: reading simple Russian words aloud with correct stress placement. Proper stress is the key to being understood and sounding natural in Russian, and it will tie together all the pronunciation work we've done so far.