Introduction
Welcome to the second and final capstone project of this course: Building a Recruitment Pipeline Report. In your previous role as a Global Recruitment Consultant, you supported hiring processes and handled candidate data. This capstone will allow you to leverage that experience to build a powerful MIS tool from the ground up, showcasing skills directly relevant to your career goal.
In the last lesson, you practiced the final step of the MIS workflow: preparing a weekly summary report based on an existing dashboard. You learned how to refresh data, analyze the output, and communicate key insights.
Today, we'll tackle the first, and often most time-consuming, part of that process: data consolidation. Your learning outcome is to consolidate candidate data from multiple source files into a single master tracker using Power Query. Imagine receiving separate weekly reports from different recruiters; instead of manually copying and pasting, you will build an automated system that combines them all with a single click. This powerful automation is a core skill for any MIS Executive.
1. The Challenge: Manual Consolidation vs. Automation
In many companies, data is fragmented. For a recruitment process, you might have one Excel file for each recruiter, or perhaps one for each week. Your job as an MIS analyst is to bring all this data together into a single, unified view—a "single source of truth."
Manually copying and pasting this data is not only tedious but also highly prone to errors. A missed file or a copy-paste mistake can corrupt your entire analysis. This is where Power Query comes in.
Power Query (found under the Data tab in Excel as "Get & Transform Data") is a tool designed specifically for connecting to, cleaning, and combining data from various sources. For our task, we'll use its ability to import all files from a specific folder.
Let's begin by watching a video that provides a complete overview of this process. We will then break it down and apply it to our recruitment scenario.
Easiest way to COMBINE Multiple Excel Files into ONE (Append data from Folder)
This video by Leila Gharani on YouTube is one of the clearest guides to combining Excel files. It demonstrates the entire process, from connecting to a folder to cleaning up messy data and loading it back into Excel.
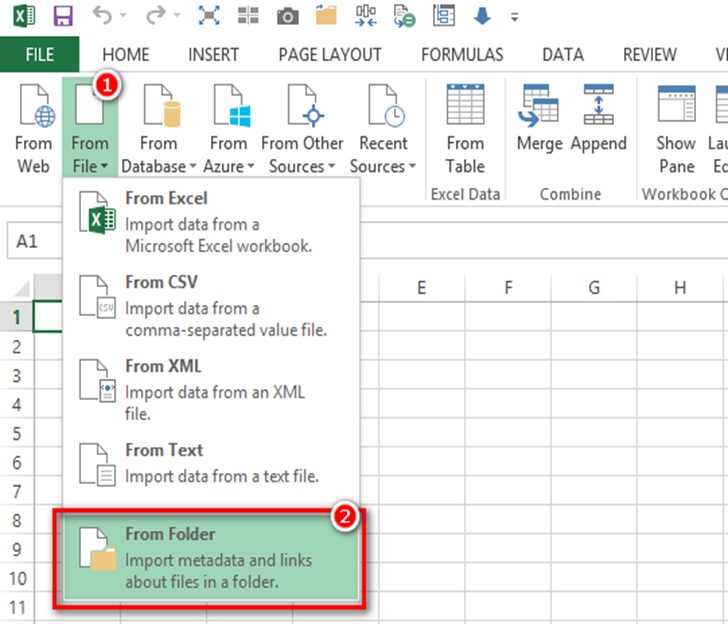
Watch the first four minutes of the video (from 01:28 to 04:23). Pay close attention to these key steps: Navigating to Data > Get Data > From File > From Folder. Using the 'Transform Data' option to open the Power Query Editor. Filtering the file list if needed. Clicking the 'Combine Files' button (the double-down arrow) to start the process.
2. The Power Query Process: A Step-by-Step Guide
As you saw in the video, Power Query guides you through the consolidation process. After you select your folder and click 'Combine', Power Query presents a dialog box where you specify what to combine from each file.
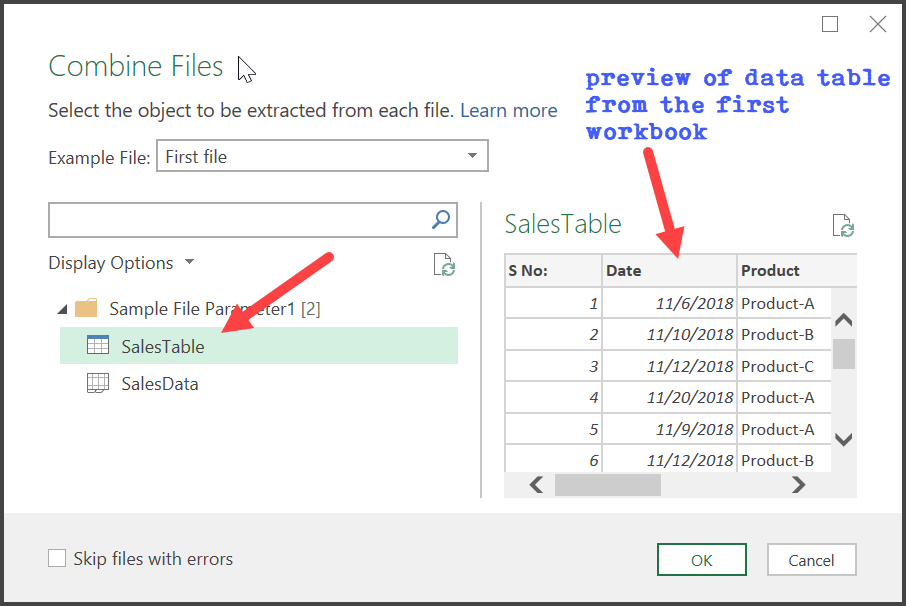
Once you confirm your selection, Power Query automatically generates a set of queries. The two most important ones are:
- The Final Query (often named after your folder): This is where the combined data from all files will end up.
- Transform Sample File: This is a special query that acts as a template. Any cleaning or transformation steps you apply here will be automatically applied to every single file before they are combined.
This concept is crucial. If your source files are messy (e.g., have extra rows at the top, or inconsistent formatting), you should perform the cleanup in the Transform Sample File query. This ensures every file is cleaned in exactly the same way before being appended together.
3. Your Turn: Consolidate Recruitment Data
It's time for you to apply this process. We'll simulate a scenario where three recruiters—Anna, Ben, and Chloe, who you'll remember from our incident management project—submit their weekly candidate tracking files.
Step 1: Create the Source Files
First, you need to create the data files that you will consolidate.
-
On your computer's Desktop, create a new folder named Recruitment_Data.
-
Open a new, blank Excel workbook.
-
Copy the data below and paste it into the worksheet, starting at cell A1.
Recruiter: Anna
Candidate ID Candidate Name Role Applied For Current Stage Application Date CAND-001 Priya Sharma Data Analyst Phone Screen 2024-10-21 CAND-002 Rohan Mehta Jr. Project Manager Technical Test 2024-10-22 CAND-003 Aisha Khan Data Analyst Offer 2024-10-22 -
Save this file inside the Recruitment_Data folder with the name
Anna_Week45.xlsx. Close the file. -
Repeat this process for the next two recruiters, creating two more separate Excel files in the same folder.
Recruiter: Ben
Candidate ID Candidate Name Role Applied For Current Stage Application Date CAND-004 Liam Wilson Data Analyst Applied 2024-10-23 CAND-005 Olivia Chen UI/UX Designer Hired 2024-10-21 Save this file as
Ben_Week45.xlsxin the Recruitment_Data folder.Recruiter: Chloe
Candidate ID Candidate Name Role Applied For Current Stage Application Date CAND-006 Kenji Tanaka Jr. Project Manager Technical Test 2024-10-24 CAND-007 Fatima Al-Jamil Data Analyst Phone Screen 2024-10-23 Save this file as
Chloe_Week45.xlsxin the Recruitment_Data folder.
You should now have a folder named Recruitment_Data containing three Excel files. Notice that each file has a title ("Recruiter: Anna", etc.) in the first row, with the actual table headers starting in the second row. This is the "messy" data we need to clean.
Step 2: Use Power Query to Combine and Clean
Now, open a new, blank Excel workbook. This will be your master file.
- Go to
Data > Get Data > From File > From Folder. - Browse to and select your Recruitment_Data folder. Click Open.
- In the preview window showing your three files, click Combine & Transform Data.
- In the 'Combine Files' dialog, select Sheet1 on the left. You will see a preview of the data from the first file, including the unwanted "Recruiter: Anna" title row. Click OK.
- The Power Query Editor will open. On the left side, in the Queries pane, you will see a folder-like group named Transform File from Recruitment_Data. Inside it, click on the Transform Sample File query.
This is where you will perform the cleaning.
Easiest way to COMBINE Multiple Excel Files into ONE (Append data from Folder)
Now, let's watch the part of Leila Gharani's video that shows exactly how to clean a sample file. Our data has similar issues (unwanted top rows, headers that need to be promoted).
Watch from 04:23 to 06:28. Follow along with the video to perform these steps in your own Power Query Editor within the Transform Sample File query: Remove Top Rows: Go to Home > Remove Rows > Remove Top Rows and enter 1 to remove the unwanted title row. Use First Row as Headers: Go to Home > Use First Row as Headers to promote the Candidate ID, Candidate Name, etc., row to be the column headers. Power Query might add an automatic 'Changed Type' step after promoting headers. You can leave it for now or remove it; we'll manage data types later.
After performing these two steps on the sample file, click on the main query (it will be named Recruitment_Data). You should now see a clean table with the data from all three files properly combined!
Step 3: Load the Data into Excel
Your data is ready. The final step is to load it into your Excel workbook.
- In the Power Query Editor, click the top half of the Close & Load button in the Home tab.
- This will create a new worksheet containing your consolidated data in a green-and-white Excel Table.
- Rename this new worksheet to MasterTracker.
You have successfully consolidated data from three separate files into one master tracker.
4. The Magic of Refresh
The real power of this method comes from its refreshability. What happens when a new file arrives?
-
Go back to your Recruitment_Data folder.
-
Create one more Excel file for a new recruiter, David.
Recruiter: David
Candidate ID Candidate Name Role Applied For Current Stage Application Date CAND-008 Sofia Garcia UI/UX Designer Applied 2024-10-25 Save this file as
David_Week45.xlsxin the Recruitment_Data folder. -
Now, go back to your master Excel file.
-
Right-click anywhere inside your
MasterTrackertable. -
Select Refresh.
Instantly, David's data appears at the bottom of the table. You don't need to repeat any of the previous steps. Power Query automatically applies the same cleaning rules to the new file and appends it to your master list. This one-click update is a cornerstone of efficient MIS reporting.
Combine multiple Excel files using Power Query [Full example + ...
For additional practice, the Chandoo.org article 'Combine multiple Excel files using Power Query' provides another excellent example and includes sample files you can download. It's a great way to reinforce what you've learned.
This is an optional but recommended read. Scroll down to the section 'Download sample files to practice this' to get more hands-on experience with a different dataset.
Conclusion
In this lesson, you mastered one of the most powerful features in Excel for an MIS role: using Power Query to consolidate data from multiple files. You learned how to:
- Connect to a folder of source files.
- Use the Transform Sample File to apply consistent cleaning rules (like removing top rows and promoting headers).
- Combine the cleaned data into a single master table.
- Refresh the entire dataset with a single click when new data is added.
By automating this data aggregation task, you eliminate hours of manual work and significantly reduce the risk of errors. This is a fundamental skill that allows you to build reliable, scalable, and efficient reporting systems.
In the next lesson, we will build upon this foundation. You will take the MasterTracker you've just created and enhance it by adding calculated columns to derive new business metrics, such as the time a candidate has spent in their current stage.