Introduction
Welcome to the final lesson of our module on hypertrophy programming. In our last session, we analyzed how a muscle's specific anatomical properties—its size, fiber type, and susceptibility to stretch—determine its recovery needs and inform our fatigue management strategies. We learned that managing fatigue is a cornerstone of sustainable progress.
Today, we address the other, equally critical pillar of training longevity. This lesson is designed to meet the learning outcome: Apply anatomical principles to select and modify exercises to minimize joint stress and injury risk.
While pushing muscles to their limits stimulates growth, our joints are the fulcrums upon which this work is done. If we neglect their health, our training careers will be short-lived. We will explore why "textbook form" is often a misleading concept and how to tailor movements to an individual's unique anatomical structure. This lesson will equip you with the principles to build robust, effective, and, most importantly, sustainable training programs for yourself and future clients.
1. The Myth of "Perfect Form": Respecting Individual Anatomy
A common pitfall in coaching is enforcing a single, "correct" way to perform an exercise. The reality is that optimal movement is not universal; it is dictated by an individual's unique anatomy. Factors like bone lengths, the shape of joint sockets, and inherent mobility limitations mean that what is a strong and safe position for one person may be stressful and injurious for another.
The first principle of injury risk reduction is to select and modify exercises to be congruent with the lifter's unique skeletal structure.
Workouts That WRECK Your Joints (I Wish I Knew This Sooner)
To see this principle in action, let's watch this segment from a video by Jeremy Ethier. He clearly demonstrates how individual anatomical differences in the squat and deadlift necessitate different movement strategies, and how ignoring this can lead to injury.
Watch the segment from 00:24 to 03:49. Pay close attention to the visual comparison of the two squatters and the explanation for why their forms differ. Also, note the practical advice on experimenting with stance and adjusting machines to fit your body.
As the video highlights, forcing a lifter with long femurs to squat with an upright torso is not only ineffective but potentially dangerous for their lower back. The goal is not to conform to an arbitrary standard but to find the execution that allows for stable, pain-free movement through a full range of motion.
2. The Physics of Joint Stress: Torque and Anatomical Levers
To understand why anatomical variations have such a profound impact on joint stress, we must revisit the concept of torque. As a reminder from Module 3, torque is the rotational force a load exerts on a joint. It's calculated as:
Where the lever arm (or moment arm) is the perpendicular distance from the joint (the fulcrum) to the line of action of the force. The longer the lever arm, the greater the torque a joint must withstand. Your individual limb and torso lengths are the primary determinants of these lever arms during an exercise.
Understanding Torque in Strength Training
The article 'Understanding Torque in Strength Training' by Christy Shaw provides a clear, practical explanation of these biomechanical principles. It breaks down how lever systems work in the human body and how limb lengths alter torque demands in key lifts.
Read Sections 1 through 4. Focus on: The definition of torque and levers (Section 1). The analysis of squats and deadlifts, noting how technique shifts torque between the hips and knees (Section 2). The critical explanation of how segment lengths (e.g., long vs. short femurs) predetermine squat and deadlift mechanics (Section 3). How manipulating the lever arm changes exercise difficulty (Section 4).
This mechanical reality is why some people are built to squat and others are built to deadlift. It's not a matter of effort, but of leverage.
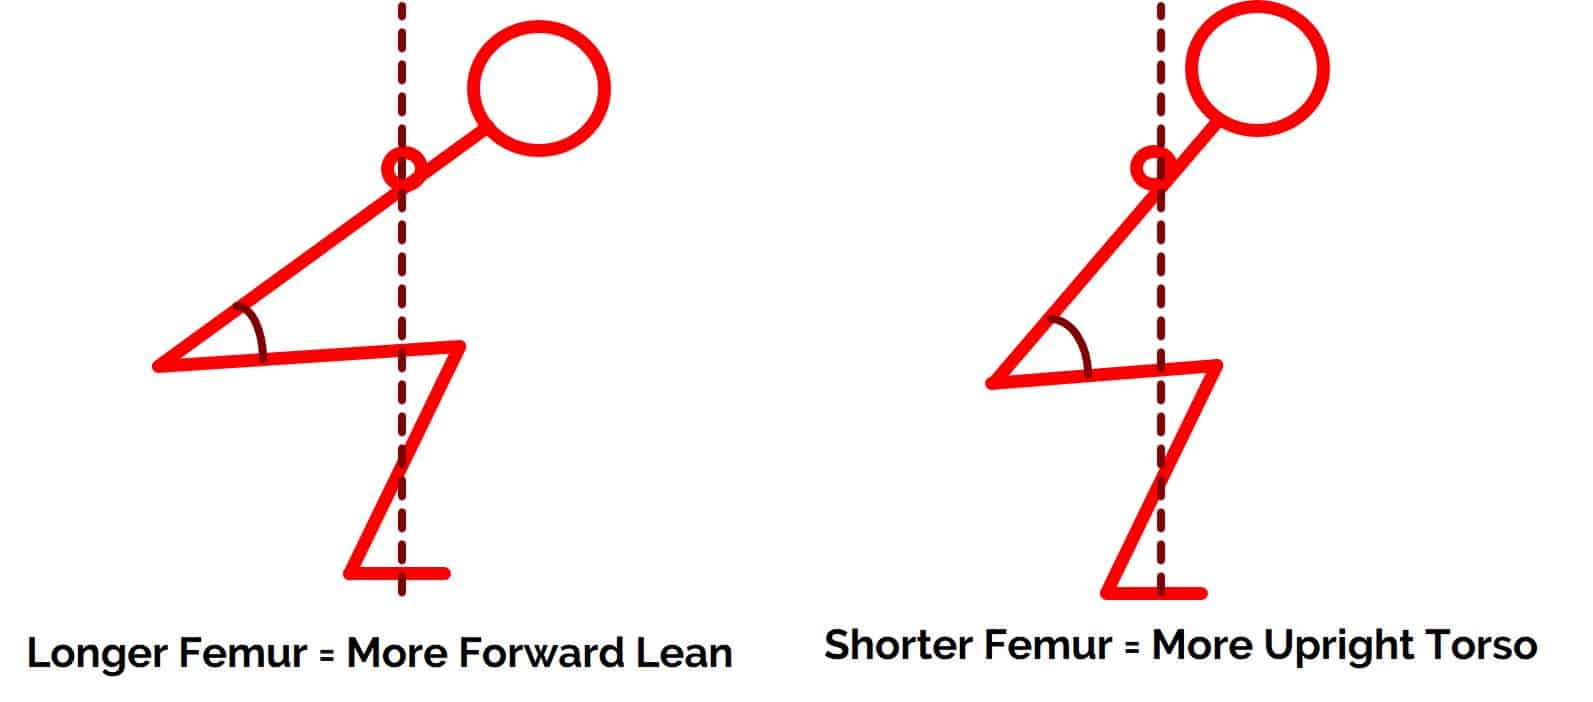
The work of renowned coach Bret Contreras further solidifies this point. He demonstrates that squat mechanics are a direct result of one's anthropometry.
How Femur Length Affects Squat Mechanics
Let's read a concise but powerful article by Bret Contreras, 'How Femur Length Affects Squat Mechanics', which visually demonstrates these concepts with real lifters.
Read the main body of the article, from the beginning down to the 'Wrap Up'. Pay special attention to the two lists that detail the factors contributing to a more upright vs. a more forward-leaning squat. This serves as an excellent checklist for analysis.
The takeaway is clear: high joint stress often occurs when a lifter tries to fight their natural mechanics, creating excessive torque at a joint that is not well-positioned to handle it.
3. A Framework for Joint-Friendly Exercise Selection & Modification
Armed with an understanding of individual anatomy and torque, we can establish practical rules for selecting and modifying exercises to minimize joint stress.
Principle 1: Allow Freedom of Movement
Our joints do not always move in perfect, straight lines. For example, the elbow has a natural "carrying angle" (valgus). Forcing it into a fixed, straight path, as with a straight barbell, can stress the wrist and elbow joints.
Workouts That WRECK Your Joints (I Wish I Knew This Sooner)
Let's return to the video 'Workouts That WRECK Your Joints'. This section explains the carrying angle and the value of using implements that allow your joints to move along their natural, individual paths.
Watch from 06:35 to 09:01. The key concept here is that fixed-path movements can clash with your natural joint anatomy. The solution is to incorporate exercises that allow for free rotation of the hands and elbows.
Application: For every muscle group, aim to include exercises that use dumbbells, cables, or well-designed machines that permit some freedom of movement. This allows the joints to find their most stable and comfortable path, reducing shear and torsional forces.
Principle 2: Ensure Proper Stabilization
The major joints of the body (shoulder, hip, knee) rely on surrounding musculature for stability. If these stabilizing muscles are weak or not properly engaged, the joint becomes unstable, and compensatory movements occur, placing stress on passive structures like ligaments and cartilage. The shoulder is a prime example.
Workouts That WRECK Your Joints (I Wish I Knew This Sooner)
This next clip from the same video explains the crucial role of the mid-back muscles (trapezius, rhomboids) in providing a stable platform for the shoulder joint during pressing and pulling movements.
Watch from 03:49 to 06:35. Focus on the concept of the scapula being 'suspended by muscles' and how poor scapular control leads to shoulder instability and pain. The cues for proper engagement during rows and pulldowns are excellent for coaching.
Application: A program that neglects stabilizers is a recipe for injury. Ensure that you program direct work for the rotator cuff, mid-back, and core. Emphasize coaching cues that promote stabilization, such as "pinch shoulder blades together" in a row or "brace your core" in a squat.
Principle 3: Prioritize Mechanical Stability Over "Sensation"
Some lifters and coaches chase a "feeling" or a "deep contraction" by contorting their bodies into extreme positions. However, as we know from your computer science background and work with optimization algorithms, the most efficient path is often the most stable one. Pushing a joint into an unstable range simply to "feel" a muscle more can be both ineffective and dangerous.
Two Joint Muscle Training Considerations, biasing Long head of triceps and hamstrings vs calves.
This advanced video from N1 Education provides a deep, biomechanical rationale for this principle. Using the example of a lying hamstring curl, Kassem Hanson explains how trying to shorten the hamstring further by extending the hip actually destabilizes the pelvis, disadvantages the target muscle, and increases the risk of inefficient, compensatory movement.
Watch the segment from 41:19 to 47:24. The core idea is that 'sensation-based' exercise modifications can lead to a loss of stability and a less effective stimulus. A stable setup allows the target muscle to express its full force-producing capacity safely.
Application: Prioritize positions that allow for maximum stability. A stable joint is a safe joint and a strong joint. This means locking down the pelvis during a leg curl, keeping the scapula controlled during a press, and maintaining a neutral spine during a hinge.
4. The Mindset of Longevity: Pain vs. Discomfort
Perhaps the most critical principle for injury prevention is learning to distinguish between productive muscular discomfort (the "burn" or fatigue) and injurious joint pain (sharp, pinching, grinding, or a deep ache). The "no pain, no gain" mantra is a dangerous fallacy when applied to joints.
Training through joint pain is like ignoring a compiler warning in your code; it might run for a while, but you are accumulating technical debt that will eventually lead to a system crash.
Workouts That WRECK Your Joints (I Wish I Knew This Sooner)
Finally, let's watch the last segment from Jeremy Ethier's video. It powerfully illustrates the danger of forcing progression and training through pain, using the cautionary tale of bodybuilding legend Ronnie Coleman.
Watch from 09:01 to 12:50. The main message is to earn progression rather than force it, and to listen to your body's signals. Switching exercises or modifying them when a joint feels 'off' is a sign of intelligent training, not weakness.
Application: As a coach, you must teach clients this distinction. If an exercise causes joint pain, the protocol is simple:
- Stop the exercise.
- Modify it (e.g., change grip, stance, or ROM).
- If pain persists, replace it with a pain-free alternative.
- Never, ever tell a client to "push through" joint pain.
Coach's Notes: The Art of Intelligent Modification
- Observe and Listen: You don't need an MRI to assess a client. Watch how they move naturally. Ask them where they feel an exercise. Does it feel "smooth" or "awkward"? This feedback is invaluable.
- Frame Modifications Positively: Modifying an exercise isn't a sign of weakness; it's a sign of intelligent training. Explain to the client why you're making a change based on their anatomy. "Because you have longer legs, leaning forward in your squat allows us to load your hips and glutes more effectively and safely." This builds trust and empowers the client.
- Create a "Joint-Friendly" Checklist: When evaluating an exercise, ask yourself:
- Does it respect the client's individual anatomy?
- Does it allow freedom of movement, or is it overly restrictive?
- Is the client able to stabilize the relevant joints?
- Is it free of sharp or pinching pain?
Conclusion
This lesson concludes our deep dive into the anatomical and biomechanical principles of programming for hypertrophy. You now understand that building a durable, high-performing physique requires a dual focus: maximizing muscular stimulus while minimizing joint stress.
Key Takeaways:
- Individuality is Key: "Perfect form" is a myth. The optimal movement pattern for any exercise is dictated by an individual's unique anatomical structure, especially their limb lengths.
- Manage Torque: Joint stress is largely a function of torque. By selecting exercises and modifying techniques (e.g., stance, bar path), you can manipulate lever arms to distribute force appropriately and away from vulnerable joints.
- Prioritize Stability: A safe exercise is a stable one. Ensure that stabilizing muscles are strong and that exercise positions do not compromise joint integrity in a misguided chase for "sensation."
- Listen to Your Body: Differentiate between muscle discomfort and joint pain. Training through joint pain is a direct path to chronic injury and derailed progress.
Preview of the Next Lesson
You have now built a comprehensive, evidence-based foundation linking anatomy, biomechanics, and programming for hypertrophy. In our next and final module, Coaching Application and Certification Pathway, we will put it all together. You will learn how to conduct client assessments, diagnose movement faults, design complete training programs from scratch, and develop a coaching philosophy that sets you up for success and points you toward formal certification.