Welcome back! In our last lesson, we successfully installed Git, the version control system that acts as a safety net for our code. You verified the installation, and now Git is ready and waiting on your computer.
Before we can ask Git to start tracking our work, we need to perform one final, crucial piece of configuration: we need to introduce ourselves to it.
1. What We Are Learning
This lesson is the fifth part of Module 2: The Developer's Toolkit. Our learning outcome is to set your global Git username and email for tracking contributions.
We will cover:
- Why Git needs to know who you are.
- How to configure your name and email for all future projects.
- How to verify that your information has been saved correctly.
This is a one-time setup on your machine, but it's essential for every project you'll ever work on.
2. Why This Matters
As a designer, you know that accountability and attribution are key. When you're collaborating in Figma, you can see exactly who made a change, added a comment, or resolved a thread. The history shows "Alex pushed the logo 2px to the left" or "Ben updated the color style."
Git's configuration does the exact same thing for code.
Every time you save a "snapshot" of your project (a process called a commit), Git permanently stamps it with your name and email. This isn't for logging in or security; it's your professional signature on the work. It’s how your contributions are identified, whether you're working alone or with a team of a thousand developers. By setting this up now, you ensure every piece of work you do is correctly attributed to you.
3. Step-by-Step Instructions
We'll be using the integrated terminal in VS Code for these commands.
Step 1: Understand the Git Configuration
First, let's understand how and where Git stores this information. The official Git documentation provides a great explanation. We're going to focus on the global setting, which is like setting your user profile once and having it apply to every project on your computer.
1.6 Getting Started - First-Time Git Setup
Please read two short sections from the official Git documentation, 'First-Time Git Setup'. This will explain the concept of Git's configuration levels and show the exact commands we are about to use.
First, read the introductory section 'First-Time Git Setup' to understand the different places Git stores settings. Pay attention to the description of the --global option. Then, read the subsection 'Your Identity'. This explains why your identity is important and shows the commands we'll be using. You can stop when you reach the 'Your Editor' section.
Step 2: Set Your Git Username
Now, let's tell Git your name.
-
Open VS Code and launch the integrated terminal (
View > TerminalorCtrl+`). -
Type the following command, replacing
"Your Name"with your actual name. If your name has spaces, the quotes are important.git config --global user.name "Your Name"Then press Enter.
Let’s break that command down:
git: The program we're giving an instruction to.config: We are changing a configuration setting.--global: This setting should apply to every Git project on this computer.user.name: The specific setting we're changing: the author's name."Your Name": The value you're setting.
Step 3: Set Your Git Email
Next, let's set the email address that will be associated with your work. This should be the same email you plan to use for GitHub later, as it's how your work on your computer will be linked to your online profile.
-
In the same terminal, type the following command, replacing the placeholder with your email address:
git config --global user.email "your.email@example.com"Then press Enter.
Step 4: Verify Your Settings
You won't see any confirmation message after running the commands, so we need to ask Git to show us what it has saved.
-
To check the name you set, run:
git config user.nameThe terminal should print your name back to you.
-
To check the email you set, run:
git config user.emailThe terminal should print your email back to you.
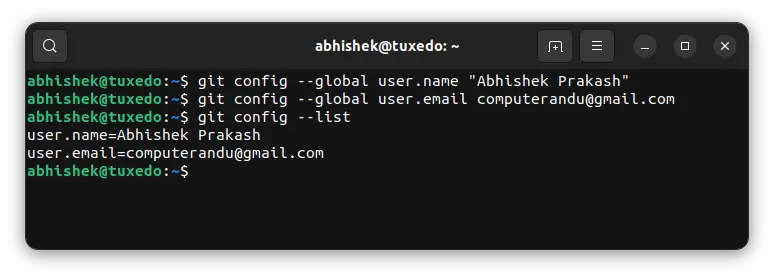
The image below shows what this entire process looks like in a terminal.
4. What Could Go Wrong
-
Error:
git: 'cofnig' is not a git command. See 'git --help'.- Why it happens: A simple typo in the command (e.g.,
cofniginstead ofconfig). The terminal is very literal. - How to fix it: Read the command carefully and re-type it, ensuring the spelling is exactly right.
- Why it happens: A simple typo in the command (e.g.,
-
Error:
error: too many arguments- Why it happens: You tried to set a name with a space in it but forgot to put quotes around it (e.g.,
git config --global user.name Your Name). - How to fix it: Re-run the command with your name enclosed in double quotes:
... user.name "Your Name".
- Why it happens: You tried to set a name with a space in it but forgot to put quotes around it (e.g.,
-
You run the verification command, and nothing is printed.
- Why it happens: The configuration might not have been set correctly. You may have forgotten the
--globalflag, or closed the terminal before the command finished. - How to fix it: Simply run the
git config --global ...commands from Step 2 and 3 again, then re-verify.
- Why it happens: The configuration might not have been set correctly. You may have forgotten the
5. Mini Exercise
Let's walk through the steps to ensure your Git identity is configured perfectly.
- Open VS Code and a new terminal.
- Run the
git config --global user.name "Your Name"command with your full name. - Run the
git config --global user.email "your.email@example.com"command with your email. - Run
git config user.nameand press Enter. Does the terminal show your name? - Run
git config user.emailand press Enter. Does the terminal show your email?
If the output for both commands matches what you entered, you have successfully configured your Git identity!
6. Checklist Before Moving Ahead
- I understand that my Git username and email act as a permanent signature on my work.
- I have run the
git config --global user.namecommand with my correct name. - I have run the
git config --global user.emailcommand with my correct email. - I have used the verification commands to confirm that Git has stored my information correctly.
Conclusion
Fantastic! You have now completed the essential, one-time setup for Git. Your machine is now fully prepared to track your work and, more importantly, give you credit for it. Every change you make from now on will be signed by you.
A Look Ahead: We have now installed all the core command-line tools: a runtime for tooling (Node.js) and a version control system (Git). There's just one more tool to add to our kit, and this one is visual. In the next lesson, we'll install a VS Code extension called Live Server, which will let us see our webpage in a browser and watch it update in real-time as we make changes.