Hello! In our last lesson, we explored the strengths and weaknesses of AI code generation. We established that the AI is like a super-fast junior developer and our role is to be the senior designer or art director—guiding it to produce high-quality work.
Today, we move from theory to practice. You're going to write your first "design brief" for the AI and watch it translate your Figma design into a real web page.
1. What We Are Learning
This lesson is all about learning to compose a clear prompt to generate the HTML and CSS for a Figma frame. We'll break down the anatomy of a high-quality prompt and construct one together, step-by-step.
2. Why This Matters
The quality of the code you get from the AI is directly proportional to the quality of your prompt. Think of it this way:
-
A lazy prompt: "Make this design."
-
A designer's analogy: This is like telling a junior designer, "make it pop," without providing a brand guide, wireframes, or user goals. You'll get something, but it will likely be generic and miss the mark.
-
A high-quality prompt: A detailed set of instructions that defines the role, goal, tech stack, and constraints.
-
A designer's analogy: This is like providing a comprehensive design brief. It gives the junior designer the context and constraints they need to produce excellent, on-brand work efficiently.
Mastering the art of the prompt is the single most important skill in this AI-powered workflow.
3. Step-by-Step Instructions
Let's walk through the process of taking a design from Figma and generating its code by writing a great prompt.
Step 1: Prepare Your Figma File
Before you even think about the prompt, ensure your Figma file is "AI-ready." The AI reads the structure of your design file. A clean file leads to clean code. As we covered in Module 6, this means:
- Using Auto Layout to define spacing and responsiveness.
- Giving layers clear, semantic names (e.g.,
hero-section,cta-button,user-avatar). - Applying styles and variables for colors, fonts, and spacing.
This gives the AI the rich, structured data it needs to write good code.
The OFFICIAL Figma MCP Server - TUTORIAL & DEMO
As a quick refresher, this video demonstrates how a well-structured Figma file with Auto Layout and proper naming directly contributes to the quality of the AI-generated code. Notice how the presenter emphasizes these design fundamentals before even starting to code.
Please watch the section from 'The OFFICIAL Figma MCP Server - TUTORIAL & DEMO' starting at 01:28 and ending at 03:41. Pay attention to how Auto Layout, variables, and layer names are used to pass context to the AI.
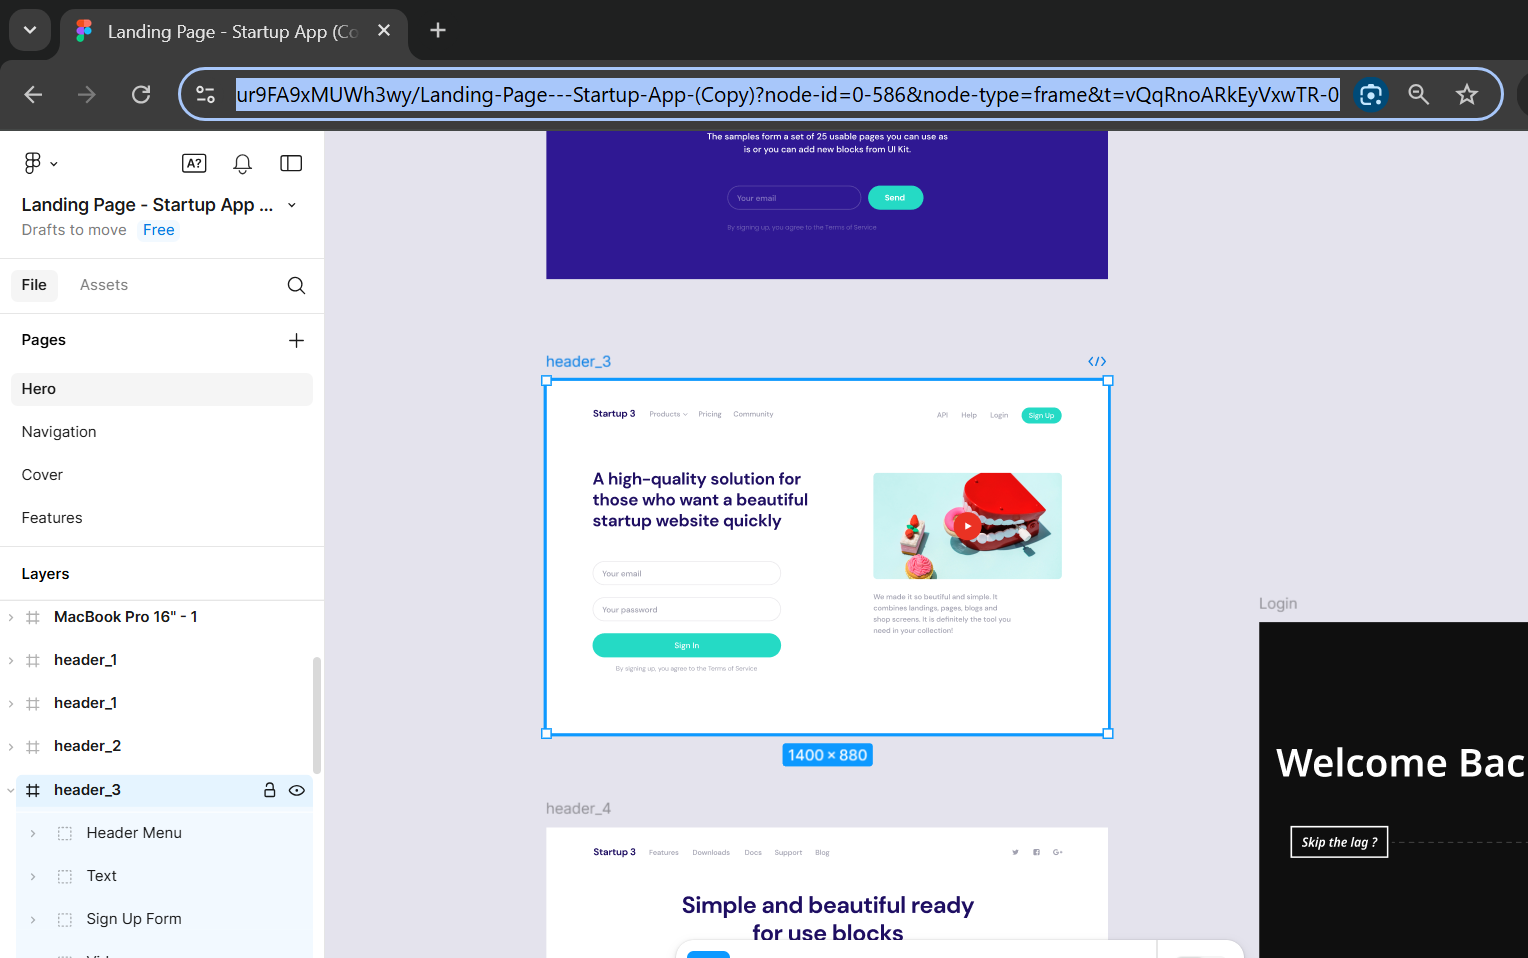
Step 2: Select Your Target in Figma
With your project open in the Figma Desktop App, simply select the specific frame you want to convert. This is the crucial link. The Model Context Protocol (MCP) server you configured will send all the data about this specific selection to your AI tool (Cursor).
Step 3: The Anatomy of a High-Quality Prompt
A powerful prompt is like a recipe with several key ingredients. We'll use the framework explained in the article "How AI Turns Figma into Code" to structure our prompts.
This article provides an excellent breakdown of what makes a prompt effective. It moves beyond a simple command to a detailed 'brief' for the AI.
Please read the section titled 'The Prompting Process'. It starts with 'The magic starts by getting the context from Figma into Cursor.' Focus on the five bullet points that describe a high-quality prompt: 'Set the Scene & Goal', 'Provide Business Context', etc.
Based on that reading, here are the 5 key ingredients for our prompt recipe:
-
Set the Scene (Give the AI a Role): Start by telling the AI who it should be. This primes it for the kind of output you expect.
Example:
"You are a senior front-end developer specializing in responsive websites." -
State the Goal (Provide Context): Tell the AI what you're building.
Example:
"Your task is to create the HTML and CSS for the hero section of a landing page based on the selected Figma frame." -
Define the Tech Stack (Be Explicit): Leave no room for guessing. Tell the AI exactly what technologies to use.
Example:
"Generate a singleindex.htmlfile. Use semantic HTML5. For styling, use Tailwind CSS utility classes directly in the HTML. Include the necessary CDN link for Tailwind CSS in thesection. Do not write a separate CSS file." -
Dictate Structure & Naming (Control the Output): Tell the AI how you want the project organized. For a single section, this is simple, but it's a good habit.
Example:
"The main container for this section should be aelement with an ID of 'hero'." -
Point to the High-Fidelity Data (Use the MCP connection): Remind the AI to use the rich data from Figma, not just guess from the visuals.
Example:
"Pay close attention to the Auto Layout rules for spacing and the semantic layer names for structure. Use the design tokens for all colors and font styles."
Step 4: Putting It All Together
Now, let's combine these ingredients into a complete prompt. In VS Code (Cursor), with the chat panel open, we'll write:
You are a senior front-end developer specializing in responsive websites using Tailwind CSS.

Your task is to convert the selected Figma frame into a single, production-ready HTML file.

- Use semantic HTML5 tags (`<section>`, `<h1>`, `<p>`, `<button>`).
- Style everything using Tailwind CSS utility classes.
- Include the Tailwind CSS CDN link in the `<head>` of the HTML file.
- Pay close attention to the layer names, Auto Layout properties, and design tokens from the Figma context to ensure the code is accurate and maintainable.
- Ensure the layout is responsive and looks good on both mobile and desktop screens.
This prompt is a clear, actionable brief. It gives the AI all the direction it needs to create a high-quality first draft.
4. What Could Go Wrong
- Vague Prompts Lead to "Magic Numbers": A prompt like "Make this design" will force the AI to guess. It will often produce code with hard-coded pixel values (e.g.,
margin-left: 117px;) instead of using your design system's spacing tokens or responsive units. This code is brittle and hard to maintain. - MCP Connection Isn't Active: If you get an error, double-check that the Figma Desktop App is running and that you've enabled the "Dev Mode MCP Server" from the main menu.
- The AI Ignores an Instruction: Sometimes, the AI might miss a detail. For example, it might use a
<div>for a button. Don't worry! This is normal. Our next lesson is all about providing feedback and refining the code with follow-up prompts. - Trying to Build Too Much at Once: For best results, work section-by-section. Prompting for an entire complex landing page at once can overwhelm the AI and lead to lower-quality output.
5. Mini Exercise
Imagine you have a simple footer component designed in Figma.
- The main frame is named
site-footer. - It uses Auto Layout to space out three text elements.
- The text elements are: a copyright notice (
© 2024 YourCompany), a link for "Privacy Policy", and a link for "Terms of Service".
Your task: Write a complete prompt to generate the code for this footer. Use the 5-ingredient recipe we just learned.
Click here to see my example prompt
You are a senior front-end developer creating a reusable website component.

Your task is to convert the selected 'site-footer' Figma frame into a semantic HTML structure for a page footer.

- Use semantic HTML5 tags. The main container should be a `<footer>` element. The links should be `<a>` tags.
- Style everything using Tailwind CSS utility classes.
- Generate the code within a single HTML block that I can copy.
- Pay close attention to the Auto Layout properties from Figma for spacing between the elements.
- Ensure the text content and links match the Figma design.
6. Checklist Before Moving Ahead
- I can explain why a detailed prompt (a "brief") is better than a simple command.
- I can list the 5 key ingredients of a high-quality prompt (Role, Goal, Stack, Structure, Data).
- I know that I must select a frame in the Figma Desktop App before writing my prompt.
- I am ready to write my first prompt to generate code from my own design.
Congratulations! You've learned the fundamental skill of this entire workflow: how to communicate effectively with your AI coding assistant. You're no longer just a designer; you're a director, providing a clear vision for the AI to execute.
A Look Ahead:
The AI's first draft is rarely perfect. In our next lesson, we will focus on the iterative cycle of refinement. You'll learn how to use follow-up prompts to reference specific components and Auto Layout properties, correcting and improving the initial code until it perfectly matches your design vision.