Hello! Welcome to the first lesson of our journey to build and deploy your first webpage. I'm excited to get started.
This first module, "Foundations," is all about building a solid mental model of how the web works. Before we touch any code or tools, it’s crucial to understand the big picture. Think of it like an architect learning about building materials and physics before designing a skyscraper.
1. What We Are Learning
Today, we'll unravel the magic behind what happens when you type a website address into your browser and hit Enter. Our goal is to explain how a browser requests and displays a webpage using a client-server analogy.
We'll cover:
- The roles of a client (your browser) and a server (where the website lives).
- The concept of a request (asking for the site) and a response (getting the site's files).
- How this all fits together, using an analogy you're very familiar with: ordering food at a restaurant.
2. Why This Matters
As a designer, you create the end-user experience. This lesson reveals the fundamental technical process that makes that experience possible. Understanding this client-server relationship is the bedrock for everything else we'll do. It explains why we need to write code in specific languages (HTML, CSS) and why we need services for "hosting" and "deployment" to make your design accessible to the world.
3. Step-by-Step Instructions
Let's break down this process piece by piece.
Step 1: The Restaurant Analogy
The best way to understand the web is to think of it as a restaurant. You, the customer, want to order a meal.
To get a feel for this analogy, please read the first few sections of the following article. It does a fantastic job of setting the scene.
Front End v. Back End Explained by Waiting Tables At A Restaurant
This article from CodeAnalogies explains the core concepts of web development using a simple restaurant metaphor. It's a perfect starting point.
Please read the introduction and the section titled 'An Intro to the Front-End'. Focus on the roles of the customer, the menu, and the waitstaff. You can stop reading when you reach 'An Intro To The Back-End'.
In short:
- You (the Customer) want to see a website.
- The Menu (HTML/CSS) shows you what's available and how it looks.
- The Waitstaff (JavaScript/The Browser) takes your order.
Now, let's map these ideas to their technical names.
Step 2: Meet the Client and the Server
In web terminology, you aren't a "customer"; your browser is the client. The "kitchen" that prepares your meal is the server.
This short video explains these two core components.
What is the Client Server Model? | System Design Concepts
This video from Be A Better Dev provides a clear, concise definition of the client-server model.
Watch from 00:58 to 03:36. The key is to understand what a 'client' is (the requester) and what a 'server' is (the provider). Don't worry about terms like 'API' for now; just focus on the main concept.
So, to recap:
- Client: Your web browser (Chrome, Safari, Firefox). Its job is to ask for information.
- Server: A powerful computer, connected to the internet, that stores the website's files (HTML, CSS, images). Its job is to provide that information.
Step 3: Making a Request
When you decide what you want from the menu and tell the waiter, you are making a request. On the web, this happens when you type an address like www.google.com and press Enter. Your browser (the client) sends a message over the internet to the correct server, requesting the files for that page.
The rules for how this request is structured and sent are called HTTP (Hypertext Transfer Protocol). You can think of it as the language the client and server agree to speak.
This next reading uses a great "town and mail service" analogy to explain this request-response process.
This article from Codecademy dives into the request-response cycle. We'll focus on the analogy it provides, which beautifully illustrates the entire process.
Please read only the section titled 'An Analogy'. It starts with 'Imagine the internet is a town.' and ends just before 'What is HTTPS?'. This reinforces the concept of making a request and getting a response.
Step 4: Getting a Response
Once the kitchen (the server) gets your order, it prepares your meal and gives it back. This is the response.
The server locates the files your browser asked for (the HTML document, the CSS stylesheet, images, etc.) and sends them back across the internet.
This response also includes a status code. You might have seen the most famous one:
200 OK: "Order up!" The server found the files and is sending them.404 Not Found: "We're out of that." The server couldn't find the requested page.
Step 5: Displaying the Page
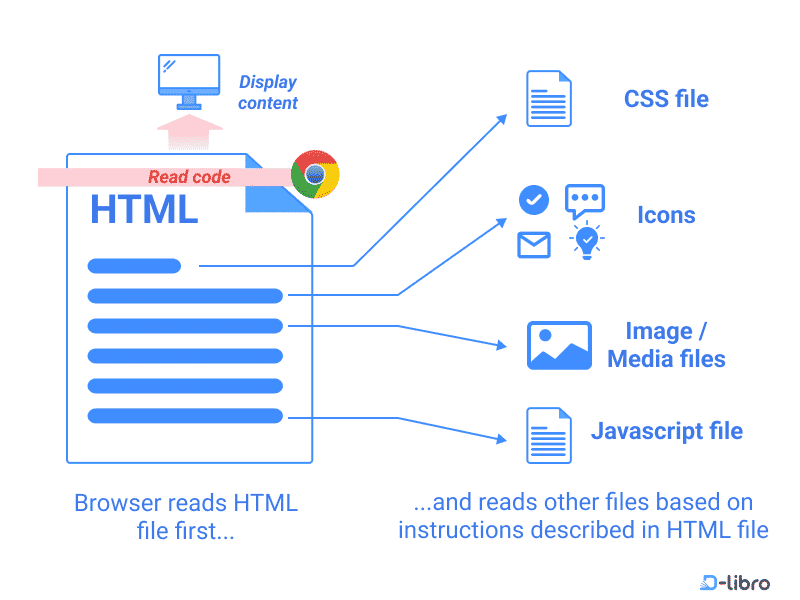
The waiter doesn't just hand you a pile of ingredients; they bring you a fully plated meal. Similarly, your browser doesn't just show you a list of files. It reads the code in those files and renders the visual webpage on your screen.
This image shows exactly how that happens:
4. What Could Go Wrong?
Even in the best restaurants, things can go wrong. The same is true on the web.
- 404 Not Found: This is the most common error you see as a user. You typed the URL incorrectly, or the page you're looking for has been moved or deleted. In our analogy, you asked the waiter for something that's not on the menu.
- Slow Load Times: If a website is slow, it could be for many reasons. The server (kitchen) might be overwhelmed with requests, or the webpage itself might be very "heavy" (lots of large images and complex files), taking a long time for the server to send and your browser to assemble.
5. Mini Exercise (Making it Real)
Let's peek behind the curtain and watch this process in action. We'll use your browser's built-in Developer Tools. Don't worry, you can't break anything!
- Open a new tab in Chrome or Firefox.
- Open Developer Tools:
- On Mac: Press
Cmd + Option + I - On Windows: Press
F12orCtrl + Shift + I - A new panel will open up. It might look intimidating, but we only care about one part for now.
- On Mac: Press
- Click on the "Network" tab at the top of this new panel.
- Now, in the main address bar, type
www.wikipedia.organd press Enter. - Watch the "Name" column in the Network panel. You will see a list of files appear.
Your task is to look at this list and identify:
- The very first item that was requested (it should be
www.wikipedia.org). This is the main HTML document. - At least one file that ends in
.css(a stylesheet). - At least one file that is an image (e.g., ends in
.pngor.svg).
This simple exercise makes the abstract idea of a "response" tangible. You're seeing the actual list of files the server sent back to your browser to build the page.
6. Checklist Before Moving Ahead
Once you've completed the readings and the exercise, take a moment to confirm you can answer these questions:
- I can explain what a "client" is in the context of the web.
- I can explain what a "server" is.
- I can describe the "request-response" cycle using the restaurant analogy.
- I understand that a webpage is not one single thing, but a collection of files (like HTML, CSS, images) that the server sends to my browser.
And that's it for our first lesson! We've established the fundamental relationship that powers the entire internet.
A Look Ahead: In our next lesson, we'll build on this by defining the specific roles of the three core file types you saw in the exercise: HTML (structure), CSS (style), and JavaScript (interactivity). This will bring us one step closer to understanding the code we'll eventually generate.