Hello again! In our last lesson, you successfully integrated AI-generated code into your project, acting as the final quality gatekeeper. You reviewed the changes, accepted them, and verified them locally with Live Server.
That's a fantastic local workflow, but your masterpiece is still confined to your computer. Today, we'll complete the cycle and push your updates to the live website for the world to see.
1. What We Are Learning
This lesson's goal is to apply the Git workflow (commit, push) to save updates and trigger a new deployment.
You'll learn how to take the changes you've approved locally, save them permanently into your project's history, and send them off to the cloud, which will automatically update your live website. This is the final and most rewarding step in our development loop.
2. Why This Matters
This workflow is the heartbeat of modern software and web development. Understanding it is crucial for managing any project, no matter the size.
Let's use a design analogy you're very familiar with: working with a shared Figma library.
- Editing files locally: This is like editing a component in your personal draft file in Figma. The changes are just for you, for now.
git commit: This is like using Figma's Version History to save a snapshot with a specific name (e.g., "v2.1 - Updated primary button style"). You are creating a permanent, named save point on your own machine that you can always look back on or revert to.git push: This is the equivalent of clicking Publish changes on your Figma library. You're sending your saved versions (your commits) to the central, shared location (GitHub). This makes your updates available to the rest of the team and, crucially for us, to our deployment service.- Automatic Deployment: This is where the magic happens. When our deployment service, Vercel, sees that you've "published" an update to GitHub, it automatically grabs the new version, rebuilds your website, and updates the live URL. It's as if publishing a Figma library update would instantly update the live, clickable prototype that your stakeholders are viewing.
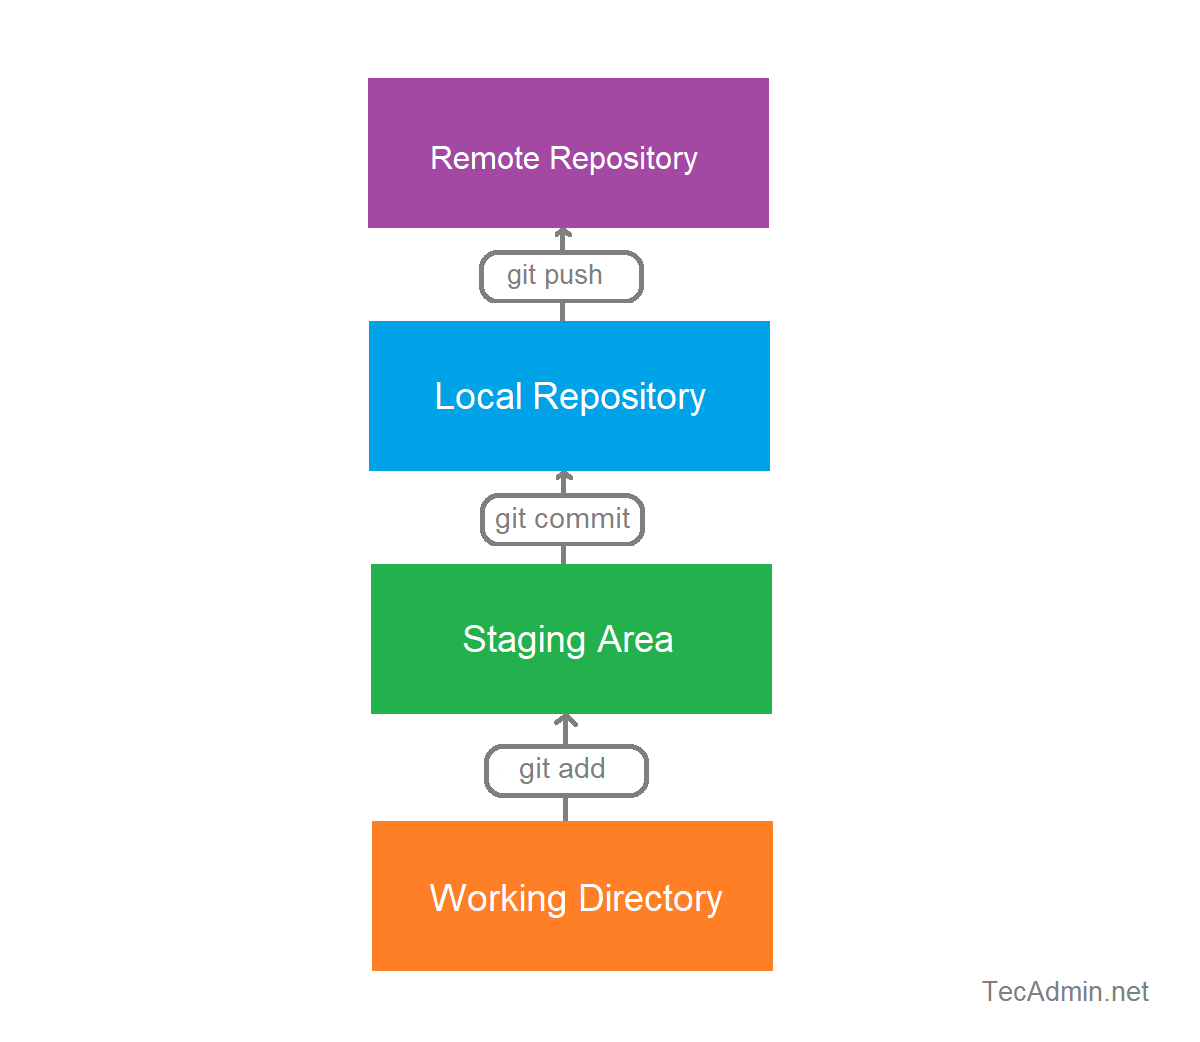
To get a clearer picture of this flow, let's establish a mental model. During this process, your code moves between four distinct places.
How Git Works: Explained in 4 Minutes
This short video from ByteByteGo is an excellent conceptual overview of the four 'homes' for your code in the Git workflow. Pay close attention to the names of the four locations.
Watch the segment from 00:35 to 01:20. Focus on understanding the role of the Working Directory, Staging Area, Local Repository, and Remote Repository.
Here is a diagram that visualizes that exact process:
3. Step-by-Step Instructions: From Local Edit to Live Site
Let's walk through the entire process, using the friendly interface of VS Code.
First, make sure you have a change to save.
- Open your project in VS Code.
- Open
index.html. - Find the main headline (
<h2>from our last exercise) and change the text to something new. For example: "My First Live Website Update!". - Save the file (
Cmd+SorCtrl+S). You'll see the change in your local Live Server preview.
Now, let's save and deploy this change.
Step 1: Stage Your Changes (Working Directory → Staging Area)
Staging is the act of selecting which changes you want to include in your next save point.
- In the Activity Bar on the left, click the Source Control icon (it looks like a branching path).
- You'll see
index.htmllisted under a "Changes" section. This means the file has been modified in your Working Directory. - Hover over the
index.htmlfile name and click the+(Stage Changes) icon. - The file will move up to a new section called "Staged Changes". It is now in the Staging Area, ready to be saved.
Why do we stage? It gives you control. Imagine you've edited three files but only want to save the changes for one of them as a single, logical update. Staging lets you do just that.
Step 2: Commit Your Changes (Staging Area → Local Repository)
A "commit" is the act of creating that permanent snapshot (the named version) in your local history.
- At the top of the Source Control panel, you'll see a Message box. This is where you name your version. It's a critical habit to write clear, concise commit messages describing what you changed.
- Type a message like:
Update hero section headline. - Click the Commit button (the checkmark icon).
The file will disappear from the Staged Changes area. You have now successfully created a commit in your Local Repository. Your change is saved safely on your machine.
To reinforce this, let's look at how to perform these same steps in a guided video.
Using Git & GitHub in VSCode: Stage, Commit, and Push
This video by Max Rohowsky demonstrates the commit and push process directly within VS Code, which is exactly our workflow. We'll focus on the parts that cover staging and committing first.
Watch the section from 03:43 to 06:06. Notice how he makes a change, sees it appear in the Source Control panel, writes a commit message, and commits it. This is exactly what you just did.
Step 3: Push Your Commit (Local Repository → Remote Repository)
Your commit is saved locally, but GitHub and Vercel don't know about it yet. We need to "push" it to the cloud.
- Look at the bottom-left of your VS Code window in the blue status bar. You should see an icon with circular arrows and a number next to an up arrow (e.g.,
↑ 1). This tells you that you have 1 local commit that is ready to be pushed to the remote repository. - Click that button. It may say "Sync Changes" or "Publish Changes".
- A dialog might pop up asking for confirmation. Click OK.
VS Code will now upload your new commit to your repository on GitHub.
Using Git & GitHub in VSCode: Stage, Commit, and Push
Now let's watch the 'push' part of the same video. This shows how to sync your local commit with the remote GitHub repository.
Watch from 08:47 to 10:20. See how he makes another change, commits it, and then uses the 'Sync Changes' button to push the update to GitHub.
Step 4: Watch the Automatic Deployment
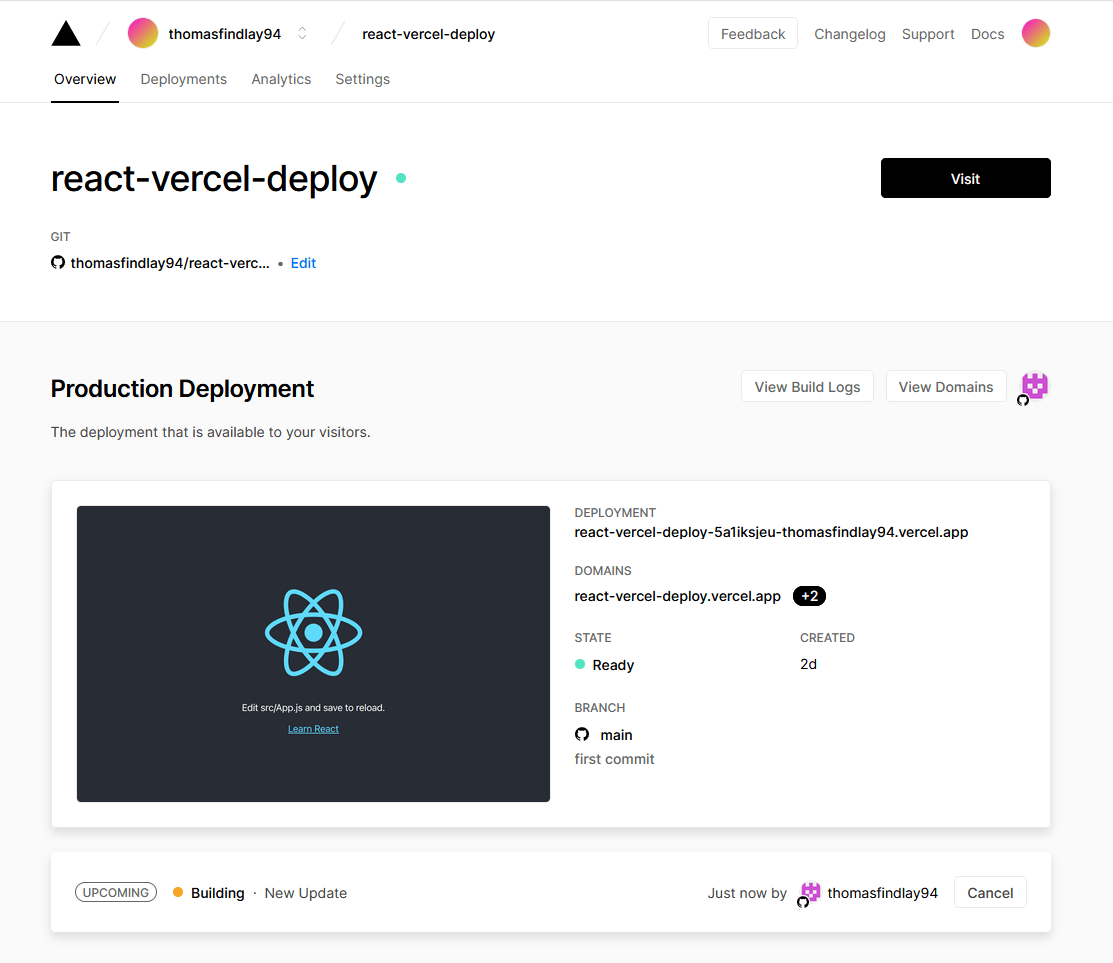
This is the payoff. Because you connected Vercel to your GitHub account, your push just triggered a new deployment.
- Open your Vercel dashboard in a browser.
- Click on your project.
- You should see a new deployment at the top of the list with a status of "Building".
This process is explained very clearly in the Vercel documentation.
This article from Vibe Coding explains how Vercel's deployment flow works. It confirms the connection between pushing to Git and triggering a build.
Read the sections 'How Vercel Works: The Deployment Flow' and 'Making Updates'. This will solidify your understanding of how your git push command automatically leads to a live site update.
After a minute or two, the status will change to "Ready". Now, open your live website URL. Congratulations, your change is live!
4. What Could Go Wrong
-
Push fails / "Sync Changes" is needed.
- Reason: This is the most common issue. It happens when the remote repository on GitHub has changes that your local machine doesn't have yet. Git stops you from pushing to prevent you from accidentally overwriting someone else's work.
- Fix: VS Code makes this simple. If you see numbers next to both the up and down arrows in the status bar (e.g.,
↓ 1 ↑ 1), it means you need to sync. Just click the Sync Changes button. This will firstpull(download) the remote changes and merge them with your local work, and thenpushyour changes up. Thispull-then-pushis the normal rhythm of collaborative work.
-
You made a typo in your commit message.
- Reason: You clicked "Commit" too fast.
- Fix: If you haven't pushed yet, you can easily amend it. In the Source Control panel, click the
...(three dots) menu, go toCommit>Amend. This will let you edit the message of your very last commit. If you've already pushed, it's best to just leave it. Correcting it is an advanced topic.
5. Mini Exercise
Let's practice the full loop one more time.
- Open your
styles/style.cssfile. - Change the
background-colorof thebodyto a different color, likelightgoldenrodyellow. Save the file. - Go to the Source Control panel.
- Stage the
styles/style.cssfile by clicking the+. - Write a clear commit message:
Change page background color. - Click Commit.
- Click the Sync Changes button in the status bar to push your commit.
- Open your Vercel dashboard and watch the deployment process.
- Once it's "Ready", open your live URL and admire your new background color!
6. Checklist Before Moving Ahead
Please confirm you can do the following:
- I understand that
commitsaves a snapshot of my work locally, andpushsends those saved snapshots to GitHub. - I can use the VS Code Source Control panel to stage, commit, and push a change.
- I understand that pushing a commit to my
mainbranch on GitHub is what triggers a new deployment on Vercel. - I know where to look in my Vercel dashboard to see if a deployment is building or ready.
Conclusion
You've done it! You have now completed the entire, end-to-end modern development workflow: making a local change, saving it with version control, and deploying it to a live website. This commit-and-push cycle is the fundamental process you'll use to update your site from now on.
In our next lesson, we'll discuss strategy. Now that you know how to regenerate code with AI and how to make minor edits manually, we'll learn how to distinguish between situations that require full regeneration vs. minor manual edits. This will help you become even more efficient as you build out your landing page.