Hello again! In our last lesson, you learned the "surgical" technique of regenerating code for a single, specific component from an updated Figma design. This is a massive step towards a fast and efficient workflow.
But what do you do with that freshly generated code? You can't just leave it sitting in the AI chat window. Today, we'll bridge that gap.
1. What We Are Learning
This lesson's outcome is to integrate newly generated code into the existing project files.
Think of this as the "implementation" phase of the AI development cycle. After you describe, generate, and refine, you need to implement the final code into your project.
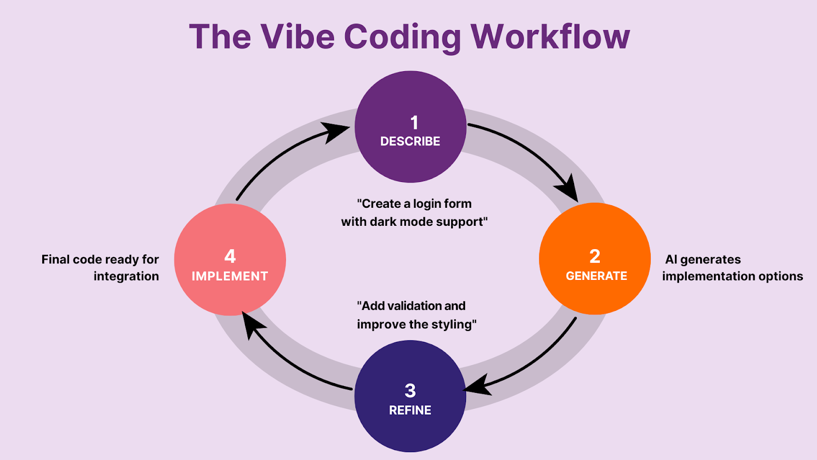
You will learn how to:
- Understand the different ways AI tools present code changes.
- Use VS Code's built-in tools to review proposed changes.
- Safely accept or reject AI edits, file by file, change by change.
- Verify that your integration was successful.
2. Why This Matters
As a designer, you know that when you receive an updated asset—like a new icon or brand logo—you don't just drag and drop it randomly into your Figma file. You carefully replace the old asset, ensuring it's in the right component, connected to the right styles, and doesn't break any layouts.
Integrating code is the exact same principle. It's a critical quality control step. By managing the integration process, you:
- Maintain Control: You are the final gatekeeper. You decide what code actually makes it into your project.
- Prevent Errors: It gives you a final chance to review the AI's work and catch potential mistakes before they break your page.
- Build Understanding: Reviewing the changes (even if you don't understand every character) helps build your "code literacy," reinforcing what HTML and CSS are doing.
3. Step-by-Step Instructions
Let's assume you've just asked your AI assistant to update the styling of a button, as we did in the last lesson. The AI now has new code for you. In VS Code, using an extension like GitHub Copilot, this typically happens in one of two ways.
Method 1: The AI Provides a Code Block in Chat
This is the most straightforward scenario. The AI will simply print the new HTML or CSS code in the chat window.
- Copy the Code: Highlight the code block in the chat and copy it.
- Locate the Old Code: Navigate to the correct file (
index.htmlorstyles/style.css) and find the old code section that you want to replace. - Replace and Save: Paste the new code over the old code and save the file.
This method is simple, but it relies on you to find and replace the code correctly. The next method is much more integrated and safer.
Method 2: The AI Proposes Changes with an Inline Diff
This is the more powerful and modern workflow. Instead of just giving you code to copy, the AI directly applies the changes to your files in a "pending" state for your review.
To understand how this works, we'll turn to the official VS Code documentation.
Review AI-generated code edits - Visual Studio Code
This article from the Visual Studio Code team explains exactly how to review AI-generated code edits. It's the definitive guide for the process we're learning today.
Please read the sections 'Pending changes' and 'Review changes'. Focus on understanding what the 'inline diff' is and how the 'Keep' and 'Undo' buttons work. Don't worry about the 'Source Control integration' part for now; we'll touch on that later.
The Integration Workflow using Inline Diffs
Let's walk through the process described in that article.
Step 1: Generate the Change and Spot the Indicators
First, give your AI a prompt, for example: Update the main CTA button to have a blue background and white text.
Once the AI processes this, you'll notice new icons appearing in VS Code:
- In the File Explorer: The files that the AI edited (
index.html,styles/style.css) will have a small "squared-dot" icon next to them. - In the Editor Tabs: The tabs for those files will also have the same icon.
These icons are signals that a file has "pending changes" from the AI that are waiting for your approval.
Step 2: Open the File and Review the Inline Diff
Click on one of the changed files to open it. You will immediately see the inline diff view.
- Code highlighted in red is the old code that will be removed.
- Code highlighted in green is the new code that will be added.
This is your moment to be the quality checker. Read the changes. Do they look reasonable? Did the AI change what you expected it to? This is the code equivalent of Figma's "Show changes" feature when you review an update from a shared library.
Step 3: Accept or Discard the Changes
Hovering over the changed block will reveal a small toolbar with a few options:
- Keep: This accepts the proposed change, making it a permanent part of your file.
- Undo: This rejects the change and reverts that specific block back to its original state.
- You can also accept or discard all changes in the file at once using the controls at the top of the editor.
Go through each change in each file and decide whether to Keep or Undo it.
Step 4: Final Verification
After you've accepted the changes, your page should be running in the Live Server preview. Check it. Does the button look correct? Did anything else on the page accidentally change? If everything looks good, you have successfully integrated the AI's code!
4. What Could Go Wrong
- You accidentally click
Keepon a bad change.- Reason: It happens! Maybe you clicked too fast or misread the code.
- Fix: This is where your safety net comes in. In the VS Code Activity Bar (the far left panel), click the Source Control icon (it looks like three dots connected by lines). Find the file you want to revert, hover over it, and click the Discard Changes icon (a counter-clockwise arrow). This will instantly restore the file to its last saved version.
- The new code looks right, but it breaks the page layout.
- Reason: The AI might have removed a critical class name that was controlling the layout (e.g., a class for a flexbox container).
- Fix: Discard the changes. Then, re-prompt the AI with more specific instructions, such as:
Update the button style, but make sure to preserve its parent container and all existing classes on that container.Being more specific in your prompt often solves these issues.
- The AI's changes are confusing and spread across multiple files.
- Reason: This is normal for web development. A single visual change often requires modifying the HTML structure (
index.html) and the CSS styling (styles/style.css). - Fix: Don't feel overwhelmed. The AI chat view usually lists all the files it has changed. Go through them one by one. Review the
index.htmlchanges first, then move on tostyles/style.css. There's no rush to accept everything at once.
- Reason: This is normal for web development. A single visual change often requires modifying the HTML structure (
5. Mini Exercise
Time for some hands-on practice.
- Open your landing page project in VS Code.
- Make sure your Live Server is running so you can see the changes.
- Open the AI chat panel (GitHub Copilot Chat).
- Type the following prompt:
Refactor the main page heading from an <h1> to an <h2>. Also, in the CSS, change the heading's color to a dark purple, like #4B0082. - The AI should propose changes in both
index.htmlandstyles/style.css. Notice the pending-change icons appear next to those files. - Open
index.html. Review the inline diff showing the<h1>tag being replaced by an<h2>tag. Click Keep. - Open
styles/style.css. Review the inline diff showing the color property being changed. Click Keep. - Look at your Live Server browser window. The heading should now be smaller (because it's an
h2) and purple. - Bonus: Go to the Source Control panel, find
styles/style.css, and click "Discard Changes" to see the color revert back, proving your safety net works.
6. Checklist Before Moving Ahead
Please confirm you can do the following:
- I can identify files with pending AI edits by looking for the "squared-dot" icon.
- I know how to open a file and review AI-generated changes using the inline diff view (red for old, green for new).
- I am comfortable using the
KeepandUndobuttons to manage incoming code changes. - I know how to use the "Discard Changes" feature in the Source Control panel as a safety net to revert a file.
Conclusion
Great work! You've now mastered the crucial step of safely integrating AI-generated code into your project. This is more than just copy-pasting; it's a deliberate process of review and approval that puts you in full control of your project's quality. You are now truly acting as the architect, directing the AI and validating its work.
In our next lesson, we'll complete the loop. Now that you've made and verified a change locally, we need to save it permanently. We will learn how to apply the Git workflow (commit, push) to save updates and prepare them for deployment.