Welcome back. In our last lesson, we explored the theoretical foundations of IPv6, from its 128-bit structure and hexadecimal notation to the crucial distinctions between Global Unicast, Unique Local, and Link-Local addresses. Now, it's time to move from theory to practice and apply this knowledge directly on Cisco network hardware.
Today, you will learn how to configure and verify IPv6 unicast addresses on a Cisco router interface. We will cover the essential global command required to enable IPv6 routing, and then dive into the two primary methods for assigning addresses to an interface: manual configuration and the automated EUI-64 process. Finally, we'll cover the show commands you'll use constantly to verify your work.
The Configuration Goal
Throughout this lesson, we will work with a simple network topology. Imagine you need to configure Router0 to connect two separate IPv6 subnets.
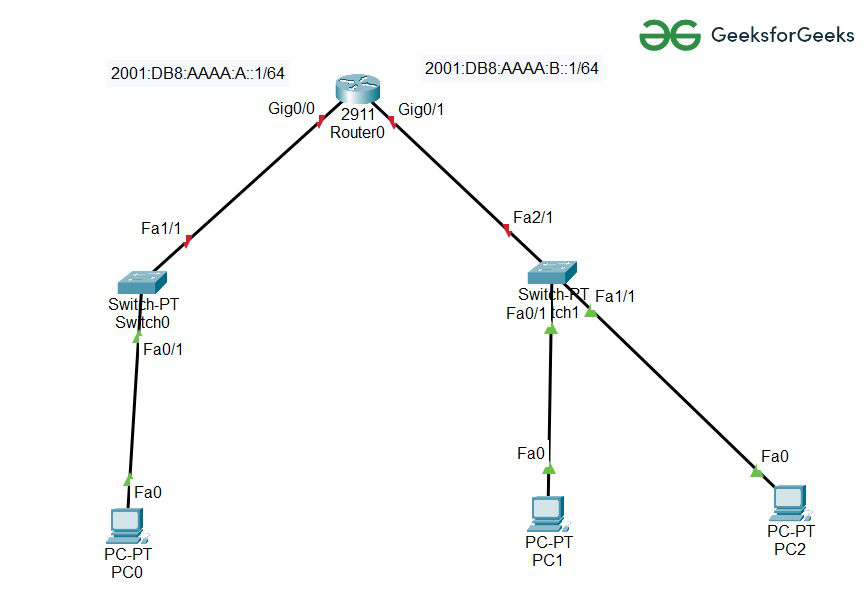
Our goal is to configure the router's interfaces with the first usable address in each subnet, which by convention is ::1.
- Gig0/0:
2001:db8:aaaa:a::1/64 - Gig0/1:
2001:db8:aaaa:b::1/64
Enabling IPv6 Routing: The Essential First Step
Before a Cisco router can forward any IPv6 traffic between different networks, you must explicitly enable this functionality at a global level. Unlike IPv4, which is enabled by default, IPv6 routing is off until you turn it on. The command is ipv6 unicast-routing.
Forgetting this single command is a classic and frequent mistake. Without it, a router can have IPv6 addresses on its interfaces, but it will not build an IPv6 routing table and will not forward packets between its connected subnets.
The following lab video from Jeremy's IT Lab perfectly demonstrates the consequences of forgetting this command. Watching a ping fail and then succeed after the command is entered is a memorable way to cement its importance.
Free CCNA | Configuring IPv6 (Part 1) | Day 31 Lab | CCNA 200-301 Complete Course
This clip shows a practical troubleshooting scenario where pings between subnets are failing.
Watch the segment from this point, where the instructor realizes why the pings are failing and applies the ipv6 unicast-routing command to fix the connectivity. This is a critical lesson for real-world configuration.
The configuration is straightforward:
Router(config)# ipv6 unicast-routing
You only need to enter this command once in global configuration mode.
Assigning Global Unicast Addresses
With IPv6 routing enabled, you can now configure the interfaces. You have two primary methods for assigning a Global Unicast Address (GUA):
- Static Manual Configuration: You specify the entire 128-bit address yourself.
- Static EUI-64 Configuration: You specify the 64-bit prefix, and the router generates the 64-bit interface ID automatically from the interface's MAC address.
The following video by Wendell Odom provides an excellent, in-depth explanation of both methods.
IPv6 Unicast Address Configuration: Static, EUI-64, and Dynamic Methods
This video is a comprehensive guide to static IPv6 address configuration on Cisco routers.
First, watch the section on manual configuration. Pay attention to how the ipv6 address command is used and how the router stores and displays addresses in their abbreviated form, regardless of how you typed them. Next, watch the segment that introduces the EUI-64 method. This shows the eui-64 keyword and how it tells the router to generate its own interface ID. Then, focus on the detailed explanation of how EUI-64 works. This is a core concept. It covers how the MAC address is split, FFFE is inserted, and the crucial 7th bit is flipped. Understanding this process is key. Finally, for exam prep and quick reference, review the EUI-64 shortcut at the end. This table is a very practical tool for quickly determining the result of the bit-flip without binary conversion.
Let's summarize the commands for our topology.
Method 1: Manual Configuration
This method gives you full control and predictability. You decide the exact address. For servers or router interfaces, a simple, memorable address like ::1 is common practice.
Router(config)# interface gigabitethernet 0/0
Router(config-if)# ipv6 address 2001:db8:aaaa:a::1/64
Router(config-if)# no shutdown

Router(config-if)# interface gigabitethernet 0/1
Router(config-if)# ipv6 address 2001:db8:aaaa:b::1/64
Router(config-if)# no shutdown
Method 2: EUI-64 Configuration
This method is more automated. It's useful when you don't need a predictable host address. The address will be unique because it's based on the unique MAC address of the interface.
Router(config)# interface gigabitethernet 0/0
Router(config-if)# ipv6 address 2001:db8:aaaa:a::/64 eui-64
Router(config-if)# no shutdown
In this case, the router would take the MAC address of Gig0/0, perform the EUI-64 process (insert FFFE, flip bit 7), append the result to 2001:db8:aaaa:a, and assign that as the interface's GUA.
A Note on Link-Local Addresses
As we discussed in the last lesson, every IPv6-enabled interface requires a Link-Local Address (LLA) for local segment communication.
When you configure a GUA (or simply enable IPv6 on an interface), the router automatically generates an LLA. By default, Cisco IOS uses the EUI-64 process to create this LLA from the interface MAC address. You will see it appear in the verification commands.
However, these auto-generated addresses are long and difficult to remember. It is often best practice to manually configure a simple, predictable LLA, such as fe80::1. Since LLAs only need to be unique on the local link, you can use the same LLA on every interface of a router.
9 Step IPv6 Configuration on Cisco Packet Tracer - IPCisco
This article section provides the exact command syntax for manually setting a Link-Local address.
Read the section titled Manual Link Local. Note the use of the link-local keyword at the end of the command, which is required to tell the router this is an LLA and not a GUA.
The command to set a manual LLA on Gig0/0 would be:
Router(config-if)# ipv6 address fe80::1 link-local
Verification: Checking Your Work
After configuration, verification is the most important skill. How do you confirm that the router has accepted your commands and that the interfaces are configured as you expect?
The Packet Tracer guide below walks through a full configuration and verification lab. It provides a great structure for applying all the concepts we've discussed.
[PDF] Packet Tracer - Configure IPv6 Addresses on Network Devices
This guide provides a hands-on exercise for configuring and verifying IPv6 addresses on routers, switches, and PCs.
Use this PDF as a reference guide. Focus on the following parts: Addressing Table (Page 1): See how an IPv6 addressing plan is laid out. Part 2, Step 1 (Page 2): Follow the steps to assign global and link-local addresses to router interfaces. Part 2, Step 2 (Page 2): This reinforces the importance of the ipv6 unicast-routing command. Part 3 (Page 3): Look at the commands used to verify connectivity, including ping and tracert for IPv6.
Here are the key verification commands you will use most often:
-
show ipv6 interface brief: This is your go-to command. It's the direct equivalent ofshow ip interface briefand gives you a concise summary of all interfaces, their IPv6 addresses, and their status.Router# show ipv6 interface brief GigabitEthernet0/0 [up/up] FE80::1 2001:DB8:AAAA:A::1 GigabitEthernet0/1 [up/up] FE80::1 2001:DB8:AAAA:B::1 -
show ipv6 interface <interface-name>: This provides detailed information about a specific interface, including its full GUA, LLA, the multicast groups it has joined, and parameters for Neighbor Discovery (which we'll cover soon). -
ping ipv6 <destination-address>: The standard connectivity test, adapted for IPv6.
Conclusion
In this lesson, we bridged the gap between IPv6 theory and practice. You now have the fundamental commands and procedures to bring an IPv6 network to life on a Cisco router.
Key Takeaways:
- IPv6 routing is not enabled by default. Always start with
ipv6 unicast-routingin global configuration. - You can assign Global Unicast Addresses manually with
ipv6 address <address>/<prefix>for predictable addresses. - Alternatively, you can use
ipv6 address <prefix>::/64 eui-64to have the router automatically generate the interface ID from its MAC address. - Link-Local Addresses are automatically generated but can be manually set for simplicity using the
link-localkeyword (e.g.,ipv6 address fe80::1 link-local). - Your primary verification command is
show ipv6 interface brief.
Now that our router interfaces have addresses, the next logical question is: how do devices on the same network learn about each other? In IPv4, this was the job of ARP. In IPv6, this and other critical functions are handled by the Neighbor Discovery Protocol (NDP). In our next lesson, we will explore the mechanisms of NDP, which is the glue that holds local IPv6 segments together.