In the previous lesson, we established why Quality of Service is critical for modern networks. You learned that the default best-effort model fails during congestion and that different applications—like voice, video, and data—have distinct needs regarding delay, jitter, and packet loss. We concluded by outlining the four core tools QoS uses to manage traffic intelligently.
This lesson delves into the mechanics of how QoS works. We will dissect those four core mechanisms: classification, marking, queuing, and policing/shaping. By the end of our session, you will be able to describe each of these components and understand how they work together to enforce a network-wide QoS policy.
Step 1: Classification and Marking
Before we can give any traffic special treatment, we must first identify it. This is the role of classification. Then, to ensure that other devices in the path don't have to repeat this identification process, we apply a tag. This is called marking. Think of it as sorting packages at a mail depot (classification) and then putting a color-coded sticker on each one (marking) so every subsequent handler knows its priority at a glance.
A network device can classify traffic based on various criteria:
- IP addresses or subnets
- Layer 4 protocol and port numbers (e.g., UDP port 5060 for SIP voice signaling)
- Application signatures using Network Based Application Recognition (NBAR), which performs a "deep packet inspection" to identify applications like Skype or BitTorrent regardless of the ports they use.
Once classified, traffic is marked. The two primary marking methods operate at Layer 2 and Layer 3.
Free CCNA | QoS (Part 2) | Day 47 | CCNA 200-301 Complete Course
To begin, we'll watch a detailed breakdown from Jeremy's IT Lab. This video provides a clear, step-by-step explanation of both Layer 2 and Layer 3 marking, and introduces the vital concept of a trust boundary.
First, watch the explanation of Layer 2 marking from PCP and CoS. This covers the 3-bit Class of Service (CoS) field within an 802.1Q VLAN tag. Next, watch the segment on Layer 3 marking from DSCP. This is the most important part, as it details the 6-bit Differentiated Services Code Point (DSCP) field in the IP header. Pay close attention to the different value sets: EF (Expedited Forwarding), AF (Assured Forwarding), and CS (Class Selector). Finally, watch the explanation of the trust boundary from this section. This concept is fundamental to network security and policy enforcement.
Let's summarize and solidify those key concepts.
Layer 2 Marking: Class of Service (CoS)
- Uses the 3-bit Priority Code Point (PCP) field within the 802.1Q VLAN tag. This is commonly referred to as Class of Service (CoS).
- Provides 8 priority levels (0-7). For example, CoS 5 is typically used for voice traffic.
- Since it's part of the VLAN tag, it only exists on 802.1Q trunk links between switches or on access ports configured with a voice VLAN. It is stripped away when a packet is routed to another subnet.
Layer 3 Marking: Differentiated Services Code Point (DSCP)
- Uses a 6-bit field in the IP header, allowing for 64 distinct priority levels (0-63).
- Because it's in the IP header, the DSCP value persists end-to-end as the packet traverses routers. This makes it far more scalable and widely used than CoS for enterprise-wide QoS.
- Key DSCP values to know:
- EF (Expedited Forwarding - 46): Provides the lowest loss, latency, and jitter. Reserved for voice traffic.
- AF (Assured Forwarding): A set of 12 values organized into four classes with three drop precedences each (e.g.,
AF41,AF23). Used for traffic like video and critical data. A higher class means higher priority, and a higher drop precedence means the packet is more likely to be dropped during congestion. - CS (Class Selector): A set of 8 values that provide backward compatibility with the older IP Precedence standard.
CS3andCS5are often used for call signaling.
- DF (Default Forwarding - 0): Best-effort traffic. This is the default for all traffic that isn't explicitly marked otherwise.
The Trust Boundary
This is the perimeter in your network where you decide to "trust" the QoS markings on incoming packets.
- Outside the boundary: Packets are considered untrusted. The network device (usually an access switch) will ignore or reset any existing markings and re-mark the traffic according to your central policy.
- Inside the boundary: Packets are trusted, and their markings are preserved as they are forwarded.
Typically, you would not trust markings from an end-user's PC, as a user could try to mark their file download as high-priority voice traffic. However, you would usually extend the trust boundary to include an IP phone, as it is a dedicated device that correctly marks its own voice and signaling traffic.
Mastering QoS for CCNA 200-301: Real-World Lessons, Lab ...
This article from the AlphaPrep blog provides a concise, real-world perspective on these concepts.
Please read the section titled Classification and Marking. Focus on the table that maps traffic types to their common DSCP and CoS values, which provides excellent context for these numbers.
Step 2: Congestion Management - Queuing
Once traffic is marked, our network devices can use those marks to provide differentiated treatment. The primary method for this is queuing. Instead of a single First-In, First-Out (FIFO) queue, devices can maintain multiple queues and use a scheduler to service them according to their priority.

There are several queuing strategies, which build upon each other in sophistication.
Free CCNA | QoS (Part 2) | Day 47 | CCNA 200-301 Complete Course
Let's return to the video from Jeremy's IT Lab to explore how these different queuing strategies work.
Watch the segment on queuing and congestion management. It effectively progresses from simple multi-queue concepts to advanced methods like CBWFQ and LLQ.
Here's a breakdown of the main queuing mechanisms:
-
Weighted Fair Queuing (WFQ): An improvement over simple FIFO. WFQ identifies individual traffic "flows" (based on source/destination IP and ports) and gives each flow a fair share of the bandwidth. This prevents a single large file transfer from starving a small, interactive SSH session. However, it still treats a voice flow and a file transfer flow "fairly," which isn't what we want.
-
Class-Based Weighted Fair Queuing (CBWFQ): This is where our markings become powerful. With CBWFQ, we can define traffic classes (e.g., a "critical-data" class) and guarantee a minimum amount of bandwidth to that class during congestion. All traffic that doesn't fit into a defined class is treated as best-effort.
-
Low Latency Queuing (LLQ): This is the final and most crucial piece for real-time traffic. LLQ adds a strict priority queue (PQ) to the CBWFQ model. Any packet that enters the priority queue is sent immediately, ahead of all other queues. This is exactly what voice and video need to minimize delay and jitter.
A critical consideration with LLQ is the danger of queue starvation. If the priority queue is constantly full, the other queues might never get serviced. To prevent this, the priority queue is always policed—a topic we'll cover next—to limit the amount of traffic it can accept, ensuring that it can't hog all the available bandwidth.
Step 3: Congestion Management - Policing and Shaping
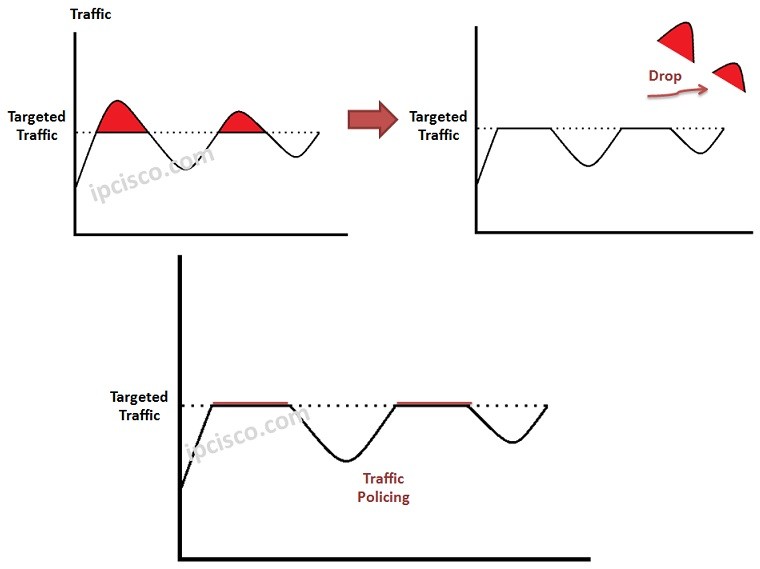
Policing and shaping are two methods for enforcing traffic rate limits. They are often used together but have a crucial difference in how they handle traffic that exceeds the configured rate.
- Policing drops excess traffic.
- Shaping buffers (queues) excess traffic.
Introduction to QoS (Quality of Service) - NetworkLessons.com
The article "Introduction to QoS" from NetworkLessons.com clearly explains the difference between these two mechanisms with a great practical example.
Read the section Policing and Shaping. Pay attention to the customer/ISP scenario, as it's the classic use case for these tools.
As you just read, the classic example is the relationship between a customer and an Internet Service Provider (ISP):
- The ISP sells a 200 Mbps connection. To enforce this, they apply a policer on their inbound interface. Any traffic the customer sends above 200 Mbps (plus a small burst allowance) is dropped.
- The customer, knowing their traffic will be dropped if they exceed the limit, applies a shaper on their outbound interface. The shaper queues any traffic bursts that go over 200 Mbps and sends them out gradually, "smoothing" the traffic flow to conform to the ISP's limit. This prevents drops but introduces delay.
This trade-off is key: policing is harsh but adds no delay, while shaping is gentle but adds delay and jitter. This is why shaping must be implemented carefully, especially on links carrying voice traffic.
Conclusion
In this lesson, we have taken a deep dive into the core mechanisms that make Quality of Service function. You've moved from the "why" to the "how," dissecting the tools that network devices use to manage congestion intelligently.
Key Takeaways:
- Classification identifies traffic, and marking applies a persistent tag (Layer 2 CoS or Layer 3 DSCP) so devices can quickly recognize its priority.
- The trust boundary is a security perimeter that determines whether a device accepts or overwrites incoming QoS markings.
- Queuing strategies manage congestion by prioritizing traffic. LLQ is the modern standard, using a strict priority queue for real-time traffic and CBWFQ to provide bandwidth guarantees for other classes.
- Policing enforces a rate limit by dropping excess traffic, typically used by ISPs.
- Shaping enforces a rate limit by queuing excess traffic, smoothing the flow to avoid being policed.
You now have a solid conceptual foundation of the QoS toolkit. In the next lesson, we will put this knowledge into practice. You will learn how to configure traffic classification and marking on a Cisco router using Access Control Lists and the Modular QoS CLI (MQC).