Hello! Welcome back to our study of Quantum Field Theory.
In the previous lesson, we reached a major milestone by constructing the full Lagrangian for Quantum Electrodynamics. We saw how the principle of local U(1) gauge invariance masterfully dictates the existence of the electromagnetic field and precisely defines its interaction with electrons and positrons through the term . This interaction term is the heart of QED, representing the fundamental vertex where matter and light meet.
Today, we will translate our Lagrangian into a practical, powerful toolkit for calculation. Our goal is to state the complete set of Feynman rules for tree-level QED in momentum space. These rules form a dictionary that allows us to draw simple diagrams representing particle interactions and convert them directly into the mathematical expressions—the Feynman amplitudes—needed to calculate physical observables like scattering cross-sections.
1. From Lagrangian to Diagrams: A Conceptual Framework
The Feynman rules don't appear out of thin air. They are a clever distillation of the results from applying perturbation theory to our QED Lagrangian. As you saw in Module 2 with theory, calculating scattering amplitudes involves:
- Expanding the S-matrix operator using the Dyson series: .
- Using Wick's theorem to decompose the time-ordered products of fields into normal-ordered products and propagators.
- Evaluating the matrix elements of these terms between initial and final particle states.
In QED, this process is significantly more complex due to the vector and spinor nature of the fields. However, the result is a beautifully systematic set of rules, one for each component of a diagram: external particles, internal propagating particles, and interaction vertices.
A key convention in these diagrams is how we distinguish particles from antiparticles. The arrows on fermion lines follow the flow of electron number (charge), not necessarily the direction of motion in time.
- An electron (charge -e) carries electron number +1. Its arrow points forward in time.
- A positron (charge +e) carries electron number -1. It is represented as an electron number of +1 flowing backward in time. Thus, its arrow points backward along its direction of motion.
This clever convention ensures that electron number is conserved at every vertex; an arrow always flows continuously through a fermion line.
To see a clear explanation of this crucial convention, please watch the following segment.
Dec2 Physics 151 QED Feynman rules and diagrams
The video 'QED Feynman rules and diagrams' by Prof. Hitoshi Murayama provides an excellent visualization of the arrow convention for fermion lines.
Please watch from 22:27 to 28:15. Pay close attention to how the arrows are used to distinguish particles from antiparticles and ensure a continuous 'flow' of electron number.
2. The Complete Feynman Rules for QED
Let's now assemble the complete set of rules. Each rule is a factor that we write down when we see the corresponding feature in a diagram. To get the total amplitude for a diagram, we multiply all these factors together.
Visual Summary
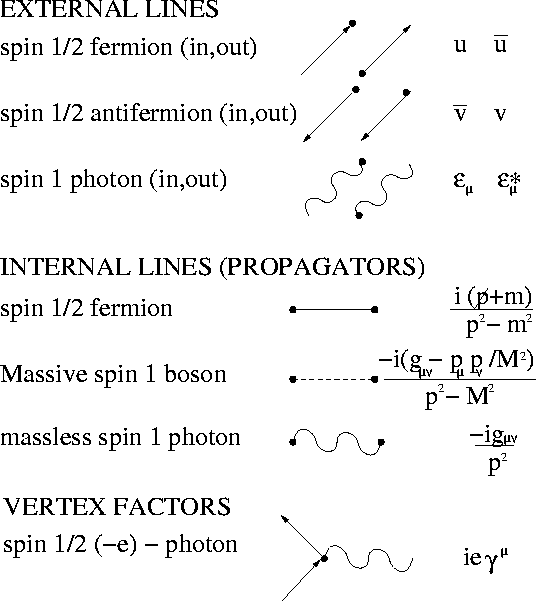
The following image provides a concise graphical summary of the core rules for QED. We will break down each component in detail below.
The Rules in Detail
We'll work in momentum space and use natural units (). The fine-structure constant is .
1. External Lines (Asymptotic States)
These factors represent the wavefunctions of the incoming and outgoing particles.
- Incoming electron:
- Outgoing electron:
- Incoming positron:
- Outgoing positron:
- Incoming photon:
- Outgoing photon:
Here, and are the 4-momenta, is the spin state, and is the polarization.
2. Internal Lines (Propagators)
These factors describe the propagation of a "virtual" particle between two vertices.
-
Fermion (electron/positron) Propagator: A solid line with momentum .
where . This is the Feynman propagator for the Dirac field which we derived previously. -
Photon Propagator: A wavy line with momentum . In the Feynman gauge, which we will use, this takes a simple, Lorentz-invariant form:
3. Vertex
This is the point where lines meet, representing the interaction .
- QED Vertex: A junction of one photon line and two fermion lines. The factor is:
The factor of comes from the in the exponential of the S-matrix expansion, .
4. Conservation and Integration
- For each vertex, impose 4-momentum conservation. The sum of incoming momenta must equal the sum of outgoing momenta.
- For any undetermined ("loop") momentum that remains after enforcing conservation at all vertices, integrate over it: . (This applies to loop diagrams, which we'll study later, not tree-level diagrams).
5. Fermionic Signs and Matrix Ordering
This is a subtle but critical set of rules arising from the anti-commuting nature of fermion fields.
- Dirac Matrix Ordering: For a continuous fermion line, write the Dirac-matrix-valued factors (spinors, propagators, vertices) from right to left as you follow the line from its "head" (where the arrow terminates) to its "tail" (where the arrow begins). This corresponds to following the fermion line against the direction of its arrow.
- Relative Signs:
- Add a relative minus sign between two diagrams that differ only by the exchange of two identical external fermion lines (e.g., swapping the two outgoing electrons in Møller scattering, ).
- Include a factor of for every closed fermion loop.
The following resource provides a very clear and comprehensive list of these rules, with excellent explanations of the trickier points like matrix ordering and sign conventions.
The Quantum EM Fields and the Photon Propagator
The document 'QED Feynman rules' from the University of Texas provides a detailed and well-structured summary of the rules we've just discussed.
Please read the section titled 'QED Feynman rules' (pages 7-14). Focus on how the external lines, propagators, and vertices are defined. Pay special attention to the section on 'continuous fermionic lines' and the example in eq. (59), as it demonstrates the crucial right-to-left matrix multiplication rule.
3. Justification and Derivation
Stating these rules is one thing, but knowing where they come from is another. While a full derivation of every rule is extensive, we can highlight the physical reasoning behind the most important ones. The process involves calculating the S-matrix element for a given process and then comparing the resulting mathematical expression with the diagram we draw for it. By identifying patterns across many different processes, the rules can be "read off".
This painstaking procedure is exactly what is performed in the video below. You are not required to watch it in its entirety, but it serves as an excellent reference for the complete, rigorous derivation that underpins the rules we use. The final segment is particularly enlightening, as it brings everything together.
How To Derive The Feynman Rules For QED | Quantum Electrodynamics | Quantum Field Theory
The video 'How To Derive The Feynman Rules For QED' from Dietterich Labs provides a complete, first-principles derivation of the QED Feynman rules from the S-matrix expansion.
Please watch the segment from 1:01:17 to 1:08:01. In this section, the author presents a large table comparing the diagrams for various QED processes (Compton, Møller, Bhabha scattering, etc.) with the amplitudes calculated from perturbation theory. He then systematically inspects this table to 'read off' the complete set of Feynman rules, showing how each rule corresponds to a recurring mathematical factor.
A particularly subtle point is the form of the photon propagator. Its form depends on the gauge choice. However, for S-matrix calculations, we can use the simple Feynman gauge form because the additional, more complex terms ultimately do not contribute to physical amplitudes due to current conservation. This is a consequence of the Ward-Takahashi identity. The following reading demonstrates this for a tree-level diagram.
David Tong's QFT notes demonstrate why the simple, Lorentz-invariant photon propagator is sufficient for calculating scattering amplitudes.
Read pages 141-142, starting from the 'Claim' and its 'Proof'. This section shows that for a typical scattering diagram, the complicated part of the propagator in a general gauge can be replaced by the simple Feynman gauge propagator because the extra terms vanish when contracted with the fermion currents.
Test your understanding!
Consider electron-electron scattering, . One of the two tree-level diagrams is the "t-channel" diagram, where a virtual photon with momentum is exchanged.
Draw this diagram and write down the expression for the Feynman amplitude by applying the rules we've just learned. Do not evaluate it; just assemble the pieces in the correct order.
Show answer
The diagram has two fermion lines.
- An electron comes in with momentum , emits a photon, and goes out with momentum .
- An electron comes in with momentum , absorbs the photon, and goes out with momentum .
(This is a sketch of the t-channel diagram for electron-electron scattering).
Applying the rules gives the Feynman amplitude . We have two vertices, two incoming electrons, two outgoing electrons, and one internal photon. The expression is a product of two fermion currents connected by a photon propagator.
Following the first fermion line (1 -> 3) against its arrow, we write the factors from right to left:
- Incoming electron :
- Vertex:
- Outgoing electron :
This gives the first current: .
Following the second fermion line (2 -> 4) gives the second current: .
The exchanged photon has momentum and its propagator is .
Multiplying these pieces together gives the amplitude for this diagram:
Note that the indices and are contracted between the two vertices and the propagator.
Conclusion
In this lesson, you have learned the complete set of Feynman rules for tree-level calculations in Quantum Electrodynamics. These rules are the bridge between the formal Lagrangian of a theory and its observable predictions.
Key Takeaways:
- Feynman rules provide a dictionary to translate diagrams into mathematical amplitudes.
- External lines are represented by spinors () for fermions and polarization vectors () for photons.
- Internal lines are represented by propagators, which for fermions and photons in Feynman gauge are and respectively.
- The QED vertex gives a factor of .
- The anti-commuting nature of fermions imposes strict rules on matrix ordering (write factors right-to-left against the fermion arrow) and relative signs for exchanged identical fermions.
Preview of the Next Lesson:
We now have the complete recipe book. In our next session, we will immediately put it to use to calculate our first full QED process: the scattering of an electron and a muon (). This will require us to learn the powerful computational techniques of Casimir's trick and gamma matrix trace technology, which are essential for dealing with the spin sums in unpolarized scattering experiments.