Hello! In our last lesson, we took a crucial step towards building a site search feature by generating a static search-index.json file at build time. This file contains all the clean, searchable content from your blog posts and service pages.
Today, we'll build the client-facing part of this feature. This lesson will guide you through building a fully interactive and accessible search interface using your React skills. We will cover how to create the UI for the search input and results display, and then implement the logic to fetch our search index and filter it in real-time based on user input.
By the end of this lesson, you will have a functional, high-performance search component ready to be integrated into your website's header.
Let's get started!
1. The Anatomy of a Client-Side Search Component
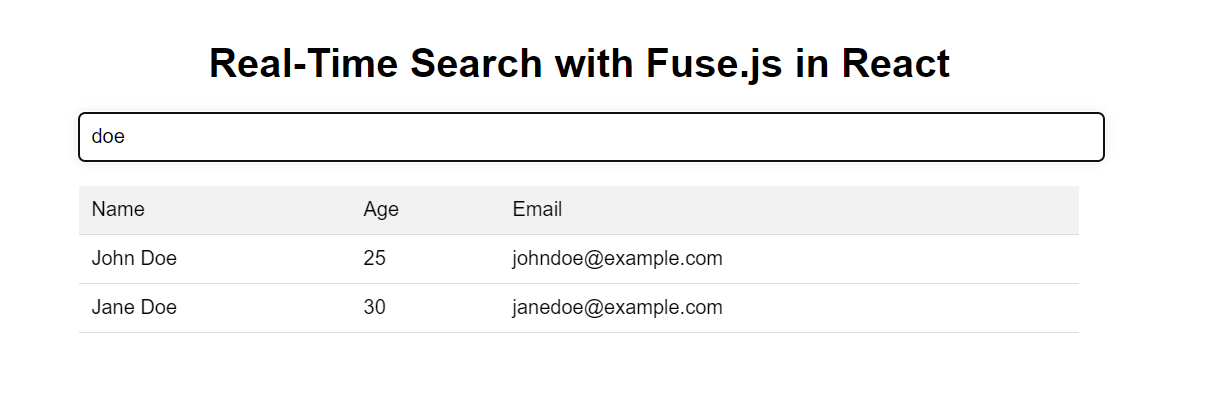
Our goal is to build a search experience like the one shown below, where results appear instantly as the user types.

To achieve this, our React component will need to:
- Fetch the Data: When the component first loads, it will fetch the
search-index.jsonfile we created in the last lesson. - Manage User Input: It will use React's state to keep track of what the user is typing into the search box.
- Filter the Data: As the user types, it will use a fast, lightweight search library to filter the full list of content against the user's query.
- Display the Results: It will update the UI to show the filtered list of matching pages.
We'll wrap all of this logic and UI inside a single React component, making it a reusable "island of interactivity" in our Astro project.
2. Setting Up the React Component and Dependencies
First, we need a library to handle the "fuzzy" searching. This allows for typos and partial matches, creating a better user experience. A great choice for this is fuse.js. Let's install it.
Open your terminal and run:
npm install fuse.js
Now, let's create the files for our search component. In your src/components/ directory, create a new React component file named Search.jsx.
This React component will be rendered by a parent Astro component. This wrapper is useful for controlling where the component appears and setting client-side hydration directives. Create src/components/SearchWrapper.astro:
---
// src/components/SearchWrapper.astro
import Search from './Search.jsx';
---

<Search client:load />
Here, client:load tells Astro to load and hydrate the React component as soon as the page loads. This makes our search bar interactive immediately. You can place <SearchWrapper /> in your site's header or layout file.
3. Building the Search UI and Logic in React
Now, let's build the core of our feature in Search.jsx. We'll start by fetching the data and setting up the search logic.
The following article, "How to Create an Astro Search component," provides a great foundation for this. However, we will adapt its approach slightly for better performance.
How to Create an Astro Search component
The article 'How to Create an Astro Search component' by Dani Diaz demonstrates building a search component using Fuse.js. We will follow its core logic for setting up Fuse.js and managing state.
Read the section 'Building a React Search component'. Focus on how it uses the useState hook to manage the user's query and how it initializes Fuse with a list of posts and options. Note that the article passes the searchList as a prop. We will modify this to fetch the data on the client side for better performance, but the logic for using Fuse remains the same.
Here is the initial implementation for src/components/Search.jsx, incorporating client-side fetching and the logic from the article.
// src/components/Search.jsx
import { useState, useEffect, useRef } from 'react';
import Fuse from 'fuse.js';

// Configure Fuse.js
const fuseOptions = {
  keys: ['title', 'body', 'headings'],
  includeMatches: true,
  minMatchCharLength: 2,
  threshold: 0.4, // Adjust this for stricter/looser matching
};

export default function Search() {
  const [query, setQuery] = useState('');
  const [results, setResults] = useState([]);
  const [fuse, setFuse] = useState(null);

  // Fetch search index on component mount
  useEffect(() => {
    fetch('/search-index.json')
      .then((res) => res.json())
      .then((data) => {
        setFuse(new Fuse(data, fuseOptions));
      });
  }, []);

  // Handle search logic
  useEffect(() => {
    if (query.length > 1 && fuse) {
      const searchResults = fuse.search(query);
      setResults(searchResults.map(result => result.item).slice(0, 5)); // Show top 5 results
    } else {
      setResults([]);
    }
  }, [query, fuse]);

  function handleOnSearch({ target }) {
    setQuery(target.value);
  }

  return (
    <div>
      <label htmlFor="search">Search</label>
      <input
        type="text"
        id="search"
        value={query}
        onChange={handleOnSearch}
        placeholder="Search posts and services..."
      />

      {results.length > 0 && (
        <ul>
          {results.map(({ slug, collection, title }) => (
            <li key={slug}>
              <a href={`/${collection}/${slug}/`}>
                {title}
              </a>
            </li>
          ))}
        </ul>
      )}
    </div>
  );
}
Let's break this down:
- State Management: We use
useStatefor the user'squery, the filteredresults, and to hold the initializedfuseinstance. - Data Fetching: The first
useEffectruns once. It fetches oursearch-index.jsonfile and initializes a newFuseinstance with the data and our configuration. This is more scalable than passing a large data object as a prop, as it keeps your initial page loads fast. - Search Execution: The second
useEffectruns whenever thequerychanges. If the query is long enough, it usesfuse.search()to find matches and updates theresultsstate. - Rendering: The JSX renders the input field and, conditionally, a list of results. Each result links to the correct page using its
collectionandslug.
4. Making the Search Component Accessible
Our search works, but for it to be production-ready and meet WCAG standards, it must be accessible to users of assistive technologies, like screen readers, and navigable via the keyboard. We will implement the ARIA combobox pattern.
The following resource is an excellent guide to building an accessible "typeahead" or autocomplete component, which is what our search UI is.
Building an Accessible Typeahead Component with React
The article 'Building an Accessible Typeahead Component with React' by Rebecca Deprey provides a masterclass in applying ARIA attributes to make a search component accessible. We will integrate its key principles.
Please study the following sections: 'How Does a Screen Reader Know...', 'Additional ARIA Attributes Needed for Comboboxes', 'aria-activedescendant', and 'Additional ARIA Attributes for the Option Role'. Focus on understanding the purpose of roles like combobox, listbox, and option, and attributes like aria-controls, aria-expanded, and especially aria-activedescendant for keyboard navigation.
Let's apply these accessibility enhancements to our Search.jsx component. This involves adding ARIA attributes and handling keyboard events.
Here is the updated, accessible version of Search.jsx:
// src/components/Search.jsx (Accessible Version)
import { useState, useEffect } from 'react';
import Fuse from 'fuse.js';

const fuseOptions = {
  keys: ['title', 'body', 'headings'],
  includeMatches: true,
  minMatchCharLength: 2,
  threshold: 0.4,
};

export default function Search() {
  const [query, setQuery] = useState('');
  const [results, setResults] = useState([]);
  const [fuse, setFuse] = useState(null);
  const [activeIndex, setActiveIndex] = useState(-1); // For keyboard navigation

  useEffect(() => {
    fetch('/search-index.json')
      .then((res) => res.json())
      .then((data) => {
        setFuse(new Fuse(data, fuseOptions));
      });
  }, []);

  useEffect(() => {
    if (query.length > 1 && fuse) {
      const searchResults = fuse.search(query);
      setResults(searchResults.map(result => result.item).slice(0, 5));
    } else {
      setResults([]);
    }
    setActiveIndex(-1); // Reset active index on new query
  }, [query, fuse]);

  const handleKeyDown = (e) => {
    if (results.length === 0) return;

    if (e.key === 'ArrowDown') {
      e.preventDefault();
      setActiveIndex((prevIndex) => (prevIndex + 1) % results.length);
    } else if (e.key === 'ArrowUp') {
      e.preventDefault();
      setActiveIndex((prevIndex) => (prevIndex - 1 + results.length) % results.length);
    } else if (e.key === 'Enter') {
      if (activeIndex !== -1) {
        const activeResult = results[activeIndex];
        window.location.href = `/${activeResult.collection}/${activeResult.slug}/`;
      }
    }
  };

  return (
    <div onKeyDown={handleKeyDown}>
      <label htmlFor="search-combobox">Search</label>
      <input
        id="search-combobox"
        type="text"
        value={query}
        onChange={(e) => setQuery(e.target.value)}
        placeholder="Search posts and services..."
        role="combobox"
        aria-expanded={results.length > 0}
        aria-controls="search-listbox"
        aria-activedescendant={activeIndex !== -1 ? `result-item-${activeIndex}` : undefined}
      />

      {results.length > 0 && (
        <ul id="search-listbox" role="listbox">
          {results.map(({ slug, collection, title }, index) => (
            <li
              key={slug}
              id={`result-item-${index}`}
              role="option"
              aria-selected={index === activeIndex}
              style={{ backgroundColor: index === activeIndex ? '#eee' : 'transparent' }} // Basic highlighting
            >
              <a href={`/${collection}/${slug}/`}>
                {title}
              </a>
            </li>
          ))}
        </ul>
      )}
    </div>
  );
}
Key accessibility improvements:
- Keyboard Navigation: We added
activeIndexstate and ahandleKeyDownfunction to allow users to navigate results withArrowUp/ArrowDownand select withEnter. role="combobox"on the<input>: Identifies the input as controlling another element (the listbox).aria-expanded: Tells screen readers whether the results list is open or closed.aria-controls: Links the input to the results<ul>by its ID.role="listbox"on the<ul>androle="option"on each<li>: Defines the results list and its items semantically.aria-activedescendant: This is the clever part. It tells screen readers which option is "active" or "focused" via keyboard navigation, while the actual browser focus remains on the input field.aria-selected: Indicates which option is currently active. We also add some basic styling to visually highlight the active item.
Test your understanding!
A common performance optimization for search inputs is "debouncing." This prevents the search function from running on every single keystroke, and instead waits for the user to pause typing. Given your experience with JavaScript and React, how might you implement a simple debounce for our handleOnSearch logic? You don't need to write the full code, just describe the approach.
Show answer
The approach would involve using setTimeout and clearTimeout.
- Instead of updating the
querystate directly in theonChangehandler, we would update an intermediate state or just the input's value directly. - Inside the
onChangehandler, we would clear any existing timeout usingclearTimeout. - Then, we'd set a new timeout with
setTimeout. Inside this timeout's callback (e.g., after 300ms), we would then update thequerystate with the input's current value.
This ensures that the useEffect hook that performs the expensive fuse.search() operation only runs after the user has stopped typing for a brief period, improving performance. You could implement this logic inside the component or use a custom useDebounce hook for a cleaner solution.
Conclusion
Fantastic work! You have now built a complete, interactive, and accessible search component in React and successfully integrated it into your Astro project. You've combined your existing frontend skills with Astro's island architecture to create a powerful feature that enhances the user experience of your content-heavy site.
Key Takeaways:
- Client-Side Fetching: Fetching a static JSON index on the client is a performant and scalable pattern for search in static sites.
- Fuzzy Search: Libraries like
Fuse.jsmake it easy to implement powerful, typo-tolerant search logic. - React for Interactivity: React components, hydrated with
client:directives, are the perfect tool for building complex interactive UIs within an Astro site. - Accessibility is Key: Using ARIA roles and attributes (
combobox,listbox,aria-activedescendant) is essential for building professional, production-ready components that are usable by everyone.
Up Next:
With your website's core features now built, the final step is to prepare it for the world. In the next and final module, we will cover Deployment and Production Readiness, where you'll learn how to deploy your static Astro site to a modern hosting platform, set up a custom domain, and enable continuous deployment.