Hello! In our last lesson, we focused on communicating with search engines by implementing structured data with JSON-LD. This helps machines understand the meaning of your content. Today, we'll shift our focus to making your site navigable for people using assistive technologies, a fundamental aspect of both accessibility and SEO.
This lesson continues the SEO and Web Accessibility module. We will be working towards the learning outcome: Structure pages with semantic HTML (landmarks, headings) for assistive technologies.
You'll learn how to use HTML elements for their meaning, not just their appearance. This practice is a cornerstone of the Web Content Accessibility Guidelines (WCAG) and has the added benefit of reinforcing your site's structure for search engines, directly supporting your goal of building an SEO-optimized and accessible accounting website.
What is Semantic HTML?
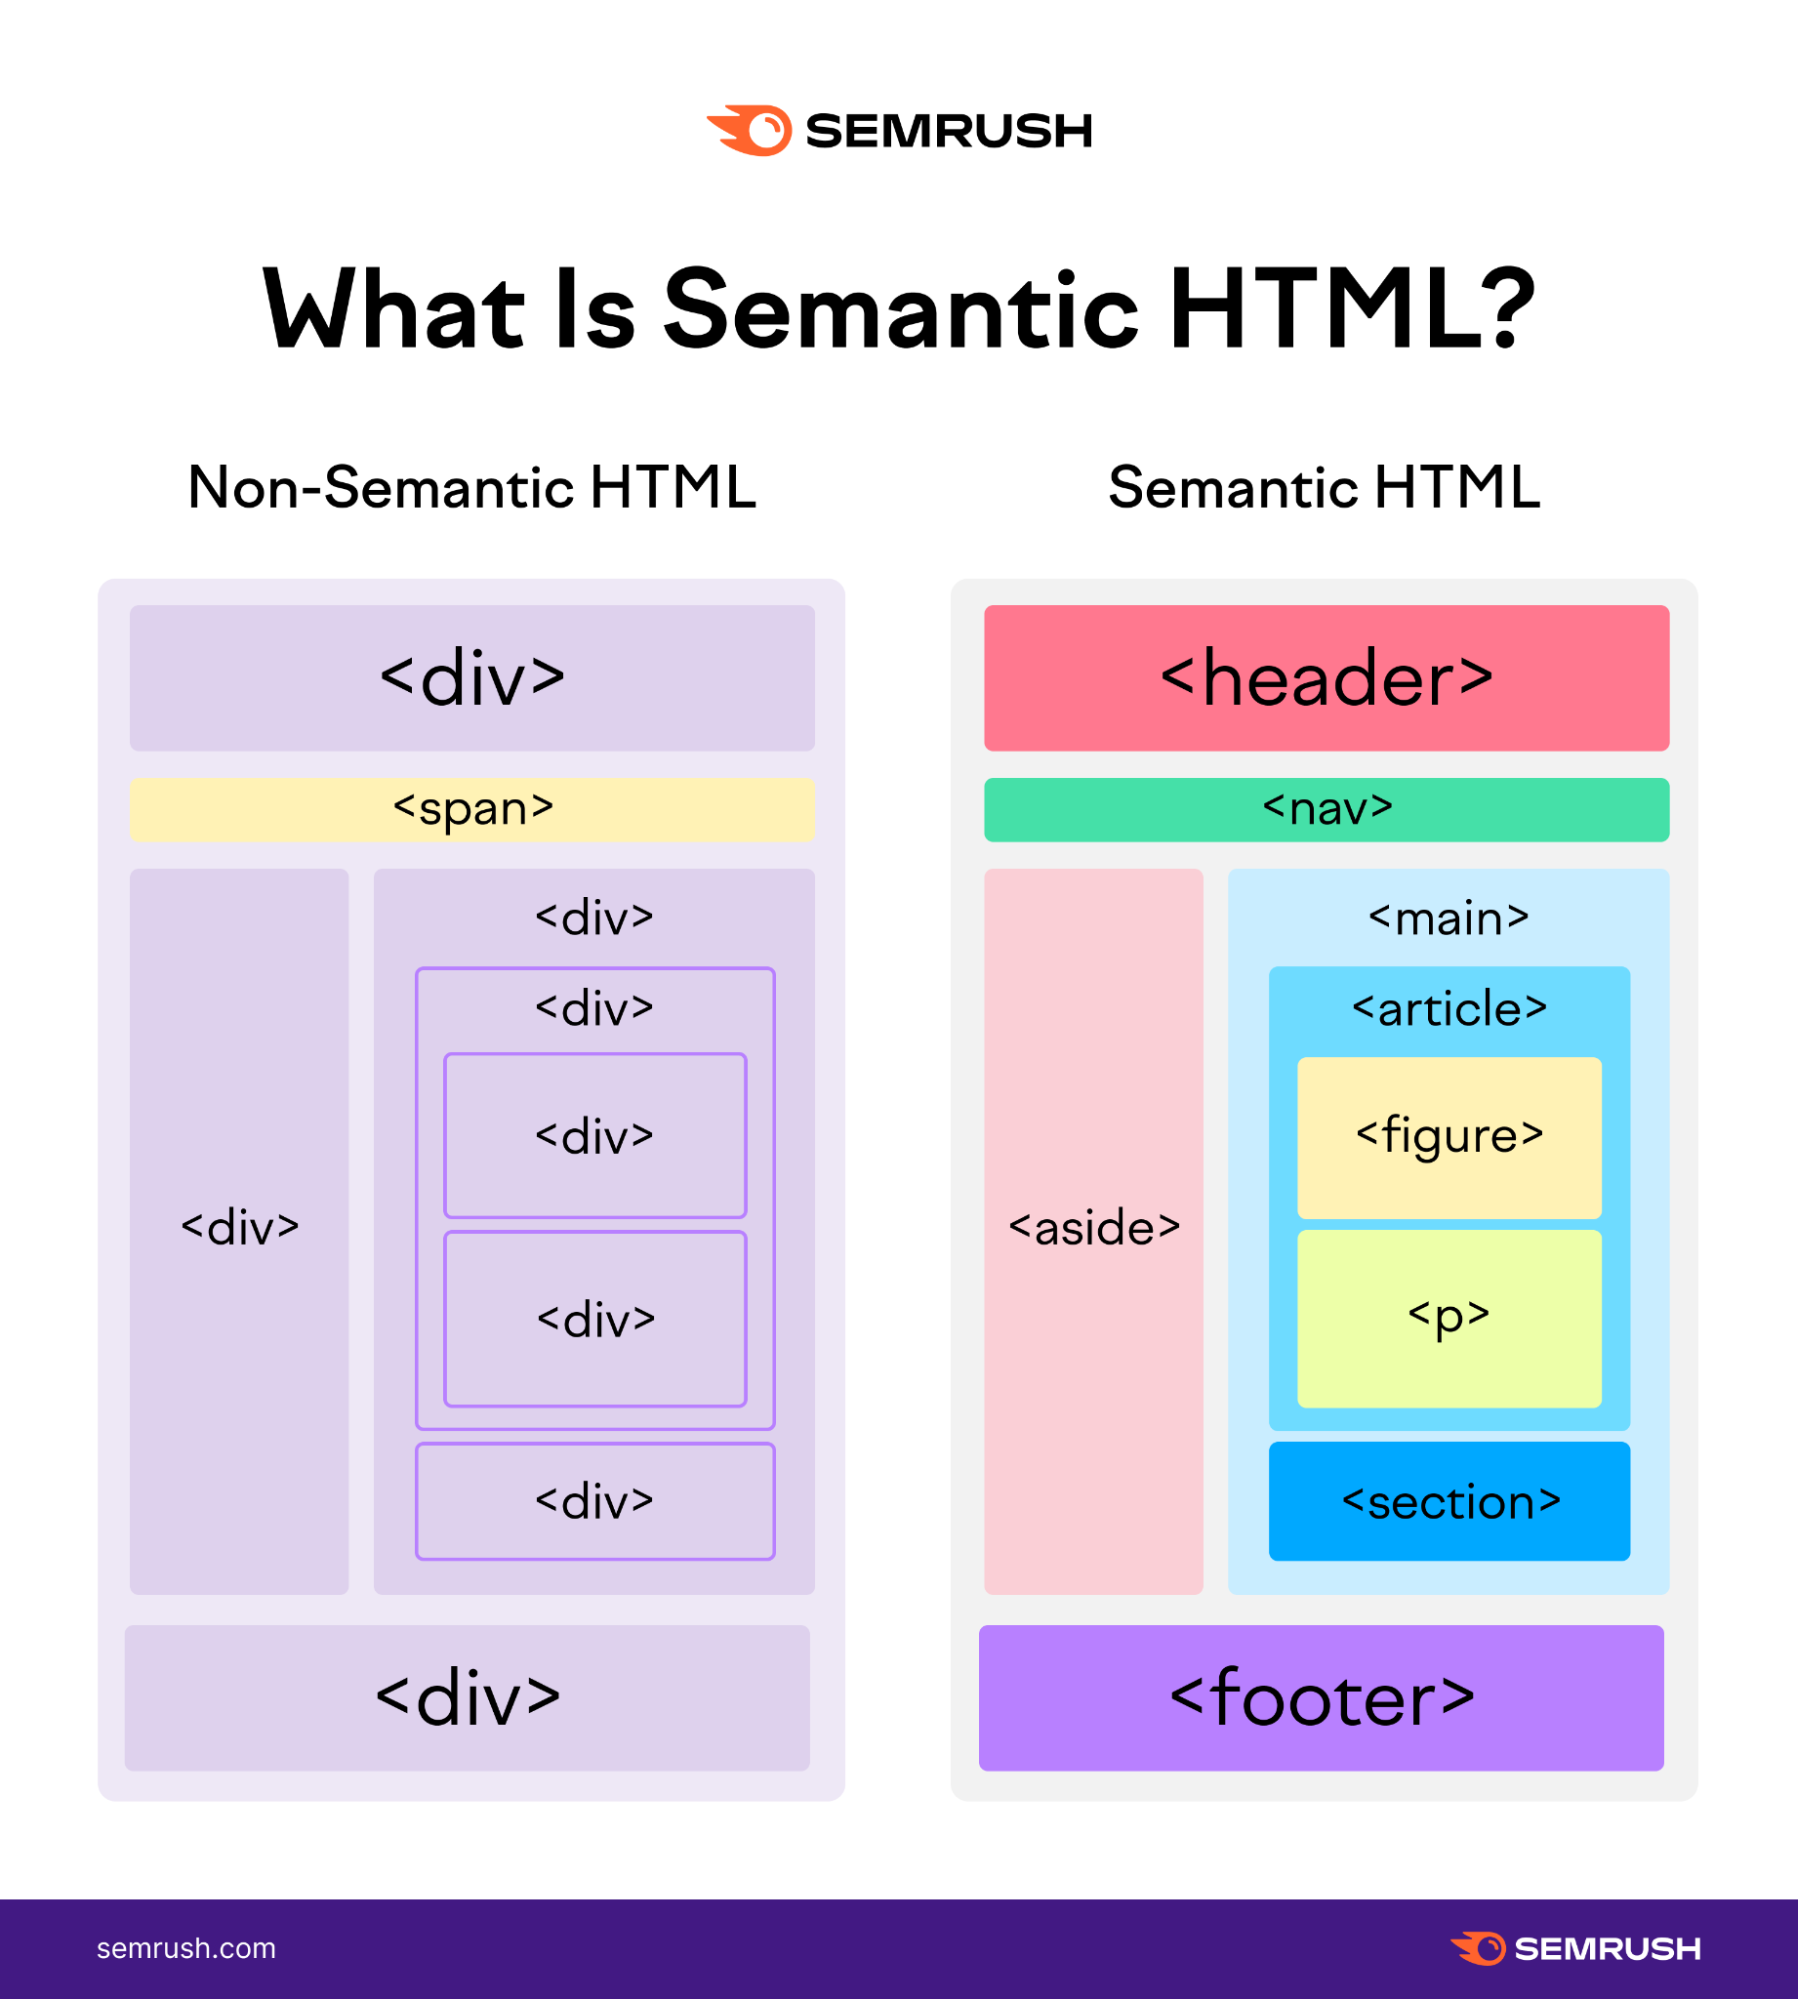
Semantic HTML means using HTML tags that convey the meaning and structure of the content they contain. For instance, using <article> for a self-contained blog post instead of a generic <div>, or <nav> for a navigation menu instead of a <ul>.
As a UI Engineer, you're accustomed to structuring layouts with components. Semantic HTML takes this a step further by ensuring the underlying DOM itself is inherently meaningful, even without CSS or JavaScript.
This has three major benefits:
- Accessibility: Screen readers and other assistive tools use these semantic cues to understand the page layout and provide navigational shortcuts to users.
- SEO: Search engines use this structure to identify the most important parts of your content, which complements the structured data you implemented in the last lesson.
- Maintainability: Your code becomes more readable and self-documenting for you and your team, which aligns with the goal of creating a clean, maintainable architecture.
The image below shows a clear comparison between a page built with non-semantic <div> tags and one built with meaningful semantic tags.
Part 1: Building a Document Outline with Headings
For a sighted user, large, bold headings create a visual hierarchy that makes a page easy to scan. For users of assistive technologies like screen readers, HTML heading tags (<h1> through <h6>) create a navigable outline of the page. This is often the primary way they navigate a new page.
The following video provides an excellent demonstration of how crucial headings are for screen reader users and establishes the core rules for using them correctly.
Why headings and landmarks are so important -- A11ycasts #18
This video from the Chrome for Developers channel demonstrates the dramatic difference in user experience when a page is structured with proper headings and landmarks.
Watch from the beginning to 04:09. Pay close attention to: The screen reader demonstration of a page with and without headings. The importance of using heading levels in sequential order (e.g., <h1> followed by <h2>, not <h3>). The advice to use CSS for styling, not heading tags.
Key Rules for Headings
As the video explains, using headings effectively comes down to a few simple but critical rules:
- Use a Single
<h1>: Each page should have exactly one<h1>element, representing the main title or topic of that unique page (e.g., the blog post title, the service name). - Don't Skip Levels: The heading structure must be logical and sequential. An
<h2>should be followed by an<h3>for a sub-section, not an<h4>. Think of it as creating a document outline in a word processor. - Use for Structure, Not Style: Never choose a heading tag based on the default font size the browser gives it. Use headings to define the structure of your content, and use CSS to achieve the visual design you want.
For your accounting website, a blog post page might look like this:
<article>
  <h1>Tax Deadlines for 2025</h1> <!-- The main title -->
  <p>An overview of important dates...</p>

  <section>
    <h2>For Individuals</h2> <!-- A main section -->
    <p>Details about personal tax filing...</p>
  </section>

  <section>
    <h2>For Businesses</h2> <!-- Another main section -->
    <p>Details about corporate tax filing...</p>

    <h3>S-Corporations</h3> <!-- A sub-section under "Businesses" -->
    <p>Specifics for S-Corps...</p>

    <h3>LLCs</h3> <!-- Another sub-section -->
    <p>Specifics for LLCs...</p>
  </section>
</article>
Part 2: Defining Page Regions with Landmark Elements
While headings structure the content within a page, landmark elements define the major structural regions of the page itself. These elements act as signposts, allowing screen reader users to instantly jump to key sections like the main content, navigation, or footer, bypassing repetitive elements like the site header.
Let's start with a foundational article from the MDN Web Docs that explains what landmark roles are and which HTML elements provide them automatically.
Using HTML landmark roles to improve accessibility
This MDN Blog post provides a comprehensive, practical guide to using native HTML elements to create landmarks. It covers each major landmark role and its associated tag.
Read through the article, focusing on the mapping between landmark roles (banner, navigation, main, etc.) and their corresponding HTML elements (<header>, <nav>, <main>). Pay attention to the nuances, such as when a <section> becomes a landmark and why you might need to label a <nav> element.
Core Landmark Elements
Based on the article, here is a summary of the most important landmark elements you'll use to structure every page of your site. The dev.to article, "Semantic HTML in 2025," provides a great cheat sheet that we can adapt.
Semantic HTML in 2025: The Bedrock of Accessible, SEO- ...
For a quick reference and modern perspective, this article provides excellent summary tables and examples.
Skim through section 3, 'Core Semantic Elements in 2025', and the cheatsheet in section 10. These provide a concise summary of the tags we are discussing.
Here’s a summary of the essential landmark elements:
| Semantic Tag | Landmark Role | Purpose |
|---|---|---|
<header> |
banner |
Site-level introductory content: logo, site name, primary navigation. |
<nav> |
navigation |
A block of navigational links (e.g., main menu, breadcrumbs). |
<main> |
main |
The primary, unique content of the page. There should only be one. |
<footer> |
contentinfo |
Closing content: copyright, privacy policy, contact links. |
<aside> |
complementary |
Content tangentially related to the main content (e.g., related links, callouts). |
<section> |
region |
A thematic grouping of content. Becomes a landmark only if it has a heading. |
<article> |
N/A | A self-contained, distributable piece of content (e.g., a blog post, a case study). |
<form> |
form |
A collection of controls for submitting information. Becomes a landmark if it has a heading. |
Important Nuances:
- Labeling Multiple Landmarks: If you have more than one
<nav>element (e.g., primary navigation in the header and secondary navigation in the footer), give each a unique, descriptive label witharia-label. For example:<nav aria-label="Primary">and<nav aria-label="Footer">. - The
<header>and<footer>Context: These elements only get theirbannerandcontentinforoles when they are top-level elements (i.e., not nested inside<main>,<article>, or<section>). When nested, they simply define the header or footer of that specific section.
Part 3: Putting It All Together
Let's apply these principles to a basic page layout for your accounting website. Imagine you're building the template for a service page.
Before: "Div Soup"
This version is visually correct but semantically meaningless. It's difficult for assistive tech and search engines to parse.
<!-- NON-SEMANTIC EXAMPLE - AVOID THIS -->
<div id="page-wrapper">
<div class="header">
<div class="logo">My Accounting Firm</div>
<div class="nav">...links...</div>
</div>
<div class="main">
<div class="page-title">Bookkeeping Services</div>
<div class="content">
<p>We offer professional bookkeeping...</p>
</div>
</div>
<div class="sidebar">
<div class="title">Related Services</div>
...links...
</div>
<div class="footer">
<p>© 2025 My Accounting Firm</p>
</div>
</div>
After: Semantic HTML
This version clearly communicates the structure and purpose of each section.
<!-- SEMANTIC EXAMPLE - DO THIS -->
<body>
<header> <!-- Banner landmark -->
<a href="/">My Accounting Firm</a>
<nav aria-label="Primary"> <!-- Navigation landmark -->
...links...
</nav>
</header>
<main> <!-- Main landmark -->
<article>
<h1>Bookkeeping Services</h1>
<p>We offer professional bookkeeping...</p>
<section aria-labelledby="pricing-title">
<h2 id="pricing-title">Our Pricing Tiers</h2>
...pricing information...
</section>
</article>
</main>
<aside> <!-- Complementary landmark -->
<h2>Related Services</h2>
...links...
</aside>
<footer> <!-- Contentinfo landmark -->
<p>© 2025 My Accounting Firm</p>
</footer>
</body>
This structure is immediately understandable to screen readers, search engine crawlers, and other developers.
Test your understanding!
You're creating a Testimonials section for your homepage. The section will have a heading "What Our Clients Say" and then three individual testimonials, each with the client's name and quote.
How would you structure this using semantic HTML, including headings?
Show answer
A great way to structure this would be using <section>, <article>, and <blockquote>.
<section aria-labelledby="testimonials-heading">
  <h2 id="testimonials-heading">What Our Clients Say</h2>

  <article>
    <h3>Jane Doe, CEO of TechCorp</h3>
    <blockquote>
      <p>"This accounting firm transformed our finances. Highly recommended!"</p>
    </blockquote>
  </article>

  <article>
    <h3>John Smith, Founder of Innovate LLC</h3>
    <blockquote>
      <p>"The best financial advice we've ever received."</p>
    </blockquote>
  </article>

  <article>
    <h3>Emily White, Small Business Owner</h3>
    <blockquote>
      <p>"Professional, responsive, and incredibly knowledgeable."</p>
    </blockquote>
  </article>
</section>
Why this works:
- The
<section>groups the related content and is given a name by the<h2>viaaria-labelledby. - Each testimonial is a self-contained piece of content, making
<article>a perfect fit. - The client's name is an
<h3>, as it's a sub-heading within the "What Our Clients Say" section. <blockquote>is the correct semantic element for a long quotation.
Conclusion
You have now learned the fundamentals of structuring web pages for accessibility and SEO. By using semantic HTML, you create a robust, meaningful, and future-proof foundation for your website. This isn't just a "nice-to-have"—it's a core requirement for professional web development and a key part of meeting WCAG standards.
Key Takeaways:
- Semantic HTML provides meaning and structure, benefiting accessibility, SEO, and code maintainability.
- Headings (
<h1>-<h6>) create a navigable document outline. Always use them in a logical, sequential order, and use only one<h1>per page. - Landmark elements (
<header>,<nav>,<main>,<footer>,<aside>) define the major regions of your page, allowing for quick navigation by assistive technologies. - Always choose an HTML element based on its meaning, not its default visual appearance.
Up Next:
We've established a solid, semantic structure for our pages. The next step is to ensure that the interactive elements within that structure are also accessible. In the following lesson, you will learn how to ensure all interactive elements are keyboard accessible and have visible focus states, another critical component of WCAG compliance.