Hello! In our previous lesson, we successfully deployed your Astro site and configured a custom domain with SSL. Your accounting website is now live, professional, and secure. However, the deployment process is still manual; you have to run a command every time you want to update the site.
This final lesson in our "Deployment and Production Readiness" module will automate this process. We will set up Continuous Deployment (CI/CD) from a Git repository. This means that every time you push a change to your code on GitHub, your website will automatically rebuild and deploy without any manual intervention. This practice is a cornerstone of modern web development, dramatically improving efficiency and reducing the risk of human error.
By the end of this lesson, your development workflow will be streamlined: write code, push to Git, and see your changes go live automatically.
1. What is Continuous Deployment?
At its core, CI/CD is a method to frequently deliver apps to customers by introducing automation into the stages of app development. The two main parts are:
- Continuous Integration (CI): The practice of automating the integration of code changes from multiple contributors into a single software project. Developers push code to a central repository (like GitHub), which then triggers an automated build and test sequence.
- Continuous Deployment (CD): An extension of CI that automatically deploys every code change that passes the automated tests to the production environment, making it visible to your users.
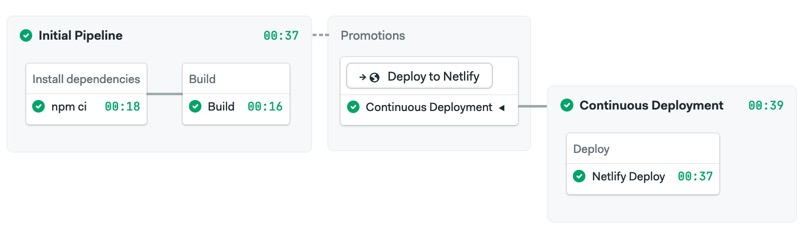
For our project, the workflow will look like this:
- You make a change to your website (e.g., add a new blog post).
- You commit and push this change to your GitHub repository.
- GitHub notifies your hosting provider (Vercel or Netlify).
- The hosting provider automatically pulls the latest code, runs the build command (
astro build), and deploys the new version of your site to production.
This automated pipeline ensures your live site is always in sync with your main branch.
2. Setting Up CI/CD with Your Hosting Provider
The fantastic news is that if you followed the last two lessons and deployed your site to Vercel or Netlify by importing a Git repository, you have already set up CI/CD! These platforms are designed around this Git-centric workflow. Let's formalize our understanding of how it works.
When you link a GitHub repository to a Vercel or Netlify project, the platform installs a "webhook." This is what allows GitHub to send an automatic notification every time you push a new commit.
The official Astro documentation provides a great summary of this process for Vercel.
Deploy your Astro Site to Vercel
Let's review the 'Website UI deployment' method in the Astro documentation for Vercel. This section confirms the automated CI/CD flow we're discussing.
Read the 'Website UI deployment' subsection. Notice how it states that after the initial import, 'all subsequent pushes to branches will generate Preview Deployments, and all changes made to the Production Branch... will result in a Production Deployment.' This is CI/CD in action.
This process gives you two powerful features out of the box:
- Production Deployments: Every push to your main branch (e.g.,
mainormaster) updates your live website. - Preview Deployments: If you push code to any other branch and open a pull request, Vercel creates a unique preview URL with those changes. This is incredibly useful for reviewing new features with team members or clients before merging them into production.
3. The CI/CD Workflow in Action: A Practical Demo
Let's see just how seamless this is. The following video walks through adding a new blog post to an Astro site, pushing it to GitHub, and watching Netlify automatically update the live site. The process is identical for Vercel.
Astro Blog Course #18 - Build, deploy, and update
This video from the 'Astro Blog Course' by Coding in Public provides a perfect real-world demonstration of the CI/CD workflow.
Watch from 03:17 to 04:21. The author adds a new MDX file, commits and pushes the change, and then shows the Netlify dashboard where the build is automatically triggered. Finally, they verify the new post is live on the website.
Now, try it yourself with the project you deployed:
- Open your project in your code editor.
- Make a small, visible change. For example, open
src/pages/index.astroand change some of the heading text. - Save the file.
- Commit and push your change to GitHub:
git add . git commit -m "Test automatic deployment" git push origin main - Open your Vercel or Netlify dashboard. You should see a new build in progress, triggered by your commit.
- Once the build completes (it should only take a minute or two), refresh your live website. Your change will be there!
This simple, powerful workflow is the core benefit of modern hosting platforms.
Test your understanding!
A colleague pushes a commit to a feature branch named feat/new-testimonial-section and opens a pull request to merge it into the main branch. Will this action update the live production website at youraccountingfirm.com? Why or why not?
Show answer
No, this action will not update the live production website. Pushing to a non-production branch and opening a pull request will trigger a Preview Deployment. Vercel (or Netlify) will create a separate, unique URL where you can view and test the changes from that specific branch. The production site is only updated when commits are pushed or merged directly into the designated production branch (usually main).
4. Advanced Control with GitHub Actions
While the built-in CI/CD is perfect for most projects, sometimes you need more control. You might want to run automated tests, check for code quality, or perform security scans before a deployment goes live. This is where GitHub Actions comes in.
GitHub Actions allows you to build custom, automated workflows directly within your GitHub repository. You define these workflows in a YAML file located in the .github/workflows/ directory.
While we won't implement a full GitHub Actions pipeline in this lesson, understanding the concept is valuable for your continued growth as a developer. It gives you ultimate control over your CI/CD process.
Use GitHub Actions to Deploy to Vercel (Preview & Production Deployments)
This video by camelCase provides an excellent overview of using GitHub Actions to deploy a project to Vercel. It illustrates how you can construct your own deployment pipeline from scratch.
Watch the following segments to grasp the core concepts: Introduction (00:00 - 01:04): Understand the 'why' behind using GitHub Actions for more control, including the concept of production vs. preview deployments. Pipeline Setup (01:56 - 04:21): See how the .github/workflows/ directory is created and how the YAML file defines the deployment steps (checkout, install, build, deploy). Handling Secrets (05:29 - 08:06): Learn how sensitive information like API tokens are securely stored as GitHub Secrets and used in the workflow, a critical security practice.
The key idea is that instead of relying on Vercel's built-in build process, you are instructing GitHub to perform the build itself and then simply upload the finished product (.vercel/output folder) to Vercel for hosting.
This approach, detailed in Vercel's documentation under "Using GitHub Actions", is the standard for complex projects or when deploying from environments that don't support native Git integrations.
Conclusion
You have now mastered the final and most crucial step in modern web deployment: automation. By setting up continuous deployment, you have created an efficient, reliable, and error-resistant workflow for maintaining and updating your website.
Key Takeaways:
- Continuous Deployment (CI/CD) automates your deployment pipeline, making your workflow faster and more reliable.
- Modern hosting platforms like Vercel and Netlify provide built-in CI/CD by default when you connect a Git repository.
- Every
git pushto yourmainbranch automatically updates your production site, while pushes to other branches create isolated preview deployments. - For advanced control, GitHub Actions allows you to build custom pipelines that can include testing, linting, and other quality checks before deployment.
Up Next:
Congratulations on completing the deployment module! Your website is now fully deployed, hosted on a custom domain, secured with SSL, and features an automated deployment pipeline. The final piece of the puzzle for a production site is understanding your audience. In the next lesson, we will learn how to integrate a web analytics service to track user behavior, giving you valuable insights into how people are using your website.