Hello! In our last lesson, you successfully deployed your Astro website to Netlify, making it live on the web with a temporary URL. This was a massive step, moving your project from a local development environment to a globally accessible one.
Today, we'll build on that success by adding the final touches that transform a project into a professional, trustworthy website. This lesson focuses on configuring a custom domain and securing it with an SSL certificate. By the end, your site will be accessible at a professional address like www.yourfirm.com with the secure padlock icon in the browser bar, which is essential for building trust with clients of an accounting firm.
We'll cover the core concepts behind domain names and security certificates, then walk through the practical steps on both Netlify and Vercel, the platforms we discussed previously.
1. Core Concepts: DNS and SSL
Before we jump into the "how," let's quickly understand the "what" and "why."
What is a Domain Name?
You already have a site live at a URL like brave-curie-12345.netlify.app. While functional, it's not memorable or professional. A custom domain is a unique, branded address (e.g., youraccountingfirm.com) that you purchase from a domain registrar (like Namecheap, GoDaddy, or Google Domains).
To make your custom domain show your Netlify/Vercel site, you need to configure the Domain Name System (DNS). Think of DNS as the internet's phonebook. It translates the human-friendly domain name you type into a browser into the machine-readable IP address where your site is hosted.
When you point your domain to a host like Netlify, you typically do it by updating your domain's nameservers. This delegates the responsibility of managing DNS records to your hosting provider, making the setup much simpler and enabling automatic features like SSL.
Why is SSL/HTTPS So Important?
SSL (Secure Sockets Layer), or its modern successor TLS (Transport Layer Security), is the technology that encrypts the connection between a user's browser and your website. It's what enables HTTPS and displays the padlock icon.
The Netlify documentation provides an excellent summary of why HTTPS is non-negotiable for any modern website. Understanding these benefits reinforces why this step is so critical.
Read the introductory section, focusing on the bulleted list of advantages. Pay attention to how it impacts not just security but also SEO and performance.
As the document highlights, HTTPS is crucial for:
- Security & Trust: It protects any data submitted through forms (like a contact form) and assures visitors that your site is legitimate. For an accounting website, this is paramount.
- SEO: Search engines like Google rank HTTPS-enabled sites higher.
- Performance: Modern web performance features, like HTTP/2, require HTTPS.
Fortunately, modern hosting platforms provide and automatically renew SSL certificates for free through services like Let's Encrypt. Once you connect your domain, the security aspect is handled for you.
2. Configuring a Custom Domain on Netlify
Since we deployed to Netlify in the previous lesson, let's start there. The process involves telling Netlify what your domain is and then telling your domain registrar where Netlify is.
Prerequisite: You must have purchased a custom domain from a registrar. The following steps assume you have access to your registrar's dashboard to change DNS settings.
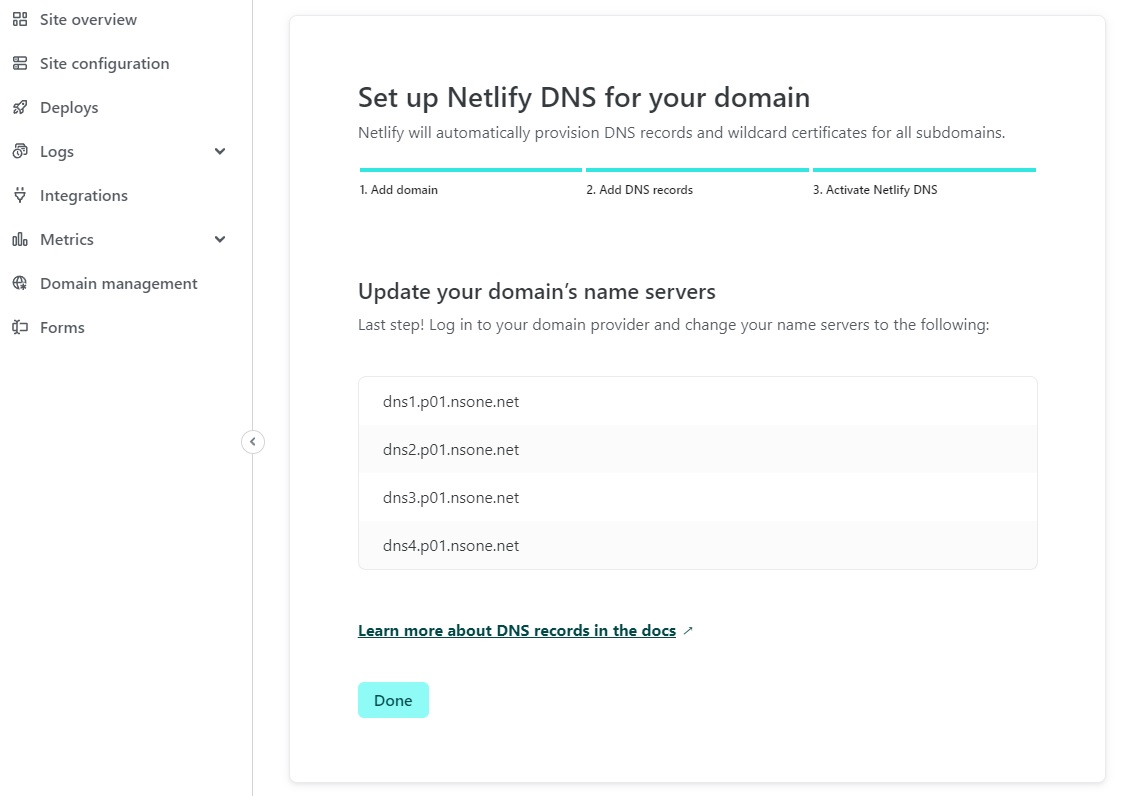
The most straightforward method is to use Netlify DNS by updating your nameservers. This lets Netlify manage your domain's DNS records automatically.
The following video provides a clear, concise walkthrough of this entire process.
Setup a Custom Domain in Netlify in 5 Minutes
To see this in action, watch this excellent tutorial from James Q Quick. He demonstrates the exact steps of adding a domain in the Netlify UI and updating the nameservers in a registrar's dashboard (Namecheap, in his case).
Watch from 01:42 to 03:56. Follow along as he: Adds the custom domain in the Netlify dashboard. Opts to set up Netlify DNS. Copies the four Netlify nameservers. Pastes these nameservers into his domain registrar's settings. Verifies the setup and shows the automatic SSL certificate in action.
To recap the steps you'll take:
- In your Netlify project, go to Domain management.
- Click Add a domain and enter your custom domain name.
- Verify you own it and select the option to set up Netlify DNS.
- Netlify will give you 2-4 nameserver addresses (e.g.,
dns1.p01.nsone.net). - Log in to your domain registrar's website.
- Navigate to the DNS or nameserver management section for your domain.
- Change the nameservers from the registrar's defaults to the ones provided by Netlify.
- Save your changes.
After you save, the changes need to propagate across the internet. This can take anywhere from a few minutes to 48 hours, but it's typically quite fast. Once propagation is complete, Netlify will automatically provision your free SSL certificate, and your site will be live and secure at your custom domain.
3. The Vercel Alternative
The process for Vercel, the other popular hosting provider, is nearly identical. Knowing how to do it on both platforms is a valuable skill.

Just like with Netlify, you'll add your domain in the Vercel project settings and then update the nameservers at your registrar.
How to Add a Custom Domain on Vercel
This video from Bryam Loaiza walks through the process on Vercel. It's a great way to see how similar the workflow is.
Watch from 00:24 to 03:36. Note the familiar steps: adding the domain in the Vercel dashboard, copying Vercel's nameservers, and pasting them into the domain registrar's settings.
For a more detailed written guide, Vercel's documentation is also an excellent resource. It explains the different configuration methods available.
Adding & Configuring a Custom Domain
The Vercel docs offer a comprehensive overview. While we're focusing on the simple nameserver method, it's useful to be aware of other options like A and CNAME records.
Skim through the sections 'Add your domain' and 'Configure the domain'. You don't need to memorize the details on A/CNAME records, but notice how 'Vercel Nameservers' is presented as a straightforward alternative that we are using.
Test your understanding!
You've updated the nameservers at your domain registrar to point to Vercel. A few minutes later, you check your Vercel dashboard and see an "Invalid Configuration" error next to your domain. What is the most likely reason for this, and what is the best course of action?
Show answer
The most likely reason is DNS propagation delay. DNS changes aren't instant; they need to spread across the internet's network of servers. The "Invalid Configuration" message is Vercel's way of saying it hasn't seen the updated nameservers yet.
The best course of action is to wait patiently. Resist the urge to change the settings again, as this can complicate things. Check back in 30 minutes, and then every few hours. The process can take up to 48 hours in rare cases, but it's usually complete within an hour.
Conclusion
Congratulations! Your accounting website is now live, professional, and secure. You've taken it from a local project to a production-ready site with a custom, branded domain and the all-important HTTPS security.
Key Takeaways:
- A custom domain is essential for professionalism, branding, and SEO. It's connected to your host via DNS.
- The nameserver method is the simplest way to delegate DNS management to platforms like Netlify and Vercel.
- HTTPS/SSL is automatically handled by modern hosts, providing critical security and trust signals for free.
- The setup process is remarkably consistent across top-tier hosting providers.
Up Next:
Your site is now fully deployed and professional. The final piece of the puzzle for a production site is understanding your audience. In the next lesson, we will learn how to integrate a web analytics service to track user behavior, giving you valuable insights into how people are using your website.