Hello and welcome back!
In our previous lesson, you successfully set up the React integration in your Astro project and rendered your first interactive component. We used the client:load directive to make a simple counter work, proving that our setup was correct.
Today, we'll build on that foundation to fully understand how to render interactive React components within Astro pages. We'll explore the critical distinction between how Astro treats static and interactive components by default. This concept is fundamental to building the high-performance, content-driven accounting website you're aiming for, as it allows you to leverage React's power without sacrificing the speed benefits of Astro.
By the end of this lesson, you'll be able to confidently decide when and how to render your React components, either as static HTML or as interactive "islands."
1. Astro's Default: Static Rendering
Coming from a React and SPA background, you're used to entire applications being managed by client-side JavaScript. Astro flips this model on its head. Its philosophy is performance first, which means it aims to ship as little JavaScript to the browser as possible.
By default, when you import a React component into an .astro file, Astro will render it to pure HTML and CSS at build time. No JavaScript for that component is sent to the client. This means any interactivity, like onClick handlers or useState hooks, will not function in the browser.
Let's see this in action.
This article from Telerik by Hassan Djirdeh provides a clear example of creating a basic, non-interactive React component and rendering it in Astro. This demonstrates Astro's default server-rendering behavior.
Please read the sections 'Creating React Components in Astro' and 'Using React Components in an Astro Page'. Focus on the Greeting.jsx example. Note that it's just a simple functional component with props, and when used in the Astro page, it's rendered without any special directives.
As the article shows, you import and use the React component with the same syntax as a native Astro component. Astro processes the JSX on the server, and the final output in the browser is just <h1> and <p> tags. This is incredibly efficient for presentational components that don't need to change after the initial page load.
2. Opting into Interactivity with client:* Directives
So, what happens when you do need client-side interactivity? This is where you must explicitly tell Astro to hydrate the component in the browser. As you saw in our last lesson, this is done using a client:* directive.
When you add a directive like client:load to a component, you are telling Astro two things:
- "Don't just render this to HTML on the server."
- "Also, send this component's JavaScript to the browser and execute it to make the component interactive."
The following resources walk through this transition from a static component to an interactive one.
The same Telerik article continues by showing how to create an interactive counter. This directly contrasts with the static Greeting component from before.
Now, read the section 'Adding Interactivity with React'. Observe how the Counter.jsx component uses useState and how the <Counter client:load /> tag in the Astro file is the key that enables its interactivity.
This next article provides an excellent step-by-step narrative that truly solidifies the concept. It first adds an onClick handler to a component, notes that it doesn't work by default, explains why (a lack of hydration), and then introduces client:load as the solution.
How to Integrate Astro With ApostropheCMS pt. 2
To reinforce this concept, this article from ApostropheCMS demonstrates the process of making a component interactive in a very practical way.
Read the section 'Add Client-Side Interaction to the Blog Card Component'. This walkthrough is invaluable because it shows the 'before' and 'after' of using a client directive and explains the concept of hydration.
Test your understanding!
You've created a React component for a client testimonial that includes a "Read More" button. This button uses a useState hook to toggle the visibility of the full text. You place the component in your Astro page like this: <Testimonial quote="..." author="..." />. When you test it in the browser, the button does nothing. Why? And what is the simplest change you need to make to fix it?
Show answer
The button doesn't work because, by default, Astro has only rendered the component's initial state to static HTML. It did not ship the component's JavaScript, so the useState hook and the onClick handler don't exist in the browser.
To fix it, you need to add a client directive to hydrate the component. The simplest change is: <Testimonial client:load quote="..." author="..." />.
3. The "Islands Architecture"
This model of having a static HTML page with small, isolated pockets of interactivity is what Astro calls the Islands Architecture.
Think of your webpage as a sea of static, server-rendered HTML. This "sea" is fast to load and display. Any component that requires client-side JavaScript to function (like our interactive counter) is an "island" of interactivity within that sea.
This architecture is the key to how Astro delivers high-performance sites. Unlike an SPA where the entire page is one large JavaScript application, Astro allows you to be surgical, only applying JavaScript where it's truly needed.
This diagram provides a great visual metaphor for the concept.
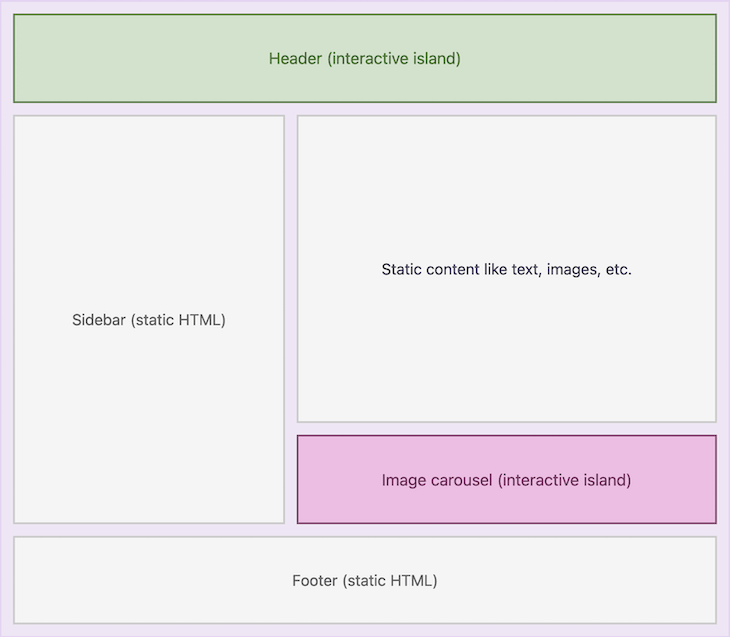
To hear it explained directly from the source, watch this short video from the Astro team.
This concept is central to Astro's identity. This official video provides a concise and clear explanation of the Islands Architecture.
Watch the entire video. It effectively breaks down a webpage into components and explains the decision-making process for when to ship JavaScript, connecting the concept directly to the client:* directives you've been seeing.
4. Practical Exercise: Static vs. Interactive Components
Now it's time to put this knowledge into practice in your project. You will create two React components: one purely presentational and one interactive.
-
Create a Static Component:
- In your
src/components/directory, create a new file:ServiceHighlight.tsx. - This component should accept
title(string) anddescription(string) as props. - It should render these props within a simple
divstructure. This component does not need any state or event handlers. - Example Code for
ServiceHighlight.tsx:import React from 'react'; interface Props { title: string; description: string; } export default function ServiceHighlight({ title, description }: Props) { return ( <div style={{ border: '1px solid #eee', padding: '1rem', borderRadius: '8px' }}> <h3>{title}</h3> <p>{description}</p> </div> ); }
- In your
-
Create an Interactive Component:
- In
src/components/, create another file:ClickableTestimonial.tsx. - This component should accept
quote(string) andauthor(string) as props. - Use the
useStatehook to manage anisExpandedboolean state, initialized tofalse. - Render the author and a shortened version of the quote. If
isExpandedis false, show a "Read More" button. If it's true, show the full quote and a "Show Less" button. The button should toggle theisExpandedstate. - Example Code for
ClickableTestimonial.tsx:import React, { useState } from 'react'; interface Props { quote: string; author: string; } export default function ClickableTestimonial({ quote, author }: Props) { const [isExpanded, setIsExpanded] = useState(false); const shortQuote = quote.substring(0, 100) + '...'; return ( <div style={{ border: '1px solid #eee', padding: '1rem', borderRadius: '8px', marginTop: '1rem' }}> <p>"{isExpanded ? quote : shortQuote}"</p> <p><em>- {author}</em></p> <button onClick={() => setIsExpanded(!isExpanded)}> {isExpanded ? 'Show Less' : 'Read More'} </button> </div> ); }
- In
-
Render Both on a Page:
- Create a new page at
src/pages/components-test.astro. - Import both
ServiceHighlightandClickableTestimonial. - Render the
ServiceHighlightcomponent statically (no client directive). - Render the
ClickableTestimonialcomponent interactively (using theclient:loaddirective). - Example Code for
components-test.astro:--- import BaseLayout from '../layouts/BaseLayout.astro'; import ServiceHighlight from '../components/ServiceHighlight.tsx'; import ClickableTestimonial from '../components/ClickableTestimonial.tsx'; const longQuote = "This accounting firm transformed our financial processes. Their attention to detail and proactive advice have been invaluable to our company's growth and stability."; --- <BaseLayout title="Component Test"> <div style={{ maxWidth: '60ch', margin: '2rem auto' }}> <h2>Static Component Example</h2> <ServiceHighlight title="Tax Planning" description="Strategic tax planning to optimize your financial outcomes." /> <h2 style={{ marginTop: '2rem' }}>Interactive Component Example</h2> <ClickableTestimonial quote={longQuote} author="Jane Doe, CEO of TechCorp" client:load /> </div> </BaseLayout>
- Create a new page at
Run npm run dev and navigate to /components-test. Confirm that the testimonial's "Read More" button works, demonstrating that you've successfully created an interactive island.
Conclusion
You've now mastered the fundamental pattern for using React components in Astro. This is a critical skill for building the sophisticated accounting website you envision.
Key Takeaways:
- By default, Astro renders React components to static HTML, shipping zero client-side JavaScript for maximum performance.
- To enable interactivity (state, event listeners), you must opt-in by adding a
client:*directive to the component tag. - This approach is called the Islands Architecture: a sea of static HTML containing isolated, interactive islands.
Up Next:
We've focused on client:load, which hydrates a component as soon as the page loads. But what if a component is in the footer, off-screen? Loading its JavaScript immediately is wasteful. In our next lesson, we will explore the full range of client directives, such as client:visible and client:idle, to give you fine-grained control over when your components become interactive. This will allow you to precisely tune your site's performance.