Welcome back. In our previous session, we architected a flexible and secure Role-Based Access Control (RBAC) system using a hybrid model of role templates and tenant-specific custom roles. We established the "what" and the "who" of our security policy. Now, it's time to design the "how"—the actual entry points into our system.
Today's objective is to move from architectural theory to a concrete low-level design for our tenant management and authentication services. We will specify the precise API endpoints and data flows that will allow a new company to register on our platform and its users to authenticate securely. This is the front door to our SaaS, and getting its design right is critical for security, scalability, and developer experience.
The "Account-First" Principle: A SaaS Cornerstone
Before we write a single endpoint definition, we must internalize the most critical principle of multi-tenant application design: you register an account (tenant), not just a user. Your experience with Django's user model is a good starting point, but in a SaaS context, the user is subordinate to the tenant. The tenant owns the data; the user is merely an actor within that tenant's boundary.
This "account-first" or "tenant-first" approach ensures that from the moment of creation, every piece of data has a clear owner. The first user created during registration is special—they become the Company Admin we defined in our RBAC design.
Multi-Tenant SaaS Architecture: Getting Account Creation Right ...
This article from dev.to brilliantly articulates the "account-first" philosophy. It's a pragmatic guide that aligns perfectly with our goal of building a robust system from day one.
Please read the first three key sections: The Account-First Decision, which establishes the core principle. Then, study Transaction-Based Consistency to understand the importance of atomicity in this process. Finally, review the Admin Bootstrap Strategy, which details how the first user becomes the tenant's administrator.
As you've just read, the registration process is not a single INSERT statement. It's a transaction that must succeed or fail as a whole, creating the Tenant (company), the initial User, their role as Company Admin, and their default Subscription status all at once. This prevents orphaned records and ensures a consistent state.
Low-Level Design: Tenant & Auth Services
With the account-first principle as our guide, let's define the API contracts. We will group these endpoints under an /auth path for clarity.
1. Company & Admin Registration
This is the primary public endpoint for onboarding a new company.
-
Endpoint:
POST /api/v1/auth/register -
Description: Creates a new tenant (company) and its initial administrator user.
-
Request Body:
{ "company_name": "Innovate Construction Inc.", "email": "admin@innovateconstruction.com", "password": "a-very-strong-password" } -
Response (Success - 201 Created):
{
  "message": "Company and admin user created successfully."
}
Architect's Note: We will deliberately not return tokens here. Registration and login are separate concerns. After registering, the user should be redirected to a login page to perform their first authentication. This is a cleaner, more secure flow.
-
Data Flow:
- Validation: The service layer receives the request payload. It first checks for global uniqueness constraints:
- Does a user with this
emailalready exist in theuserstable? - Does a company with this
company_namealready exist in thetenantstable? If so, reject the request (409 Conflict).
- Does a user with this
- Transaction Start: Begin a database transaction.
- Create Tenant: Create a new record in the
tenantstable. - Create Subscription: Create a corresponding record in the
subscriptionstable, linked to the new tenant, with a default plan (e.g., "trial"). - Hash Password: Securely hash the user's provided password using a strong algorithm like Argon2 or bcrypt.
- Create User: Create a new record in the
userstable, including the hashed password and linking it to the newtenant_id. - Assign Role: In the
user_rolesjunction table, assign this new user the system's defaultCompany Adminrole. - Transaction Commit: If all steps succeed, commit the transaction. If any step fails, roll back the entire transaction.
- (Optional Async Task): Dispatch a background task to send a "Welcome" email.
- Return Response: Send the
201 Createdresponse to the client.
- Validation: The service layer receives the request payload. It first checks for global uniqueness constraints:
2. User Authentication (Token Generation)
This endpoint exchanges user credentials for access and refresh tokens.
-
Endpoint:
POST /api/v1/auth/token -
Description: Authenticates a user and returns a JWT token pair. This follows the OAuth 2.0 convention for token endpoints.
-
Request Body:
application/x-www-form-urlencodedusername=admin@innovateconstruction.com&password=a-very-strong-passwordArchitect's Note: Using form data for the token endpoint is a best practice from the OAuth 2.0 specification (
RFC 6749). While FastAPI can easily handle JSON, adhering to this standard improves interoperability. -
Response (Success - 200 OK):
{ "access_token": "eyJhbGciOiJIUzI1NiIsInR5cCI6IkpXVCJ9...", "refresh_token": "def502002733a17e57...", "token_type": "bearer" } -
JWT Payload Design: The access token is not just an opaque string; it's a self-contained credential. Its payload is critical for our stateless architecture.
{
  "sub": "user_uuid_12345", // Subject (User ID)
  "tenant_id": "tenant_uuid_abcde", // Tenant ID
  "permissions": 15, // The bitmask of permissions for the user's role(s)
  "exp": 1672531800 // Expiration time
}
This payload is powerful. On every request, our middleware can decode this token and immediately know who the user is, which tenant they belong to, and what they can do (via the permission bitmask from our RBAC design), all without a single database query.
3. Token Refresh
Access tokens are short-lived (e.g., 15 minutes) for security. The refresh token is long-lived (e.g., 30 days) and is used to get a new access token without forcing the user to log in again.
-
Endpoint:
POST /api/v1/auth/token/refresh -
Request Body:
{ "refresh_token": "def502002733a17e57..." } -
Response (Success - 200 OK): A new token pair.
-
Data Flow & Security (Refresh Token Rotation):
- Validate the incoming refresh token.
- Check it against a database of issued/revoked refresh tokens.
- If valid, immediately mark it as "used" or delete it.
- Generate a new access token AND a new refresh token.
- Return the new pair to the client.
This strategy, known as refresh token rotation, is a major security enhancement. If a refresh token is ever leaked, it can only be used once, minimizing the window of attack.
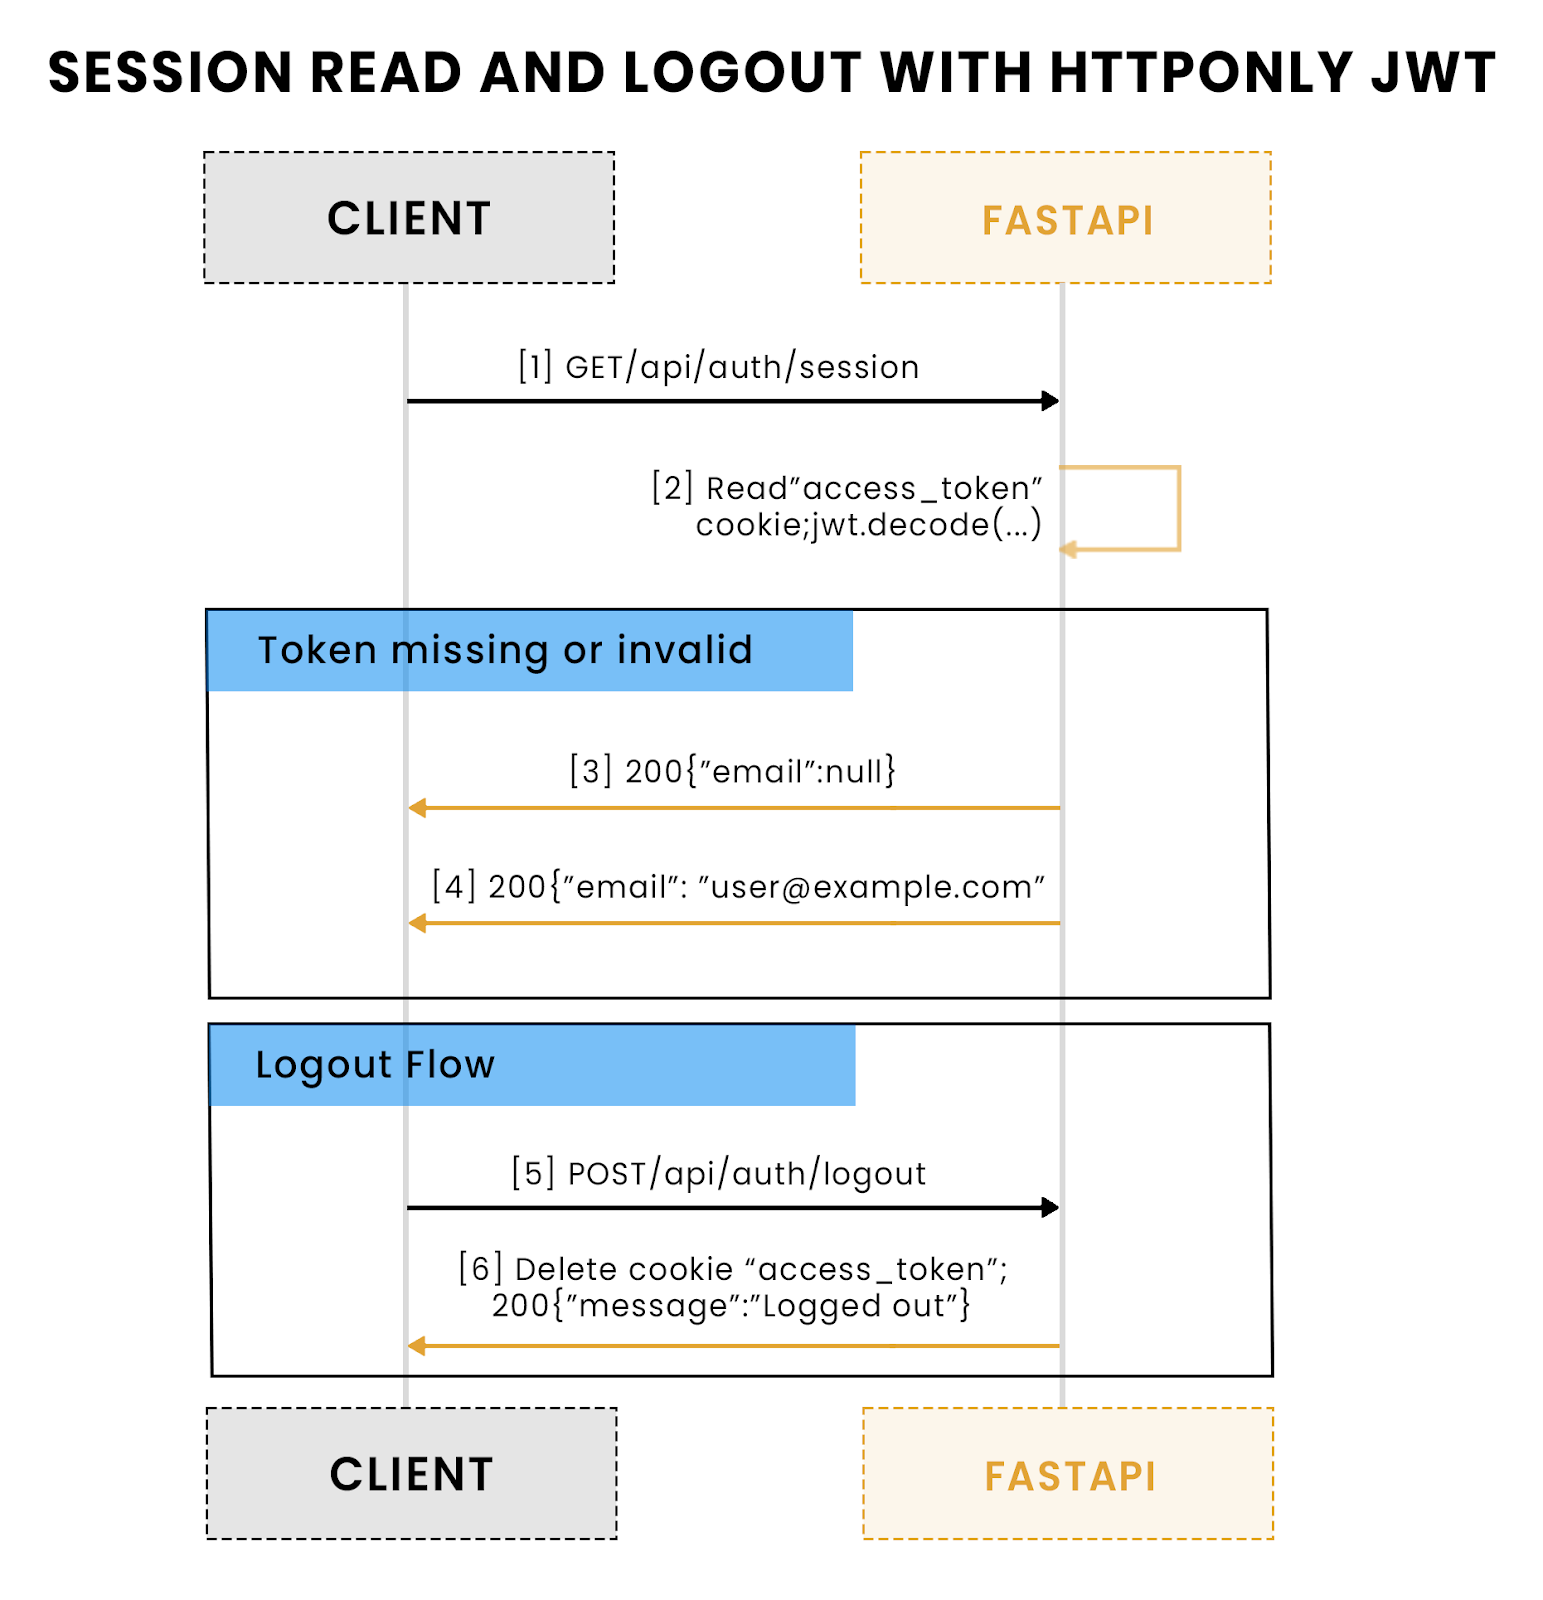
4. User Logout
In a stateless JWT system, true "logout" is primarily a client-side action.
- Endpoint:
POST /api/v1/auth/logout - Request Body:
{ "refresh_token": "def502002733a17e57..." } - Description: Invalidates the user's session. The client must delete its stored access token. The server will invalidate the long-lived refresh token.
- Data Flow:
- The server receives the refresh token.
- It finds the token in the database and revokes it (marks as invalid or deletes).
- The client, upon receiving a
200 OKresponse, is responsible for discarding the access token. Any subsequent requests with that access token will fail after it expires.
Tenant Identification: Connecting the Dots
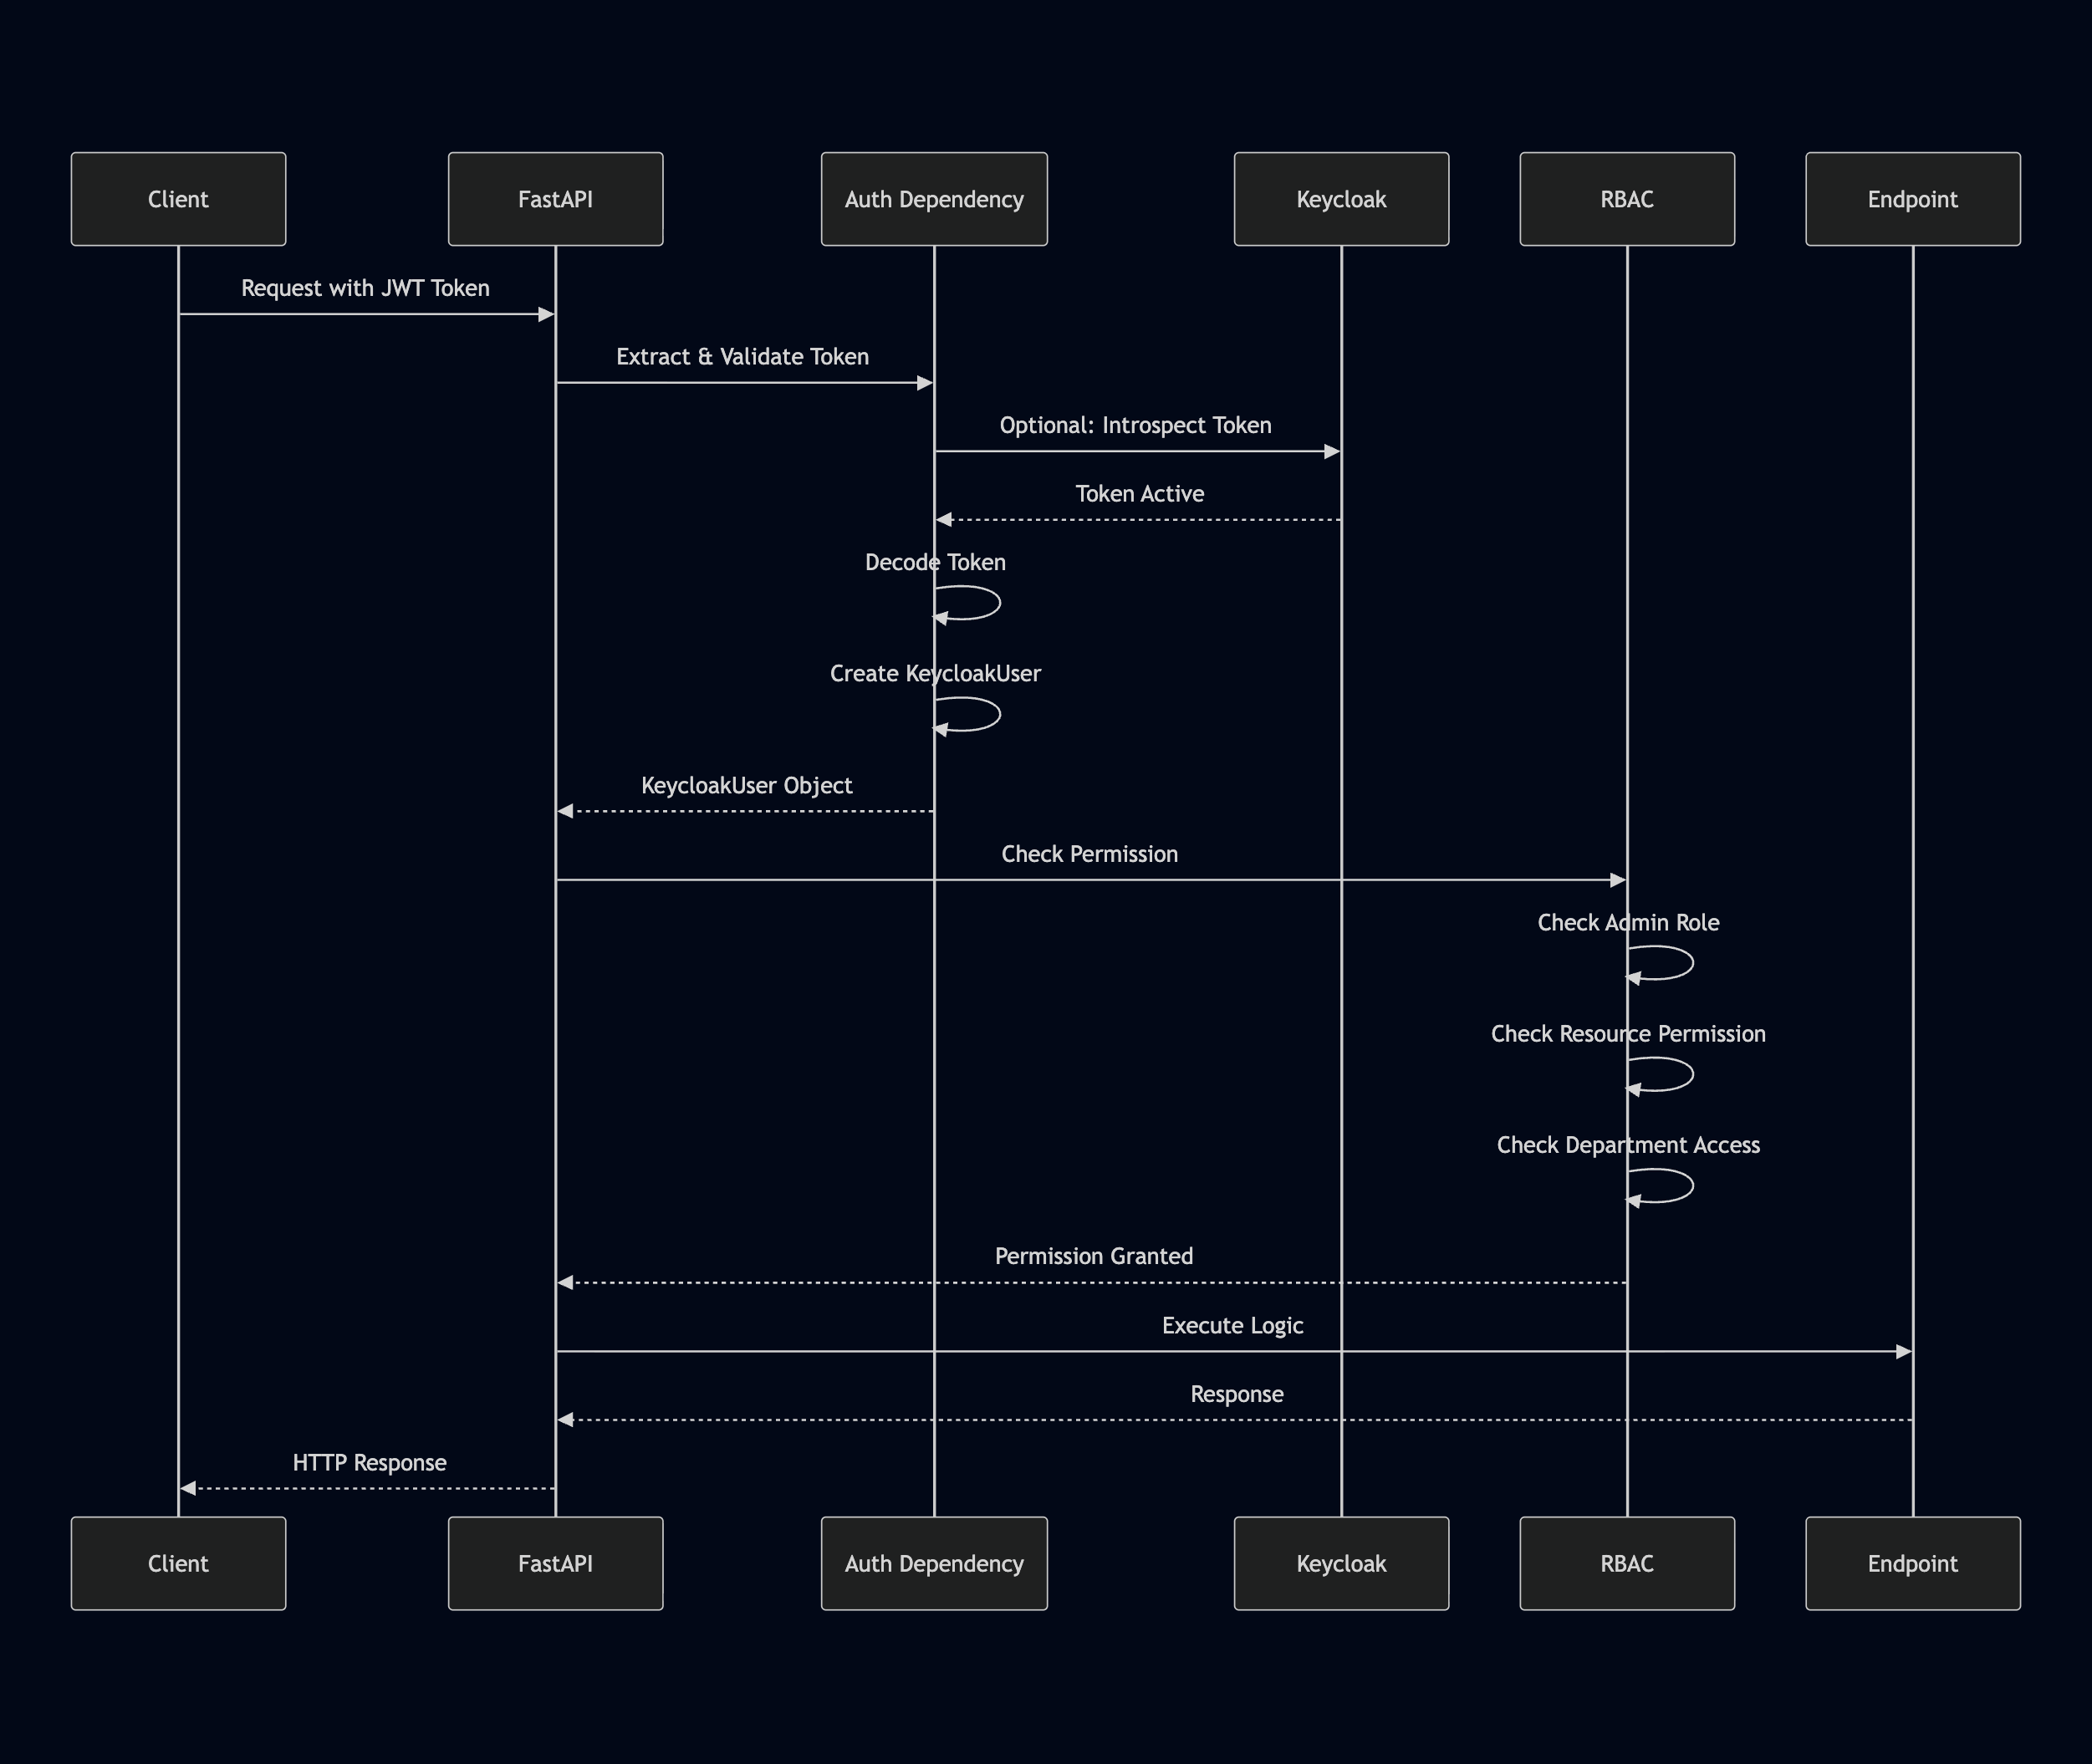
Once a user is logged in, how does our API know which tenant's data to operate on for every subsequent request? This is where a tenant identification strategy is crucial.
How to Build Multi-Tenant APIs in Node.js
This article provides an excellent overview of tenant identification strategies. Though the code examples are in Node.js, the architectural concepts are universal and directly applicable to FastAPI.
Focus your reading on the section "Tenant Identification Middleware." Analyze the four methods presented: fromSubdomain, fromHeader, fromPathParam, and fromJWT.
We will adopt the fromJWT() strategy as our primary method.
- Why? It's the most suitable for a pure API backend serving a mobile client. The
tenant_idis embedded directly in the access token, making every authenticated request self-contained. Our authentication dependency will extract the user ID and the tenant ID from the token payload, making this information available to the rest of the application for every request.
This brings our design full circle. The login endpoint provides a token containing the tenant_id. All subsequent requests to protected endpoints will use this token. A middleware will extract the tenant_id, and our service/repository layers will use it to scope all database queries, ensuring perfect data isolation.
Conclusion
We have now translated our high-level architectural goals into a concrete low-level design for the services that manage tenants and users. We have defined the API contracts, data flows, and security mechanisms that form the bedrock of our SaaS application.
Key Takeaways:
- Atomic Registration: New tenants and their first admin user are created together in a single, atomic transaction using the "account-first" principle.
- Standard-Based Authentication: We've adopted an OAuth 2.0-style token endpoint (
/token) that issues a JWT pair (access and refresh tokens). - Secure Token Handling: Our design includes short-lived access tokens and long-lived refresh tokens with rotation for enhanced security.
- Self-Contained Auth: The JWT payload contains the
user_id,tenant_id, and permission bitmask, enabling stateless and efficient authorization checks. - JWT-based Tenant Identification: We will use the
tenant_idclaim within the JWT to identify the tenant context for every authenticated API call.
Preview of the Next Lesson:
With our authentication and tenant management foundation designed, we are ready to build the first set of core feature APIs that will be protected by this system. In the next lesson, we will create the low-level design for the project management service, defining API contracts for projects, tasks, and milestones. This is where we'll see our RBAC and multi-tenancy designs in action for the first time.