Welcome back! In our previous lesson, we mastered the __init__ method and used it to set up our objects with unique data. We saw how self.title = "..." gave each task its own specific title. These attributes are called instance variables because they belong to a single instance of a class.
Today, we'll build on that by introducing a new concept: class variables. Our learning outcome is to differentiate between class variables and instance variables. Understanding this distinction is fundamental to writing clean, efficient, and well-structured object-oriented code in Python. It allows you to manage data that is unique to an object (like a task's description) versus data that is shared across all objects of that type (like a company-wide setting).
1. Instance vs. Class Variables: The Core Idea
Let's start with a quick formal definition of what you were already using in the last lesson.
-
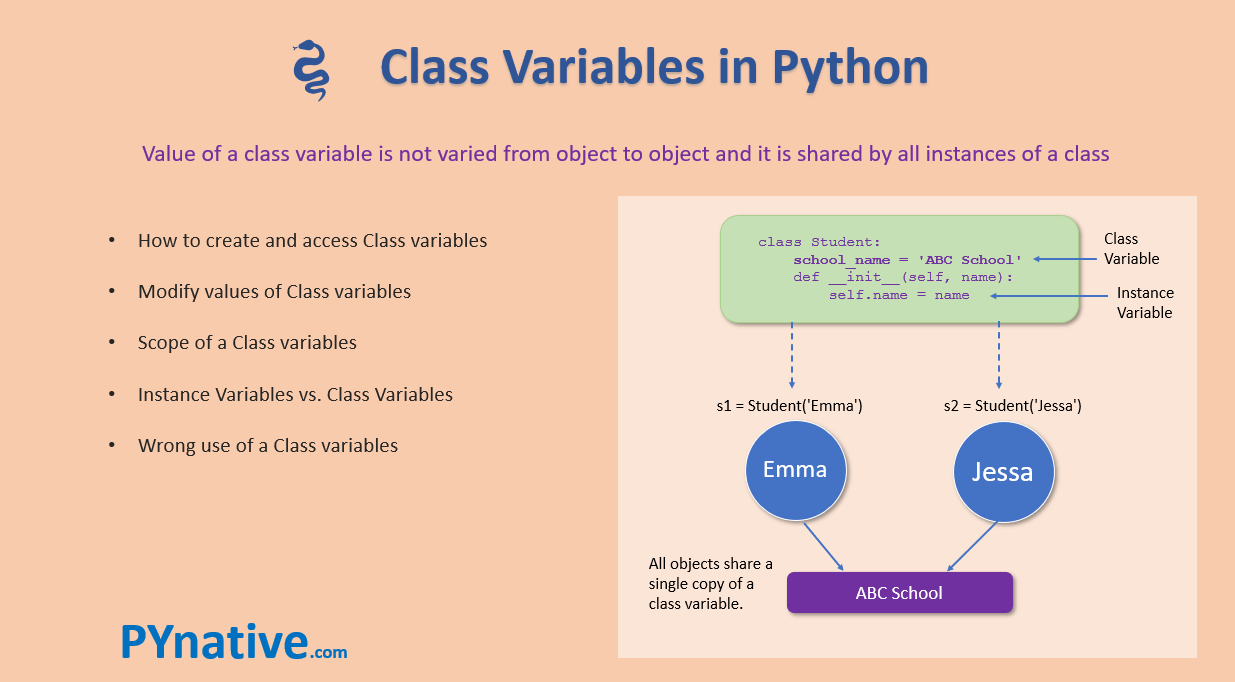
Instance Variables: These are owned by a specific instance of a class. Each object has its own copy of these variables. They are for data that is unique to each object. You've been creating these inside
__init__usingself(e.g.,self.name = "Alice"). -
Class Variables: These are owned by the class itself. They are shared among all instances of the class. If you change a class variable, the change is reflected in all instances (with a crucial exception we'll cover shortly). They are perfect for storing data that is constant or shared across all objects of that class.
To dive deep into how this works in practice, we'll watch a detailed video from Corey Schafer, a highly-respected Python educator. His explanation of the nuances here is excellent.
Python OOP Tutorial 2: Class Variables
This video, "Python OOP Tutorial 2: Class Variables", provides a clear and methodical explanation of what class variables are, how they are defined, and how they differ from the instance variables we've already seen.
Please watch from the beginning up to 05:37. The video uses an Employee class as an example. Focus on: Where the class variable (raise_amount) is defined compared to the instance variables (first, last, pay). The two ways to access the class variable: through the class (Employee.raise_amount) and through an instance (self.raise_amount). The explanation of the attribute lookup order: Python first checks the instance for the attribute, and if it's not there, it looks in the class.
2. The Mechanics of Access and Modification
As the video explained, the way you access and, more importantly, modify these variables is what truly defines their behavior.
Let's summarize the key points with our own code example. Imagine we're building the Task class for our project. We can use a class variable to define a set of approved statuses.
class Task:
    # Class variable: shared by all Task objects
    VALID_STATUSES = ('Not Started', 'In Progress', 'Completed')

    def __init__(self, title, description):
        # Instance variables: unique to each task
        self.title = title
        self.description = description
        self.status = 'Not Started' # Default instance variable

    def set_status(self, new_status):
        # We can access the class variable using the class name
        if new_status in Task.VALID_STATUSES:
            self.status = new_status
        else:
            print(f"'{new_status}' is not a valid status.")

# --- Let's create some tasks ---
task1 = Task("Design Homepage", "Create a mockup in Figma.")
task2 = Task("Setup Database", "Install PostgreSQL and create DB.")

# Accessing the class variable (best practice is through the class)
print(f"Valid statuses are: {Task.VALID_STATUSES}")

# You can also access it through an instance, because of the lookup chain
print(f"Task 1 knows the valid statuses: {task1.VALID_STATUSES}")

task1.set_status('In Progress')
print(f"Task 1 status: {task1.status}")

task2.set_status('Done') # This will fail
print(f"Task 2 status: {task2.status}")
The "Shadowing" Effect: Modifying Variables
This is the most critical concept to grasp. What happens when you try to change a class variable's value?
Continue with the same video to see this behavior in action. This is where the difference becomes crystal clear.
Python OOP Tutorial 2: Class Variables
Now, let's watch the part of the video that demonstrates what happens when you try to change the value of a class variable.
Watch from 05:37 to 08:54. Pay close attention to the difference between these two lines of code: Employee.raise_amount = 1.05 employee_1.raise_amount = 1.05 Notice how the first one affects all instances, while the second one only affects employee_1 by creating a new instance variable with the same name. You can use the __dict__ attribute he shows to see this for yourself.
To summarize this crucial point:
- Modifying via the Class (
Task.SOME_VAR = ...): This changes the class variable itself. All instances that don't have their own overriding instance variable will see this new value. - Modifying via an Instance (
task1.SOME_VAR = ...): This does not change the class variable. Instead, it creates a new instance variable fortask1that "shadows" or hides the class variable. Other instances (liketask2) are completely unaffected.
3. A Practical Use Case: Counting Instances
So, when should you use a class variable? One of the most common use cases is to keep track of data related to the class as a whole, such as counting how many objects have been created.
This final clip from the video demonstrates this perfectly.
Python OOP Tutorial 2: Class Variables
Finally, let's look at a scenario where a class variable is the perfect tool for the job: counting the number of employees.
Watch from 08:54 to 10:40. Note how he increments num_of_employees inside __init__ and why he explicitly uses Employee.num_of_employees instead of self.num_of_employees. This is a deliberate choice to avoid accidentally creating a shadowing instance variable.
Let's apply this to our Task class. We'll add a counter to track how many tasks have been created in total.
class Task:
    # Class variable to count tasks
    task_count = 0

    def __init__(self, title):
        self.title = title
        # Increment the CLASS variable each time a new instance is created
        Task.task_count += 1
        # We can assign an instance-specific ID as well
        self.id = Task.task_count

    def display(self):
        print(f"ID: {self.id}, Title: {self.title}")

# --- Using the counter ---
print(f"Initial task count: {Task.task_count}") # Output: 0

t1 = Task("Learn Class Variables")
t2 = Task("Practice with an exercise")
t3 = Task("Read documentation")

print(f"Final task count: {Task.task_count}") # Output: 3

t1.display() # Output: ID: 1, Title: Learn Class Variables
t2.display() # Output: ID: 2, Title: Practice with an exercise
In this example, Task.task_count is the single source of truth for the total number of tasks. Each task also gets its own unique id as an instance variable, derived from the counter at the moment of its creation.
4. Summary and Quick Reference
To consolidate your understanding, the following article provides a concise textual summary and a very useful comparison table.
Python Attributes: Class Vs. Instance Explained
The article "Python Attributes: Class Vs. Instance Explained" from GeeksForGeeks offers a great recap. The comparison table is especially helpful for quick reviews.
Please read the sections 'What is Class Attributes?', 'What is Instance Attributes?', and pay special attention to the table under 'Difference Between Python Attributes: Class Vs. Instance'. This table is an excellent reference you can use later.
Test your understanding!
Let's apply these concepts to a Project class for our future application.
- Define a
Projectclass. - Add a class variable
project_prefixwith the value"PROJ". - Add another class variable
project_counterinitialized to0. - In the
__init__method, accept anamefor the project (this will be an instance variable). - Inside
__init__, increment theproject_counterand create a uniqueproject_idfor each instance (e.g.,"PROJ-1","PROJ-2"). Store this as an instance variable. - Create three
Projectinstances. For each one, print itsnameandproject_id. - After creating the projects, change the class variable
Project.project_prefixto"TASKFORCE". - Create one more project and print its details to show that it uses the new prefix.
Show answer
Here is a possible solution:
class Project:
    # Class variables
    project_prefix = "PROJ"
    project_counter = 0

    def __init__(self, name):
        # Instance variable
        self.name = name

        # Update class counter and create instance-specific ID
        Project.project_counter += 1
        self.project_id = f"{Project.project_prefix}-{Project.project_counter}"

    def display_info(self):
        print(f"ID: {self.project_id}, Name: {self.name}")

# --- Testing the implementation ---

print("--- Creating initial projects ---")
p1 = Project("Website Redesign")
p2 = Project("API Development")
p3 = Project("Mobile App Launch")

p1.display_info()
p2.display_info()
p3.display_info()

print(f"\nTotal projects created: {Project.project_counter}")

print("\n--- Updating project prefix and creating a new project ---")
# Modify the class variable
Project.project_prefix = "TASKFORCE"

p4 = Project("Q4 Marketing Campaign")
p4.display_info()

# Expected Output:
# --- Creating initial projects ---
# ID: PROJ-1, Name: Website Redesign
# ID: PROJ-2, Name: API Development
# ID: PROJ-3, Name: Mobile App Launch
#
# Total projects created: 3
#
# --- Updating project prefix and creating a new project ---
# ID: TASKFORCE-4, Name: Q4 Marketing Campaign
Conclusion
Great job! You now have a solid understanding of the difference between class and instance variables, which is a key piece of the object-oriented puzzle. This knowledge helps you decide where data should live in your classes, leading to more organized and maintainable code.
Key Takeaways:
- Instance variables are for data unique to each object (e.g.,
task.title). They are defined in__init__usingself. - Class variables are for data shared by all objects of a class (e.g.,
Task.task_count). They are defined directly within the class. - Accessing an attribute follows a chain: Python checks the instance first, then the class.
- Modifying a class variable via the class (
ClassName.var) changes it for everyone. Modifying it via an instance (instance.var) creates a new, shadowing instance variable for that object only.
Preview of the Next Lesson:
Now that we are comfortable with how a single class works, we are ready to explore one of the most powerful features of OOP: inheritance. In the next lesson, you will learn how to implement inheritance by creating a child class that extends a parent class. This will allow us to create specialized versions of our classes (e.g., a BugReport that is a special kind of Task) without duplicating code.