Hello! Welcome back to our journey of building a full-stack task manager.
In our last lesson, you implemented a powerful search feature, allowing users to find tasks using free-text queries. That was a huge step in making the application more usable. Now, we're going to add another layer of control: structured filtering.
While search is great for finding specific text, filtering allows users to narrow down their list based on predefined criteria, like a task's status or priority. This lesson will teach you how to implement dropdowns or input fields to sort and view tasks by these properties.
To do this efficiently, we'll use a popular third-party package called django-filter. While you could build this manually like we started to with the search feature, using a dedicated library will keep your code cleaner, reduce boilerplate, and give you access to more advanced features out of the box.
By the end of this lesson, your application will look something like this, with dedicated controls for filtering the task list:
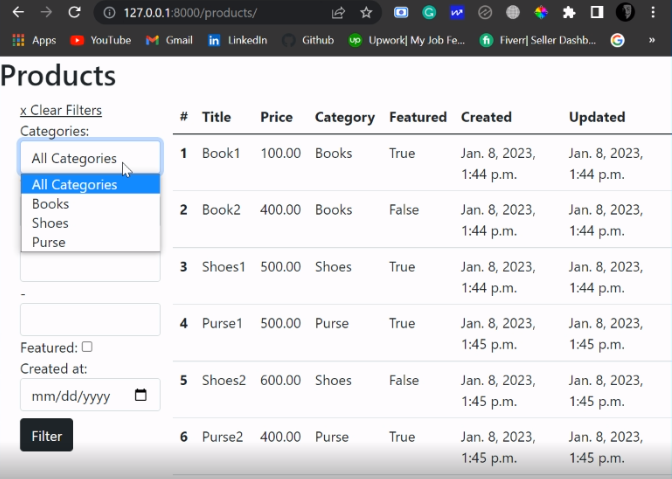
1. Setting Up django-filter
First, we need to install the package and tell our Django project that we're using it.
-
Install the package: Open your terminal (with your virtual environment activated) and run the following command:
pip install django-filter -
Update
settings.py: Add'django_filters'to yourINSTALLED_APPSlist in your project'ssettings.pyfile. It's conventional to place third-party apps after Django's built-in apps but before your own apps.# In settings.py INSTALLED_APPS = [ 'django.contrib.admin', 'django.contrib.auth', 'django.contrib.contenttypes', 'django.contrib.sessions', 'django.contrib.messages', 'django.contrib.staticfiles', # Third-party apps 'django_filters', # Your apps 'your_app_name', # Make sure this is the actual name of your app ]
The following video gives a great overview of this initial setup and the entire filtering process. We'll follow its structure closely.
How to easily filter objects in Django
Watch this section from the video 'How to easily filter objects in Django' by Cloud With Django to see the installation process in action.
Watch from the beginning until 02:04. This part covers installing django-filter and adding it to INSTALLED_APPS, which is exactly what we just did.
2. Creating a FilterSet
A FilterSet is a class that defines how to filter a specific model. It's very similar in concept to a Django ModelForm. You tell it which model to use and which fields you want to be able to filter by.
First, create a new file named filters.py inside your application directory (the same directory that contains your models.py and views.py).
Now, let's define our filter. For this example, let's assume your Task model has a status field (e.g., 'To Do', 'In Progress', 'Done') and is associated with the logged-in user.
# In your_app_name/filters.py

import django_filters
from .models import Task

class TaskFilter(django_filters.FilterSet):
    class Meta:
        model = Task
        fields = ['status'] # We will start by filtering on the 'status' field
This simple TaskFilter tells django-filter that we want to create a filter for the Task model based on its status field. By default, this will create an "exact match" filter.
The django-filter documentation and the next section of the video provide more detail on how this FilterSet works.
Getting Started - django-filter 25.2 documentation
The official documentation provides a clear, concise explanation of how a FilterSet is constructed. Take a moment to read it.
Read the section titled 'The filter'. Focus on the 'Generating filters with Meta.fields' part. Notice how it's similar to creating a ModelForm.
3. Integrating the Filter into Your View
Now we need to use this TaskFilter in our TaskListView. We'll modify the view to handle the filter form, apply the filtering to the queryset, and pass the filter object to the template.
Here's how we'll combine the filtering logic with the user-specific data and the search functionality you already built.
# In your_app_name/views.py

from django.views.generic import ListView
from django.contrib.auth.mixins import LoginRequiredMixin
from django.db.models import Q
from .models import Task
from .filters import TaskFilter # Import the filter

class TaskListView(LoginRequiredMixin, ListView):
    model = Task
    context_object_name = 'tasks'
    template_name = 'task_list.html'

    def get_queryset(self):
        # Start with all tasks for the current user
        queryset = super().get_queryset().filter(user=self.request.user)

        # Apply the filter
        self.filterset = TaskFilter(self.request.GET, queryset=queryset)

        # Use the filtered queryset for further filtering
        queryset = self.filterset.qs

        # Apply the search query
        query = self.request.GET.get('q')
        if query:
            queryset = queryset.filter(
                Q(title__icontains=query) |
                Q(description__icontains=query)
            )

        return queryset.order_by('created')

    def get_context_data(self, **kwargs):
        context = super().get_context_data(**kwargs)
        # Pass the filterset and search query to the template
        context['filterset'] = self.filterset
        context['search_query'] = self.request.GET.get('q', '')
        return context
Key Changes:
- Import
TaskFilter: We bring in the filter we just created. get_queryset():- We first get the tasks for the logged-in user.
- We then instantiate
TaskFilter, passing it therequest.GETdata (which contains any submitted filter values) and the user's queryset. We store it asself.filtersetso we can access it inget_context_data. - We update our
querysetto be the filtered result fromself.filterset.qs. - Finally, we apply the search logic to this already filtered queryset. This allows search and filtering to work together!
get_context_data(): We addself.filtersetto the context. This will allow us to render the filter form in the template.
4. Updating the Template
The final step is to add the filter form to task_list.html. django-filter automatically generates a form from your FilterSet.
Place this code right next to your search form.
<!-- In task_list.html -->

<div class="row mb-4">
    <div class="col-md-6">
        <h5>Search Tasks</h5>
        <form method="GET" class="">
            <div class="input-group">
                <input type="text" name="q" class="form-control" placeholder="Search title or description..." value="{{ search_query }}">
                <button class="btn btn-outline-primary" type="submit">Search</button>
            </div>
        </form>
    </div>
    <div class="col-md-6">
        <h5>Filter Tasks</h5>
        <form method="GET" class="">
            <div class="input-group">
                {{ filterset.form.as_p }}
                <button class="btn btn-outline-secondary" type="submit">Filter</button>
            </div>
        </form>
    </div>
</div>

{% if search_query %}
    <p>Showing search results for: <strong>"{{ search_query }}"</strong></p>
{% endif %}

<h3>Your Tasks</h3>
<table class="table">
    <thead>
        <!-- your table headers -->
    </thead>
    <tbody>
        {% for task in tasks %}
        <tr>
            <!-- your table data -->
        </tr>
        {% empty %}
        <tr>
            <td colspan="5">No tasks found.</td>
        </tr>
        {% endfor %}
    </tbody>
</table>
Key Changes:
- Filter Form: We created a new
<form method="GET">. {{ filterset.form.as_p }}: This is the magic part. It renders the form fields generated by ourTaskFilter. Since we only specifiedstatus, it will render a text input for status. The.as_pwraps the fields in<p>tags.- Submit Button: A button to apply the filter.
Now, run your server and try it out! You can type a status into the new input field, click "Filter," and the list will update. Notice that the filter value and the search query both appear in the URL.
Test your understanding!
Let's say your Task model also has a priority field (e.g., a CharField). How would you modify your TaskFilter in filters.py to allow users to filter by both status and priority?
Show answer
You would simply add 'priority' to the fields list in the Meta class.
# In your_app_name/filters.py

class TaskFilter(django_filters.FilterSet):
    class Meta:
        model = Task
        fields = ['status', 'priority'] # Add priority here
django-filter will automatically add a new input field for priority to the form.
5. Improving the Filter with ChoiceFilter
A text input for status works, but it's not ideal. Users have to remember the exact names of the statuses. A dropdown menu (<select>) would be much more user-friendly.
We can achieve this by customizing our TaskFilter. Let's assume your Task model has choices defined like this:
# In your_app_name/models.py

class Task(models.Model):
    STATUS_CHOICES = [
        ('todo', 'To Do'),
        ('in_progress', 'In Progress'),
        ('done', 'Done'),
    ]
    # ... other fields ...
    status = models.CharField(max_length=20, choices=STATUS_CHOICES, default='todo')
    # ...
If you have choices set up, you can tell django-filter to use a ChoiceFilter. Update your filters.py:
# In your_app_name/filters.py

import django_filters
from .models import Task

class TaskFilter(django_filters.FilterSet):
    # Explicitly declare the status field as a ChoiceFilter
    status = django_filters.ChoiceFilter(choices=Task.STATUS_CHOICES)

    class Meta:
        model = Task
        fields = ['status'] # The field is now declared above
By explicitly defining status as a ChoiceFilter and passing it the same choices from your model, django-filter will now render a dropdown menu instead of a text input. Refresh your page to see the change!
Conclusion
Fantastic work! You have now implemented a powerful and user-friendly filtering system. This is a standard feature in modern web applications, and you've learned how to build it using a clean, maintainable, and industry-standard approach with django-filter.
Key Takeaways:
django-filteris a powerful library for adding filtering to QuerySets with minimal boilerplate.- A
FilterSetclass defines which model and fields to filter on, similar to aModelForm. - You can integrate filtering into a
ListViewby instantiating theFilterSetinget_querysetand passing it to the template viaget_context_data. - The filter form is rendered in the template using
{{ filterset.form }}. - You can customize filter fields (e.g., using
ChoiceFilter) for a better user experience.
Preview of the Next Lesson:
Your task list is getting more functional, but what happens when a user has hundreds of tasks? The page would become incredibly long. In the next lesson, we will address this by implementing pagination, which will break your long list of tasks into multiple pages. We will also see how to make sure our new pagination controls work correctly with our filtering and search features.