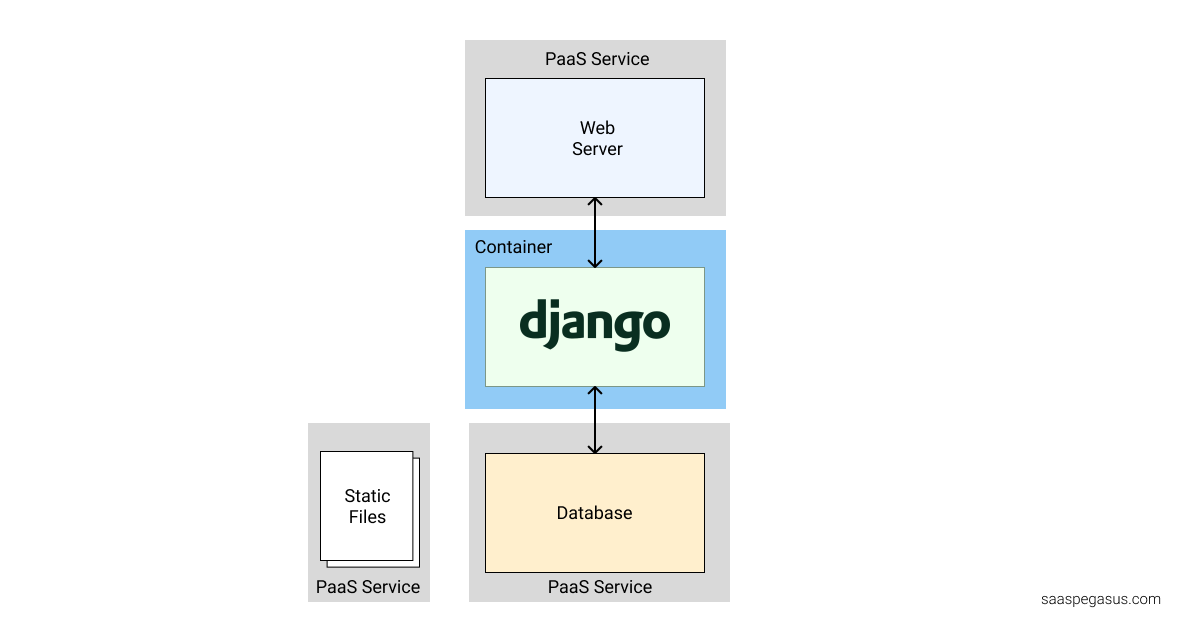
Hello! Welcome to the next lesson in our journey to deploy your Django application.
In our last session, we learned how to create a requirements.txt file to ensure that your project's dependencies can be installed consistently anywhere. This was a critical step in making your application portable and ready for deployment.
Today, we'll tackle another essential piece of the deployment puzzle: handling static files. In a production environment, Django does not serve files like CSS, JavaScript, and images by default. We need a robust solution to do this for us. This lesson will teach you how to configure WhiteNoise, a popular and simple tool that allows your Django application to serve its own static files efficiently in production.
By the end of this lesson, you will be able to configure static file serving for a production environment using a service like WhiteNoise, making your application a self-contained unit ready for deployment on any modern platform.
1. The Static File Problem in Production
As you know from your background in web development, static files are the CSS, JavaScript, and image files that make your application look and function correctly.
During development, Django's built-in web server (manage.py runserver) is smart enough to handle these files for you, as long as DEBUG = True is set in your settings.py. However, for security and performance reasons, you must never run a production site with DEBUG = True.
When you set DEBUG = False, Django stops serving static files. This means if you deployed your app as-is, it would appear without any styling or client-side functionality.
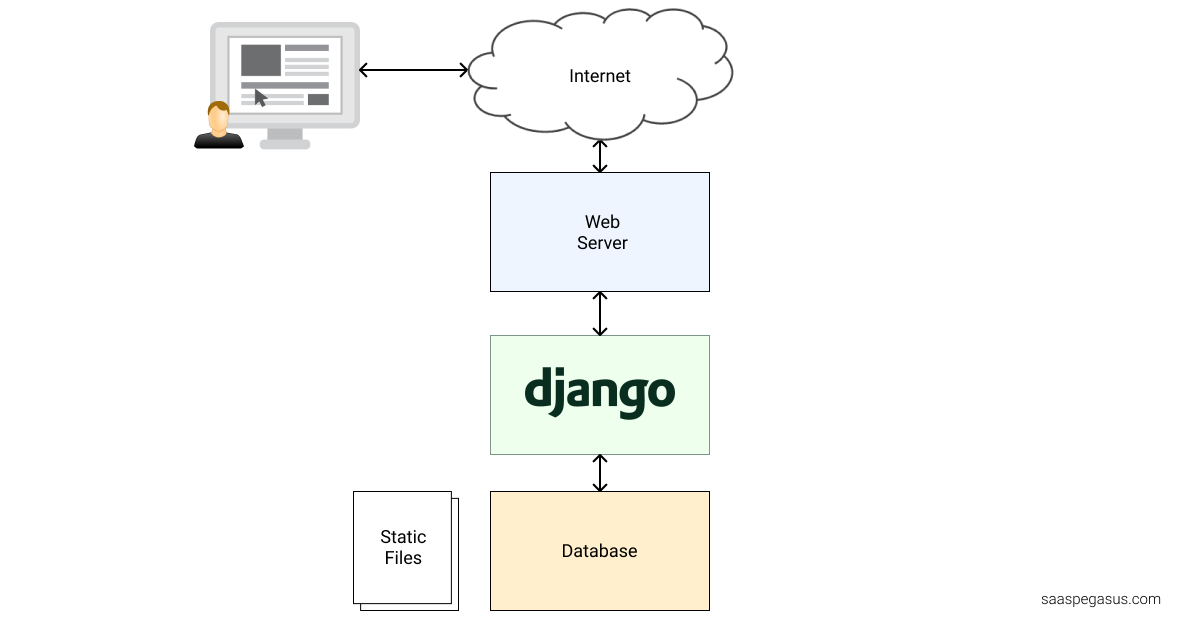
The following video explains this distinction between development and production environments for static files.
Whitenoise for Django Static Assets - Overview!
Watch this clip from the 'Whitenoise for Django Static Assets' video by BugBytes to understand why Django's development approach to static files isn't suitable for production.
Watch from 02:28 to 04:26. Focus on the explanation of why static file serving works automatically when DEBUG=True and why this behavior changes in a production setting where DEBUG=False.
So, we need a production-grade solution. While traditional setups might use a separate web server like Nginx, a more modern and simpler approach for Platform-as-a-Service (PaaS) deployments is to use WhiteNoise.
2. What is WhiteNoise and Why Use It?
WhiteNoise is a Python library that allows your web application to serve its own static files. It's designed to be incredibly simple to set up and is highly optimized for performance.
Let's watch a brief overview to see why it's such a popular choice, especially for deploying to services like Heroku and Render.
Whitenoise for Django Static Assets - Overview!
This introduction from the same BugBytes video explains what WhiteNoise is and the advantages it offers.
Watch from the beginning to 02:11. Pay attention to the key benefits mentioned, such as making the app a 'self-contained unit' and its ability to handle compression and caching for you.
As the video highlights, WhiteNoise is powerful because it:
- Simplifies Deployment: Your app doesn't rely on an external service like Amazon S3 or a complex Nginx configuration just for static files.
- Improves Performance: It automatically compresses files (using Gzip and Brotli) and sets optimal caching headers, reducing load times for your users.
- Is PaaS-Friendly: It's the recommended method for many popular deployment platforms.
3. Configuring Your Project to Use WhiteNoise
Now for the practical part. We'll walk through the steps to integrate WhiteNoise into your project. The process involves installing the package and making a few key changes to your settings.py file.
This excellent article from LearnDjango provides a clear, text-based guide that we will follow.
This article, 'Django Static Files', details the exact steps for configuring WhiteNoise. We'll use it as our main reference for the code changes.
Read the 'Production' section. It outlines the three main changes we need to make in our settings.py file. Keep this open as a reference.
Let's implement these changes step-by-step.
Step 1: Install WhiteNoise and Update Dependencies
First, make sure your virtual environment is activated. Then, install WhiteNoise using pip.
pip install whitenoise
Immediately after installing a new package, it's crucial to update your dependencies list. This reinforces what we learned in the last lesson.
pip freeze > requirements.txt
Step 2: Update MIDDLEWARE in settings.py
WhiteNoise works as "middleware"—a component that processes requests and responses. It needs to be placed correctly in the MIDDLEWARE list in your settings.py file.
Open your_project/settings.py and add whitenoise.middleware.WhiteNoiseMiddleware directly after the SecurityMiddleware.
# settings.py

MIDDLEWARE = [
    "django.middleware.security.SecurityMiddleware",
    "whitenoise.middleware.WhiteNoiseMiddleware",  # Add this line
    "django.contrib.sessions.middleware.SessionMiddleware",
    "django.middleware.common.CommonMiddleware",
    # ... other middleware
]
Step 3: Configure Static Files Storage
Next, we need to tell Django to use WhiteNoise's enhanced storage backend. This specific backend is what enables compression and cache-busting (the unique filenames that help browsers know when a file has changed).
In settings.py, find the STORAGES setting (or add it if it doesn't exist) and configure it like this:
# settings.py

STORAGES = {
    "default": {
        "BACKEND": "django.core.files.storage.FileSystemStorage",
    },
    "staticfiles": {
        "BACKEND": "whitenoise.storage.CompressedManifestStaticFilesStorage",
    },
}
If you don't have a STORAGES dictionary, you can just add the code block above near your other static file settings. If you only have STATICFILES_STORAGE, you can replace it with this dictionary.
Step 4: Define STATIC_ROOT
Finally, we need to tell Django where to collect all the static files into a single directory for production. This is done using the STATIC_ROOT setting.
STATICFILES_DIRS: Tells Django where to find your static files in your project (e.g., a top-levelstatic/folder). You've likely already configured this.STATIC_ROOT: Tells Django where to put all static files when you run thecollectstaticcommand. This is the directory WhiteNoise will serve from.
Add the following to your settings.py file, near STATIC_URL:
# settings.py

STATIC_ROOT = BASE_DIR / "staticfiles"
This creates a directory named staticfiles in your project's root folder to hold the collected assets.
Test your understanding!
A colleague is confused about Django's static file settings. In your own words, what is the difference between STATICFILES_DIRS and STATIC_ROOT?
Show answer
STATICFILES_DIRS is an input setting: it tells Django which folders to look in to find your project's static files. STATIC_ROOT is an output setting: it specifies the single folder where Django should copy all static files (from all apps and directories) when preparing the project for production.
4. Collecting Static Files with collectstatic
With the configuration complete, there's one last command to run before deployment: collectstatic. This command gathers all static files from your various apps (including the Django admin) and copies them into the STATIC_ROOT directory you just defined.
Run this in your terminal:
python manage.py collectstatic
You'll see a new directory named staticfiles appear in your project. If you look inside, you'll find your CSS/JS files, but with strange-looking names. This is WhiteNoise's cache-busting in action!
The following video demonstrates this process and explains what's happening.
Whitenoise for Django Static Assets - Overview!
This clip from the BugBytes video shows the collectstatic command in action and explains what happens behind the scenes with file hashing and compression.
Watch from 10:38 to 13:31. Observe how collectstatic creates the staticfiles directory and how the filenames are hashed. The explanation of the static.json manifest file is particularly insightful.
By hashing filenames based on their content, WhiteNoise ensures that when you update a CSS file, users' browsers will be forced to download the new version instead of using an old, cached one. This completely solves a common deployment headache.
5. A Crucial Distinction: Static Files vs. Media Files
It's very important to understand that WhiteNoise is designed only for your project's static files—the ones that are part of your code repository (CSS, JS, logos, etc.).
It is not suitable for serving user-uploaded files (often called "media" files), such as profile pictures or document uploads.
Whitenoise for Django Static Assets - Overview!
Finally, this short clip clarifies why you shouldn't use WhiteNoise for user-uploaded media.
Watch from 13:31 to 14:48. This section explains the security and scalability reasons for handling media files separately.
In production, user-uploaded files are almost always handled by a dedicated cloud storage service like Amazon S3. This keeps your application server clean and scales more effectively. We won't cover that today, but it's an important distinction to remember as you build more complex applications.
Conclusion
Fantastic work! You have now configured your Django project to handle static files in a way that is simple, efficient, and ready for a production environment. This is a huge milestone on the path to deploying your first full-stack application.
Key Takeaways:
- Django's development server doesn't serve static files when
DEBUG = False. - WhiteNoise is a library that allows your Django application to serve its own static files in production, making it a self-contained unit.
- The configuration involves four main steps:
pip install whitenoiseand updatingrequirements.txt.- Adding
WhiteNoiseMiddlewaretosettings.py. - Setting
STATICFILES_STORAGEtowhitenoise.storage.CompressedManifestStaticFilesStorage. - Defining a
STATIC_ROOTdirectory.
- The
python manage.py collectstaticcommand must be run to gather all static assets intoSTATIC_ROOTfor WhiteNoise to serve. - WhiteNoise is for static project assets, not user-uploaded media files.
Preview of the Next Lesson:
Your application is now almost fully prepared for the real world. We've handled secret keys, listed our dependencies, and configured static file serving. In the next lesson, we will take the final leap: preparing the application for deployment on a Platform-as-a-Service (PaaS) like Render and pushing it live.