Hello! Welcome back.
In our last lesson, you successfully created your first template and used the Django Template Language (DTL) to display a list of tasks. You learned how to use {% extends %} to build a consistent layout and {% for %} to loop through data. We passed that data using a context dictionary, but we didn't explore the concept in depth.
This lesson focuses on exactly that: passing context data from views to templates. We'll dive into what the context dictionary is, the different kinds of data you can pass with it, and how to access that data to make your web pages truly dynamic. Mastering this is the key to connecting your Python logic with the user-facing HTML.
1. The Bridge Between Python and HTML: The Context Dictionary
So, what exactly is "context"? In Django, context is simply a Python dictionary that you pass to the render() function. The keys of this dictionary become variable names in your template, and the dictionary's values become the values of those variables.
This mechanism is the core of Django's MVT (Model-View-Template) architecture.
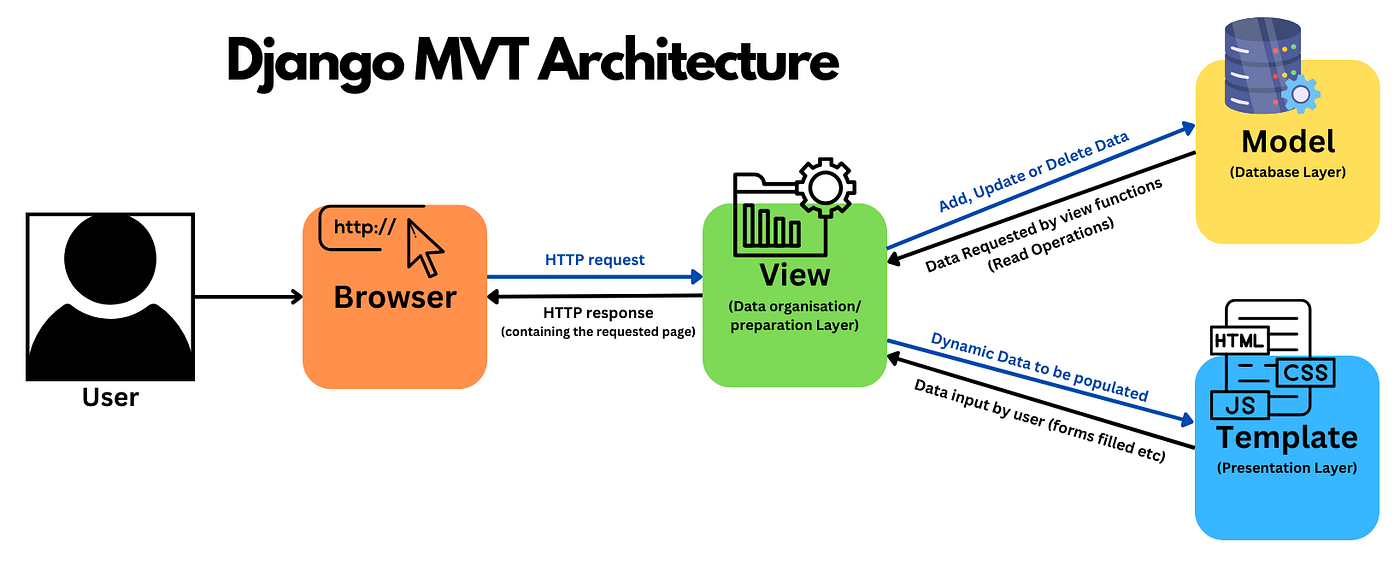
Essentially, the view prepares the data, and the context dictionary is the "package" it sends to the template.
To get a clear overview of why this is so important and how it works, let's watch a short video.
Try DJANGO Tutorial - 17 - Rendering Context in a Template
The video "Rendering Context in a Template" by CodingEntrepreneurs provides an excellent conceptual introduction to what context is and why it's used to make templates dynamic.
Watch from the beginning to 05:07. Focus on understanding how a standard Python dictionary in the view is used to pass data, and how the {{ variable_name }} syntax makes that data appear in the HTML.
As the video demonstrates, the process is straightforward:
- Create a dictionary in your
views.pyfile. - Pass this dictionary as the third argument to the
render()function. - Use
{{ key_name }}in your template to access the corresponding value.
2. Passing Different Data Structures
You can pass almost any Python data type through the context, from simple strings and numbers to more complex lists and dictionaries. Let's see this in action. The following video gives a practical walkthrough of passing different data types and, as a useful review, shows how to loop through a list in the template.
Passing Variables to a Template with Django
The video "Passing Variables to a Template with Django" by CodingWithMitch is a great hands-on demonstration of the different ways you can construct and pass context data.
Watch from 00:49 to 05:44. Pay attention to the two different methods for creating the context dictionary and how a for loop is used to iterate over a list that's passed from the view.
3. Accessing Nested Data with Dot Notation
The real power comes when you pass nested data structures, like a dictionary that contains other dictionaries or lists. Django's template language provides a convenient dot notation (.) to access these nested values.
This is a very important concept, so let's look at a clear textual explanation.
Context And Variables | Django Tutorial - Python Assets
The article "Context And Variables" from the Django Tutorial by Python Assets provides concise examples of accessing nested data.
Read the second half of the article, starting from the line "If the object between braces is a collection...". Focus on the code examples showing how to access a dictionary key with {{ current_course.name }} and a list item by its index with {{ previous_courses.0 }}.
To summarize the key points from that reading:
- Dictionary Lookup:
{{ my_dict.key }} - Attribute Lookup:
{{ my_object.attribute }}(We'll use this extensively with database models later). - List-Index Lookup:
{{ my_list.0 }}
Let's imagine we are building the detail page for a single task. In our view, we might create a context like this:
# views.py
def task_detail_view(request):
    # For now, this is hardcoded. Soon it will come from a database.
    task_data = {
        'id': 1,
        'title': 'Learn Django Context',
        'completed': True,
        'assignee': {
            'name': 'Alex',
            'role': 'Developer'
        },
        'tags': ['django', 'python', 'webdev']
    }

    context = {
        'task': task_data
    }
    return render(request, 'tasks/task_detail.html', context)
In the template task_detail.html, you could then access all of this data:
<h1>{{ task.title }}</h1>
<p>Status: {% if task.completed %}Done{% else %}Pending{% endif %}</p>
<p>Assigned to: {{ task.assignee.name }} ({{ task.assignee.role }})</p>
<p>First tag: {{ task.tags.0 }}</p>
Test your understanding!
Given the context from the example above, how would you display the third tag from the tags list inside an <li> element?
Show answer
You would use index lookup with the number 2 (since lists are zero-indexed):<li>{{ task.tags.2 }}</li>
This would render: <li>webdev</li>
4. Practice: Enhancing Your Task List
Now it's time to apply this to your project. Let's pass more than just the list of tasks to your task_list.html template.
-
Modify your View (
tasks/views.py):
Open yourtasks_viewfunction. Instead of passing thedummy_taskslist directly, create a more completecontextdictionary. Add a page title and the number of tasks.# tasks/views.py from django.shortcuts import render def tasks_view(request): # This is the same dummy data from our previous lessons dummy_tasks = [ {'id': 1, 'title': 'Learn Django Views', 'completed': True}, {'id': 2, 'title': 'Build a Template', 'completed': True}, {'id': 3, 'title': 'Understand Context', 'completed': False}, {'id': 4, 'title': 'Create a Model', 'completed': False}, ] # Create a new context dictionary context = { 'page_title': 'My To-Do List', 'tasks': dummy_tasks, 'task_count': len(dummy_tasks) } # Pass the entire context dictionary to render() return render(request, 'tasks/task_list.html', context) -
Update your Template (
tasks/templates/tasks/task_list.html):
Now, use these new context variables in your template.{% extends "base.html" %} {% block title %}{{ page_title }}{% endblock %} {% block content %} <!-- Use the page_title variable for the main heading --> <h1>{{ page_title }}</h1> <!-- Display the number of tasks --> <p>You have {{ task_count }} tasks.</p> <ul> {% for task in tasks %} <li>{{ task.title }} - {% if task.completed %} Done {% else %} Pending {% endif %} </li> {% endfor %} </ul> {% endblock %}
After saving both files, refresh your browser. The page title in the browser tab and the main <h1> heading should now both say "My To-Do List", and you should see the message "You have 4 tasks." This demonstrates that you are successfully passing and using multiple pieces of data from your view.
Conclusion
Excellent progress! You now have a solid understanding of one of Django's most fundamental concepts: passing data from your backend Python code to your frontend HTML templates. This separation of concerns is what makes Django powerful and organized.
Key Takeaways:
- Context is a Dictionary: The
contextpassed torender()is a Python dictionary. - Keys are Variables: The dictionary keys become variable names in the template.
- Dot Notation is Key: You can access nested data in dictionaries and object attributes using dot notation (e.g.,
{{ task.assignee.name }}). - Index Notation for Lists: You can access specific list items using their index (e.g.,
{{ my_list.0 }}).
Preview of the Next Lesson:
We've successfully passed data to our template, but what if we want to format it? For example, what if we have a datetime object and only want to display the date? In the next lesson, we will cover template tags and filters. You'll learn how to use filters to easily modify how your variables are displayed (like {{ task.due_date|date:"F j, Y" }}) and how to use the {% url %} tag to create robust links that don't break when you change your URL configurations.