Hello! Welcome back.
In our last lesson, you mastered Django's template tags and filters, learning how to add logic and format data to create dynamic pages. We took our plain task list and made it smarter by using {% url %} for robust links and filters like |date for clean formatting.
Now, it's time to make our application look professional. This lesson will focus on integrating your existing skills in CSS and JavaScript with Django. We'll cover how Django finds and serves these "static files," which are the assets that give your website its style and interactivity.
By the end of this lesson, you will be able to achieve the learning outcome: Configure and serve static files (CSS, JavaScript) in a development environment.
1. Understanding Static Files in Django
First, let's clarify what Django considers a "static file." You're already familiar with the building blocks of a front-end: CSS for styling, JavaScript for interactivity, and images. In the context of a Django project, these are all considered static files because they don't change while the application is running, unlike the dynamic HTML generated by your templates.
It's helpful to understand how Django categorizes the different files in a project.
Working with Static and Media Files in Django
This article from TestDriven.io, "Working with Static and Media Files in Django", provides an excellent definition of the different file types in a Django project. Understanding this distinction is key.
Read the first two sections, "Types of Files" and the introduction to "Static Files". Focus on the difference between source code, static files, and media files.
The key takeaway is that Django keeps a clear separation:
- Source Code: Your Python files (
.py) and templates (.html). - Static Files: Your CSS, JavaScript, and images. These are part of your project's code.
- Media Files: User-uploaded content (like a profile picture). We'll cover this much later.
Our focus today is entirely on static files.
2. The Three-Step Process for Serving Static Files
Getting Django to serve your static files involves a straightforward, three-step configuration process.
- Organize Files: Place your CSS, JS, and image files in a dedicated
staticdirectory. - Configure Settings: Tell Django where this
staticdirectory is located by updating yoursettings.pyfile. - Link in Template: Use Django's template tags to correctly link to these files in your HTML.
This diagram provides a great visual summary of how these three pieces fit together.
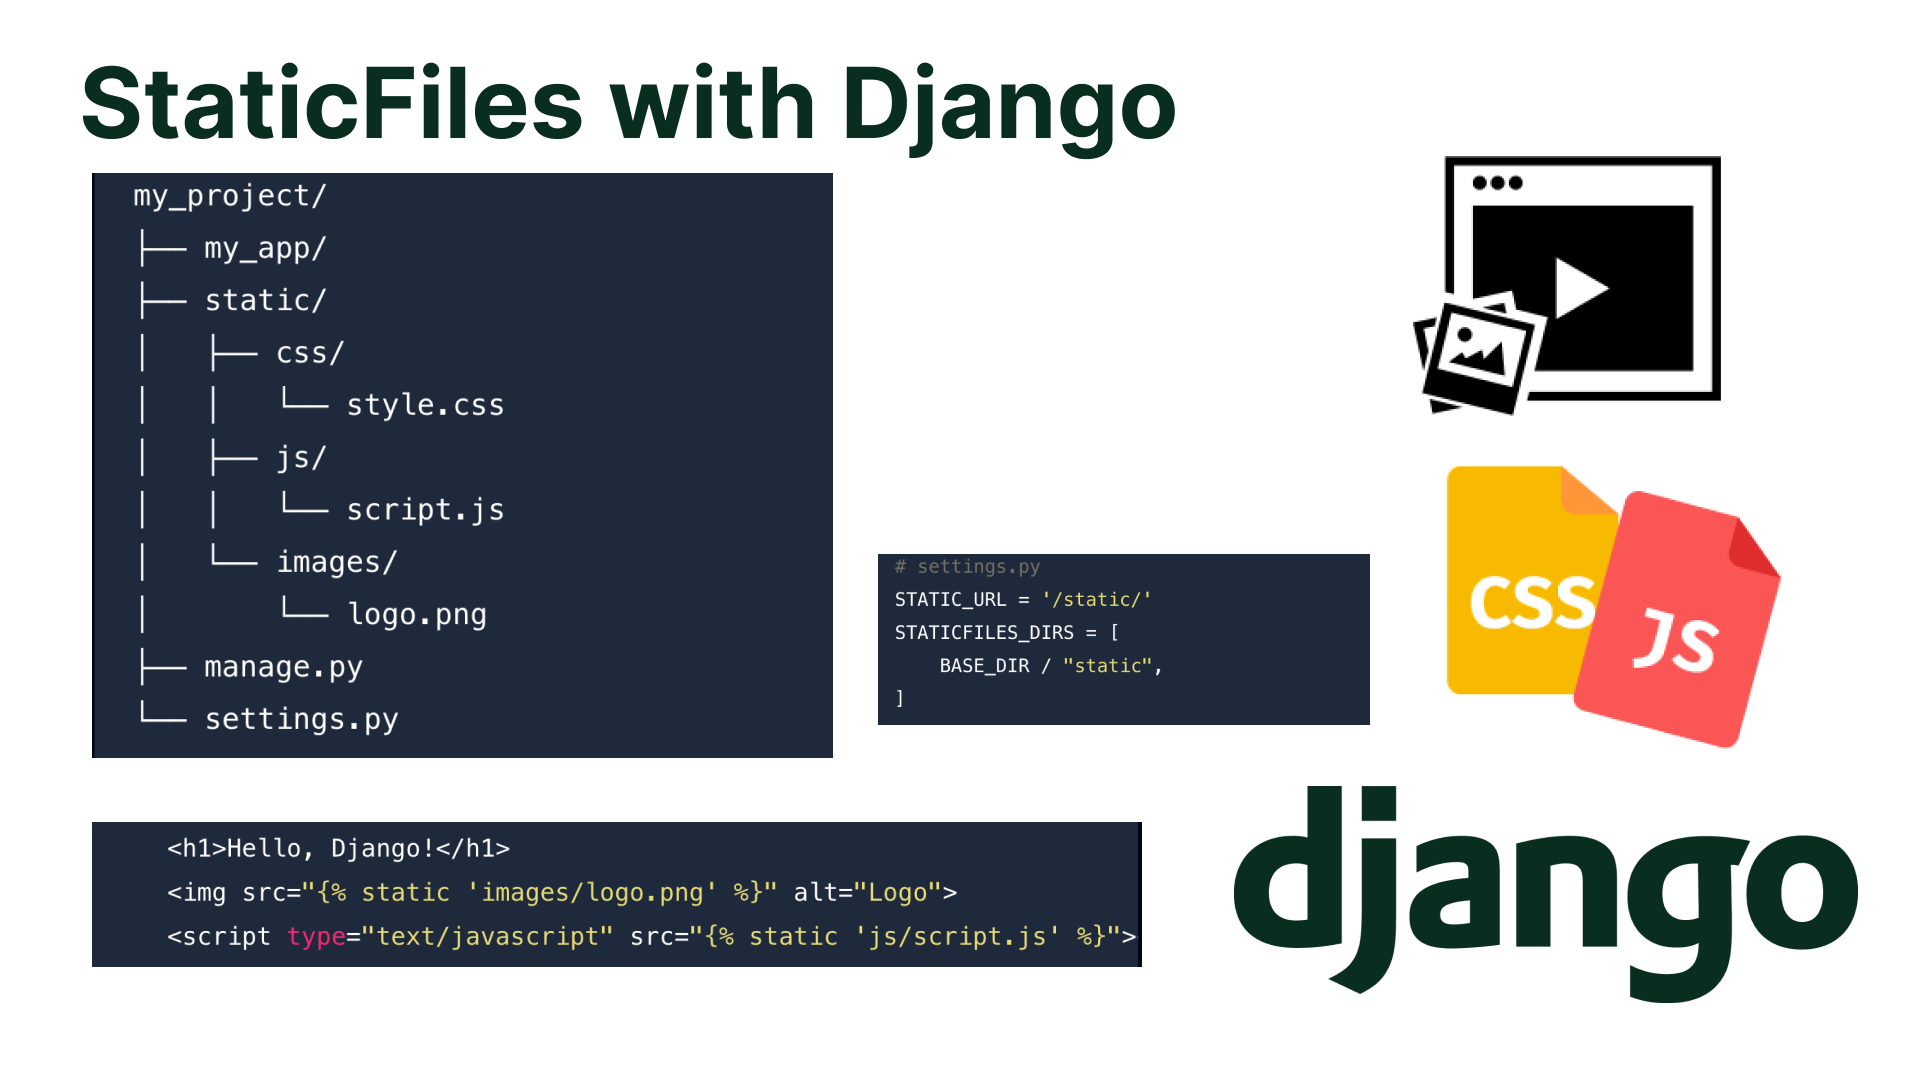
3. A Practical Walkthrough
Theory is useful, but seeing it in action is better. The following video provides a complete walkthrough of setting up static files from scratch. It's a great way to see the three steps we just discussed applied in a real project.
Django Tutorial #8 - Static Assets
This video from Net Ninja provides a complete, step-by-step guide to setting up static files. It covers everything from creating the folders to configuring the settings and updating the template.
Follow along with the video, pausing as needed. You don't need to code along just yet; we'll do that in the next section. Focus on understanding the why behind each step. Organize Files (03:58 - 04:48): See how to create the static folder and its subdirectories (styles, images, js). Note that he names the CSS folder styles; css is also very common. Configure Settings (04:48 - 09:27): This is the most important part. Pay close attention to the explanation of STATIC_URL and STATICFILES_DIRS. Update Template (11:09 - 14:46): Learn the two-step process in the template: {% load static %} at the top, and using the {% static '...' %} tag to build the URL for your files. Run & Debug (14:46 - 17:38): This is a realistic part of development! Notice how a small syntax error (a missing comma) can cause issues. Folder Location (19:24 - 21:26): This part explains the flexibility of placing the static folder. For our project, we will use a single, project-level static folder, as it's cleaner for shared assets.
4. Applying Styles to Your Task Manager
Now, let's apply what you've learned to our project. We will add a simple CSS file to style our task list.
Step 1: Create the Directories
In your project's root directory (the same level as manage.py), create a new folder named static. Inside that static folder, create another folder named css.
Your project structure should look something like this:
your_project_name/
├── your_project_name/
│   ├── settings.py
│   └── ...
├── tasks/
│   └── ...
├── static/
│   └── css/
├── templates/
└── manage.py
Step 2: Add a CSS File
Inside the static/css/ directory, create a new file named main.css. Add the following CSS rules to it. This will give our page a cleaner, more modern look.
/* static/css/main.css */

body {
    font-family: -apple-system, BlinkMacSystemFont, "Segoe UI", Roboto, "Helvetica Neue", Arial, sans-serif;
    background-color: #f4f7f6;
    color: #333;
    line-height: 1.6;
    margin: 0;
    padding: 20px;
}

.container {
    max-width: 800px;
    margin: auto;
    background: #fff;
    padding: 20px;
    border-radius: 8px;
    box-shadow: 0 2px 4px rgba(0, 0, 0, 0.1);
}

h1 {
    color: #0056b3;
}

ul {
    list-style-type: none;
    padding: 0;
}

li {
    background: #f9f9f9;
    margin-bottom: 10px;
    padding: 15px;
    border-left: 5px solid #0056b3;
    display: flex;
    justify-content: space-between;
    align-items: center;
}
Step 3: Configure settings.py
Open your project's settings.py file. We need to tell Django where to find our new static directory.
- Make sure you have
import osat the top of the file. - Find the
STATIC_URLsetting (it should already be there). - Below it, add the
STATICFILES_DIRSsetting.
# your_project_name/settings.py
import os


# ... other settings

STATIC_URL = 'static/'


# Add the following line:
STATICFILES_DIRS = [os.path.join(BASE_DIR, 'static')]


# ... rest of the settings
STATIC_URLis the URL prefix your browser will use (e.g.,/static/css/main.css).STATICFILES_DIRSis a list of filesystem paths where Django will search for static files.os.path.join(BASE_DIR, 'static')safely constructs the full path to thestaticfolder you created in the project root.
Step 4: Update Your Base Template
Now, we need to link our CSS file in our main template. Since we want this style to apply to all pages, we'll edit base.html.
<!-- templates/base.html -->

{% load static %}  <!-- Add this at the very top -->

<!DOCTYPE html>
<html lang="en">
<head>
    <meta charset="UTF-8">
    <meta name="viewport" content="width=device-width, initial-scale=1.0">
    <title>{% block title %}My Django App{% endblock %}</title>
    <!-- Add this link to your stylesheet -->
    <link rel="stylesheet" href="{% static 'css/main.css' %}">
</head>
<body>
    <div class="container">
        {% block content %}{% endblock %}
    </div>
</body>
</html>
The two crucial changes are:
{% load static %}: This tag must be at the top of any template that uses static files. It tells Django to enable thestatictemplate tag.<link rel="stylesheet" href="{% static 'css/main.css' %}">: The{% static %}tag dynamically generates the correct URL to your file. This is much better than hard-coding<link href="/static/css/main.css">, as it adapts if you ever change yourSTATIC_URL.
Step 5: Run the Server
Save all your files, run python manage.py runserver, and visit your task list page. You should now see your application with the new styles applied!
Test your understanding!
You've successfully added main.css. Now, imagine you want to add a JavaScript file named app.js. You place it in static/js/app.js.
What single line of code would you add to your base.html file to include this script, and where would you typically place it?
Show answer
You would add the following line, typically just before the closing </body> tag, to ensure the HTML content has loaded before the script runs.
<script src="{% static 'js/app.js' %}"></script>
Remember, {% load static %} only needs to be at the top of the file once.
Conclusion
Excellent work! You've now bridged the gap between your back-end Django logic and your front-end design. By correctly configuring static file handling, you can now apply all your HTML, CSS, and JavaScript knowledge to build beautiful, modern web applications.
Key Takeaways:
- Static files (CSS, JS, images) are assets that don't change and are kept separate from your Python code.
- Configuration involves three main steps:
- Creating a project-level
staticdirectory. - Setting
STATICFILES_DIRSinsettings.pyto point to that directory. - Using
{% load static %}and{% static 'path/to/file' %}in your templates.
- Creating a project-level
- During development (
DEBUG=True), Django's built-in server will automatically serve these files for you.
Preview of the Next Lesson:
Our application has structure, logic, and now styling. However, our "tasks" are still just a hard-coded list in our view function. The next major step is to work with real, persistent data. In the next module, we will dive into Django Models to define our database structure and learn how to create, read, update, and delete data using the powerful Django ORM (Object-Relational Mapper).