Hello! Welcome back to our journey into building REST APIs with Django REST Framework.
In our last lesson, we successfully installed and configured DRF in your project. You created a dedicated api app, which is now ready to house all the logic for your API. This setup is the foundation upon which we'll build the API for your Task Manager application.
Today, we will tackle a core concept of DRF: serializers. The goal of this lesson is to learn how to create serializers to convert your Django Task model instances to and from JSON. Serializers are the crucial link that allows your Django back-end to communicate with a front-end or any other client by translating data into a universally understood format.
1. What is a Serializer?
Before we write any code, let's understand the problem serializers solve. Your Django application works with complex Python objects—specifically, instances of your Task model. However, when you want to send task data to a web browser, that browser's JavaScript engine can't directly understand a Python object. It expects data in a format like JSON (JavaScript Object Notation).
A serializer is a component that translates data between these two worlds.
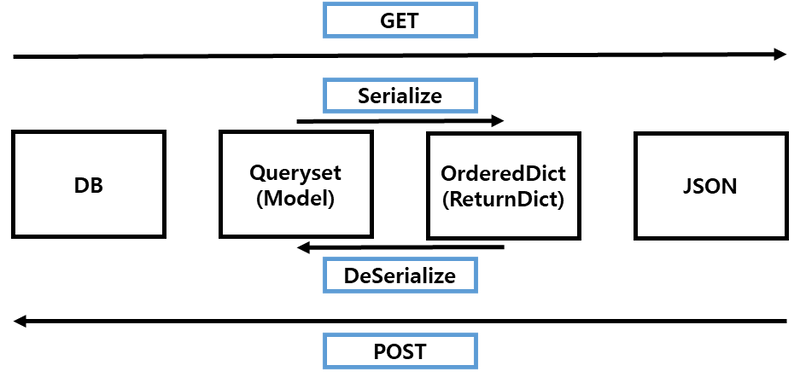
- Serialization: The process of converting a complex object (like a Django model instance) into a simple, transmittable format like JSON. This is what happens when a client requests data from your API (e.g., a GET request).
- Deserialization: The reverse process of converting incoming data in a simple format (like JSON) back into a complex object. This also includes validating that the incoming data is correct before creating or updating an object in your database (e.g., a POST or PUT request).
The following diagram illustrates this flow:
2. Creating Your First Serializer
Django REST Framework makes creating serializers incredibly efficient, especially when they correspond directly to a model. We'll use a ModelSerializer, which automatically generates fields and validation rules based on your model definition.
Let's start by creating the necessary file. In your api app directory, create a new file named serializers.py.
Now, let's watch a clear demonstration of how to define a ModelSerializer for a Task model.
Django Rest Framework | Serializers & CRUD
In this clip from Dennis Ivy's tutorial 'Django Rest Framework | Serializers & CRUD', you'll see exactly how to create a serializers.py file, import the necessary modules, and define a TaskSerializer class.
Watch from 08:05 to 10:13. Pay close attention to the structure: the class inherits from serializers.ModelSerializer, and the inner Meta class specifies the model and the fields.
Based on the video, open your new api/serializers.py file and add the following code. Note that we are importing the Task model from your tasks app.
# api/serializers.py

from rest_framework import serializers
from tasks.models import Task

class TaskSerializer(serializers.ModelSerializer):
    class Meta:
        model = Task
        fields = '__all__'
Let's break this down:
from rest_framework import serializers: Imports the DRF serializer library.from tasks.models import Task: Imports yourTaskmodel. Your models live in thetasksapp, but our API logic, including serializers, will live in theapiapp.class TaskSerializer(serializers.ModelSerializer):: We define a new class that inherits fromModelSerializer. This tells DRF to automatically build the serializer based on a model.class Meta:: This inner class is where we configure the serializer.model = Task: We tell the serializer which model it is based on.fields = '__all__': This is a convenient shortcut that tells the serializer to include all fields from theTaskmodel.
For a quick written reference on this step, you can also consult this guide.
How to Build a Task Manager API with Django REST ...
This article, 'How to Build a Task Manager API with Django REST Framework: Part 2', provides a concise text-based explanation of creating a serializer.
Read 'Step 1: Create a Serializer'. It reinforces the code we just wrote and gives a brief explanation of what each part does.
Test your understanding!
Suppose for your API, you decide you don't want to expose the created_at timestamp of a task. You only want to expose its id, title, description, and completed status. How would you modify the fields attribute in your TaskSerializer's Meta class to achieve this?
Show answer
You would replace fields = '__all__' with a list of the specific field names you want to include:
class Meta:
    model = Task
    fields = ['id', 'title', 'description', 'completed']
This gives you fine-grained control over your API's representation of the model.
3. How to Use the Serializer
Now that you've defined the TaskSerializer, how does it actually work? Although we will build the full API views in the next lesson, let's look at how the serializer is used to handle both outgoing and incoming data.
Serialization: From Model to JSON (for GET requests)
When a client requests a list of tasks, your view will first query the database to get the Task objects. Then, it will pass this queryset to the TaskSerializer.
The following video segment demonstrates this process.
Django Rest Framework | Serializers & CRUD
Continuing with the same video, this part shows how the TaskSerializer is used within a view to handle a list of tasks.
Watch from 10:13 to 12:25. Notice how the tasks are queried with Task.objects.all() and then passed to the serializer. The many=True argument is important because we are serializing a list of objects, not just one.
As you saw, the key lines are:
# In a view function (we will build this next lesson)
tasks = Task.objects.all()
serializer = TaskSerializer(tasks, many=True)
# serializer.data now contains a list of Python dictionaries.
# DRF will then render this data as JSON.
The many=True flag tells the serializer to expect an iterable (like a queryset) and to serialize each object in it.
Deserialization: From JSON to Model (for POST requests)
When a user submits a new task through your API, they send JSON data. Your TaskSerializer handles the validation and creation of a new Task object from this data.
This final video clip shows how the same serializer is used to create a new task.
Django Rest Framework | Serializers & CRUD
This clip demonstrates the deserialization process for creating a new task.
Watch from 15:34 to 18:15. Focus on how request.data (which contains the parsed JSON) is passed to the serializer. The serializer.is_valid() method checks the data against the model's constraints, and serializer.save() creates the new database entry.
The core logic for deserialization looks like this:
# In a view function handling a POST request
serializer = TaskSerializer(data=request.data)
if serializer.is_valid():
    serializer.save()
    # Return a success response with the new task data
else:
    # Return an error response with validation details
Here, we pass the incoming request.data to the data argument. The call to is_valid() is crucial—it ensures the submitted data is complete and correct. If it is, save() creates and saves a new Task instance. This single serializer elegantly handles both reading and writing data!
Conclusion
Great job! You've successfully created your first serializer and understood its dual role in an API. This is a fundamental skill for building any API with Django REST Framework.
Key Takeaways:
- Serializers are the translators between Django's complex data types (like model instances) and simple, portable formats like JSON.
ModelSerializeris a powerful tool that automates the creation of serializers directly from your models, saving you from writing boilerplate code.- The inner
Metaclass is used to configure aModelSerializer, specifying themodeland whichfieldsto include. - A single serializer is used for both serialization (Python object -> JSON, using
many=Truefor querysets) and deserialization (JSON -> Python object, using thedataargument and methods likeis_valid()andsave()).
Preview of the Next Lesson:
With our serializer defined, we're ready to expose our Task data to the world. In the next lesson, we will build API endpoints using DRF's generic views. You'll create views that use the TaskSerializer to handle GET, POST, and other HTTP requests, bringing your Task Manager API to life.