Hello! Welcome back to our series on building a web application with Django and Django REST Framework (DRF).
In our last lesson, you did some excellent work refactoring our API to use ModelViewSet and DefaultRouter. This powerful combination automatically generated a full set of CRUD (Create, Retrieve, Update, Delete) endpoints for our Task model, dramatically cleaning up our code. Now that we have these functional endpoints, the next logical question is: how do we know they actually work?
Today's lesson is all about answering that question. Our goal is to test our API endpoints using two key tools: DRF's built-in Browsable API and the industry-standard tool, Postman. This is a critical skill for any backend or full-stack developer. It allows you to verify that your API behaves as expected, simulate requests from a front-end application, and efficiently debug issues long before you write a single line of front-end code.
1. The Browsable API: Your First Line of Defense
You've already seen the Browsable API in action. It's the user-friendly HTML interface that DRF provides when you access your endpoints in a web browser. While it's not how a real application (like a JavaScript frontend) would consume your API, it's an incredibly convenient tool for quick, on-the-fly testing during development.
Let's start with a quick video that shows how you can interact with it.
Django REST Framework Oversimplified
This short clip from a video by Dennis Ivy demonstrates the core features of the Browsable API, including how to view data and how to make a POST request using its interface.
Watch the two segments from 03:10 to 03:45 and from 08:30 to 09:34. Notice how the interface allows you to view the raw JSON data and how you can use the HTML form to send data to create a new item.
Now that you have a visual, let's dive deeper with a more structured guide. The following article from TestDriven.io provides an excellent walkthrough of manually testing an API, starting with the Browsable API.
We will read the section on the Browsable API from the article 'Manually Testing the API'. It provides a clear, step-by-step guide to interacting with your list and detail endpoints.
Please read the section titled 'Browsable API'. It starts after the initial database setup and ends just before 'JSON Representation'. You can skip the part about populating the database with fixtures for now, but pay close attention to the descriptions of the 'API Root', 'List Endpoint', and 'Detail Endpoint'.
Your Turn: Test Your Task Endpoints
With your development server running (python manage.py runserver), open your browser and put the Browsable API to the test on your own project:
- Navigate to the API root: Go to
http://127.0.0.1:8000/api/. You should see the entry for yourtasksendpoint that theDefaultRoutercreated. - Test
GET(list) andPOST: Click the link to go to/api/tasks/.- You'll see a list of any tasks you've already created.
- Scroll down to the HTML form. Use it to create a new task by filling in the
titleanddescriptionand clickingPOST. The new task should appear in the list above.
- Test
GET(detail),PUT, andDELETE: From the task list, click the link for the task you just created (e.g.,/api/tasks/1/).- You are now on the detail view for that single task.
- Use the HTML form to update the task (this performs a
PUTrequest). - Finally, click the red
DELETEbutton to remove the task.
The Browsable API is fantastic for this kind of quick verification. However, to truly simulate how another program would interact with your API, we need a more powerful tool.
2. Professional API Testing with Postman
Postman is an application designed specifically for API testing. It acts as a true API client, allowing you to craft raw HTTP requests (GET, POST, PUT, etc.), set headers, and send data in formats like JSON. The response you get back is exactly what a front-end application would receive. This makes it an essential tool for backend development.
If you don't have it installed, please download and install Postman now.
Let's watch a demonstration of how to use Postman to test the five main types of API requests.
Python Django ModelViewSet: Ultimate Guide to ReST API Development & Testing with Postman
This video by codiin provides a complete walkthrough of testing a DRF API with Postman. It covers GET, POST, PUT, PATCH, and DELETE requests.
Watch the segment from 13:54 to 19:28. The presenter demonstrates how to set up each request type in Postman. Pay attention to: How the URL and HTTP method are selected. Where to put the JSON data for POST and PUT requests (in the 'Body' tab). The difference in responses for GET (data), POST (created data), and DELETE (no content).
Now, let's use the same article from before, which also has a fantastic, detailed guide to using Postman. We'll use it to test our Task API.
We'll now read the 'Postman' section of the 'Manually Testing the API' article. This will guide us through replicating our tests using a professional tool.
Read the entire section titled 'Postman'. It will walk you through setting up GET, POST, PUT, PATCH, and DELETE requests for both list and detail endpoints.
Step-by-Step with Postman and Your Task API
Let's follow the steps from the article and apply them to your Task endpoints.
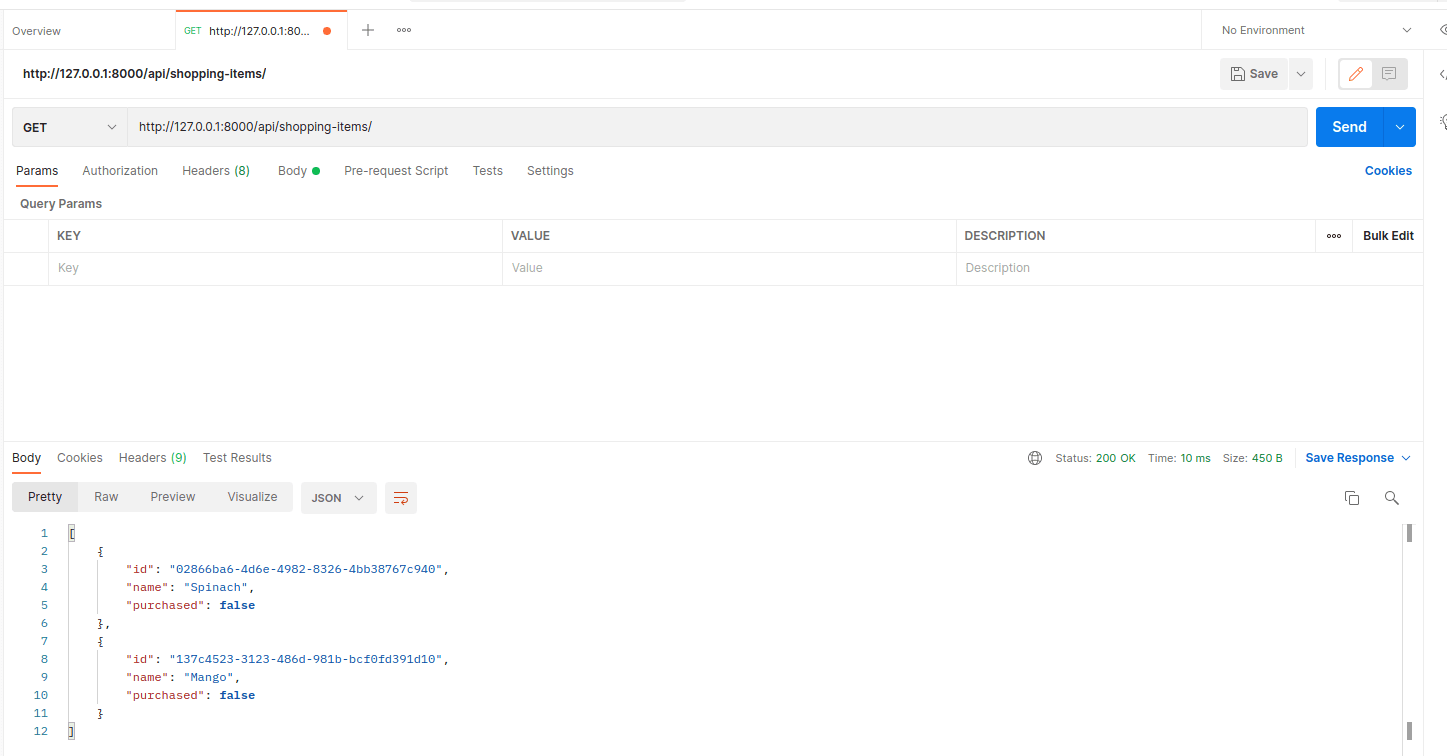
1. GET (list)
- In Postman, create a new request.
- Set the method to
GET. - Enter the URL:
http://127.0.0.1:8000/api/tasks/ - Click "Send". You should see a JSON array of your tasks in the response body.
2. POST (create)
- Change the method to
POST. - Go to the
Bodytab, selectraw, and chooseJSONfrom the dropdown. - Enter the JSON for a new task. Remember,
idandcreatedare handled by the server.
json { "title": "Learn Postman", "description": "Test the API for my task manager project.", "completed": false } - Click "Send". You should get a
201 Createdstatus and see the newly created task in the response.
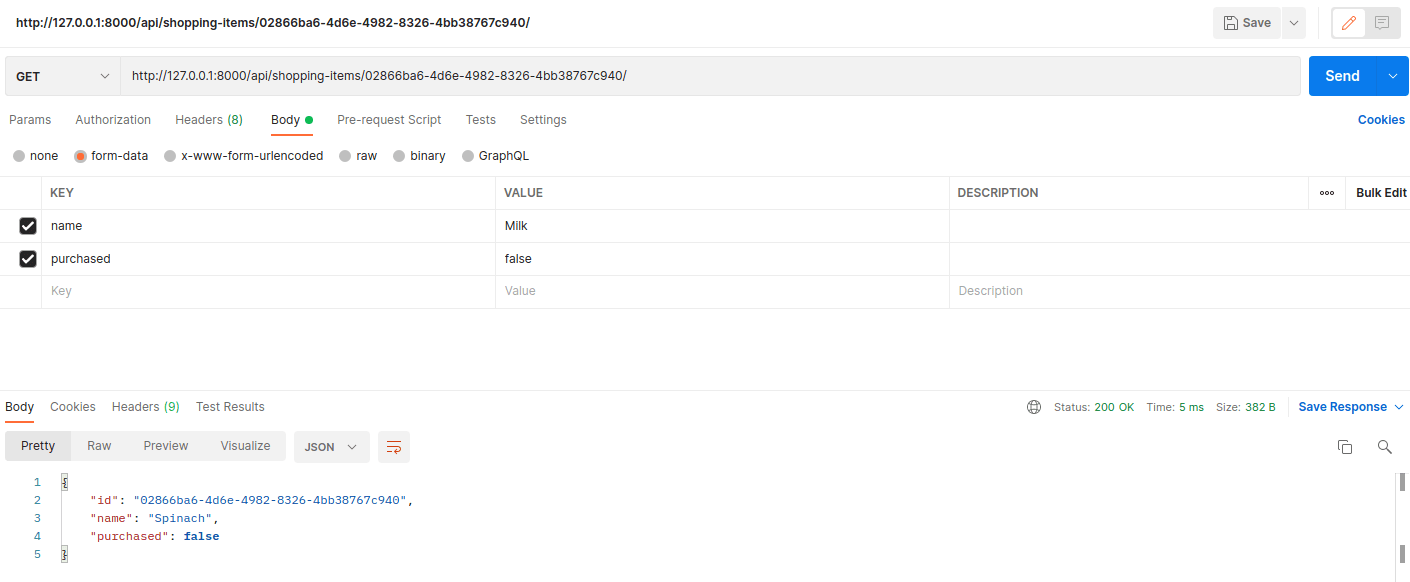
3. GET (detail)
- Change the method back to
GET. - Append the ID of the task you just created to the URL:
http://127.0.0.1:8000/api/tasks/<your_task_id>/. - Click "Send". You'll get the JSON object for that single task.
4. PUT vs. PATCH (update)
PUT(Full Update): Change the method toPUT. In theBody(raw, JSON), you must provide all the required fields for the object.
json { "title": "Master Postman", "description": "Test the PUT method for the API.", "completed": true }PATCH(Partial Update): Change the method toPATCH. Now you only need to send the field(s) you want to change.
json { "completed": false }- Send each request (to the detail URL) and observe the updated object in the response.
Test your understanding!
You want to update only the title of a task using the API. You send a PUT request to http://127.0.0.1:8000/api/tasks/5/ with the body {"title": "An updated title"}. What is likely to happen and why?
Show answer
You will likely get an error. A PUT request is for a full replacement of the resource. Since your TaskSerializer also expects the description and completed fields, the API will complain that they are missing. For updating only a single field, you should use the PATCH method.
5. DELETE
- Change the method to
DELETE. - Use the same detail URL:
http://127.0.0.1:8000/api/tasks/<your_task_id>/. - No body is needed. Click "Send".
- You should receive a
204 No Contentstatus code, and the response body will be empty. If you now try to do aGETrequest for that ID, you should get a404 Not Found.
Conclusion
Great job! You've successfully tested your API both as a developer with the convenient Browsable API and as a client with the more realistic Postman. This manual testing process is fundamental to API development, ensuring your backend logic is solid before connecting it to anything else.
Key Takeaways:
- The Browsable API is a fantastic tool for quick, human-readable feedback during development.
- Postman simulates a real API client, allowing you to craft precise HTTP requests and inspect raw JSON responses. It's the standard for thorough manual API testing.
- The five core HTTP methods map directly to CRUD operations:
GET: Retrieve data (list or detail).POST: Create new data.PUT: Replace an existing resource completely.PATCH: Partially update an existing resource.DELETE: Remove a resource.
Preview of the Next Lesson:
Manual testing is essential, but it can become repetitive and time-consuming as your application grows. What if you could automate this process? In our next lesson, we will explore the importance of automated testing and learn how to write unit tests for our Django application. This will allow us to verify our models, views, and API logic automatically every time we make a change, giving us confidence that our code is always working correctly.