Introduction
In our last lesson, we took a deep dive into the computational core of FlashAttention: the inner loop. You saw how the algorithm processes tiles of the Key and Value matrices, fusing the score calculation (), the online softmax update, and the output accumulation () into a single, memory-efficient pass. You've analyzed the code structure and traced the update of the running statistics—the maximum , the denominator , and the output accumulator .
Now, we will zoom out from the inner loop to construct and verify the complete forward pass. This lesson will connect the initialization steps that occur before the loop with the final normalization that happens after, culminating in a full, albeit simplified, FlashAttention kernel. To close the loop on engineering practice, we will then discuss the crucial process of verifying your kernel's output against a baseline implementation to ensure its correctness.
The Complete Kernel: Initialization, Loop, and Finalization
A complete kernel does more than just its core computation. It needs to set up its state correctly and finalize the results before writing them back to memory. Let's examine these two phases that bookend the inner loop we studied previously.
1. Initialization: Setting the Stage
Before the kernel's main loop begins processing tiles of and , for each output tile corresponding to a block of , we must initialize the "attention state". This state consists of the three running statistics that are updated with each iteration:
- Running Maximum (): This tracks the maximum value of the scores computed so far. It must be initialized to the lowest possible value to ensure any real score will be greater. In practice, this is .
- Running Denominator (): This is the sum of the unnormalized softmax terms. It starts at zero.
- Output Accumulator (): This accumulates the contributions from each multiplication. It's a tensor of the same dimension as the final output tile and is initialized to all zeros.
These initial values provide the correct starting point for the associative update rule of the online softmax.
2. The Main Loop (Recap)
This is the part you are already familiar with. The kernel loads a tile of into registers and then iterates through tiles of and . Inside this loop, the attention state is continuously updated.
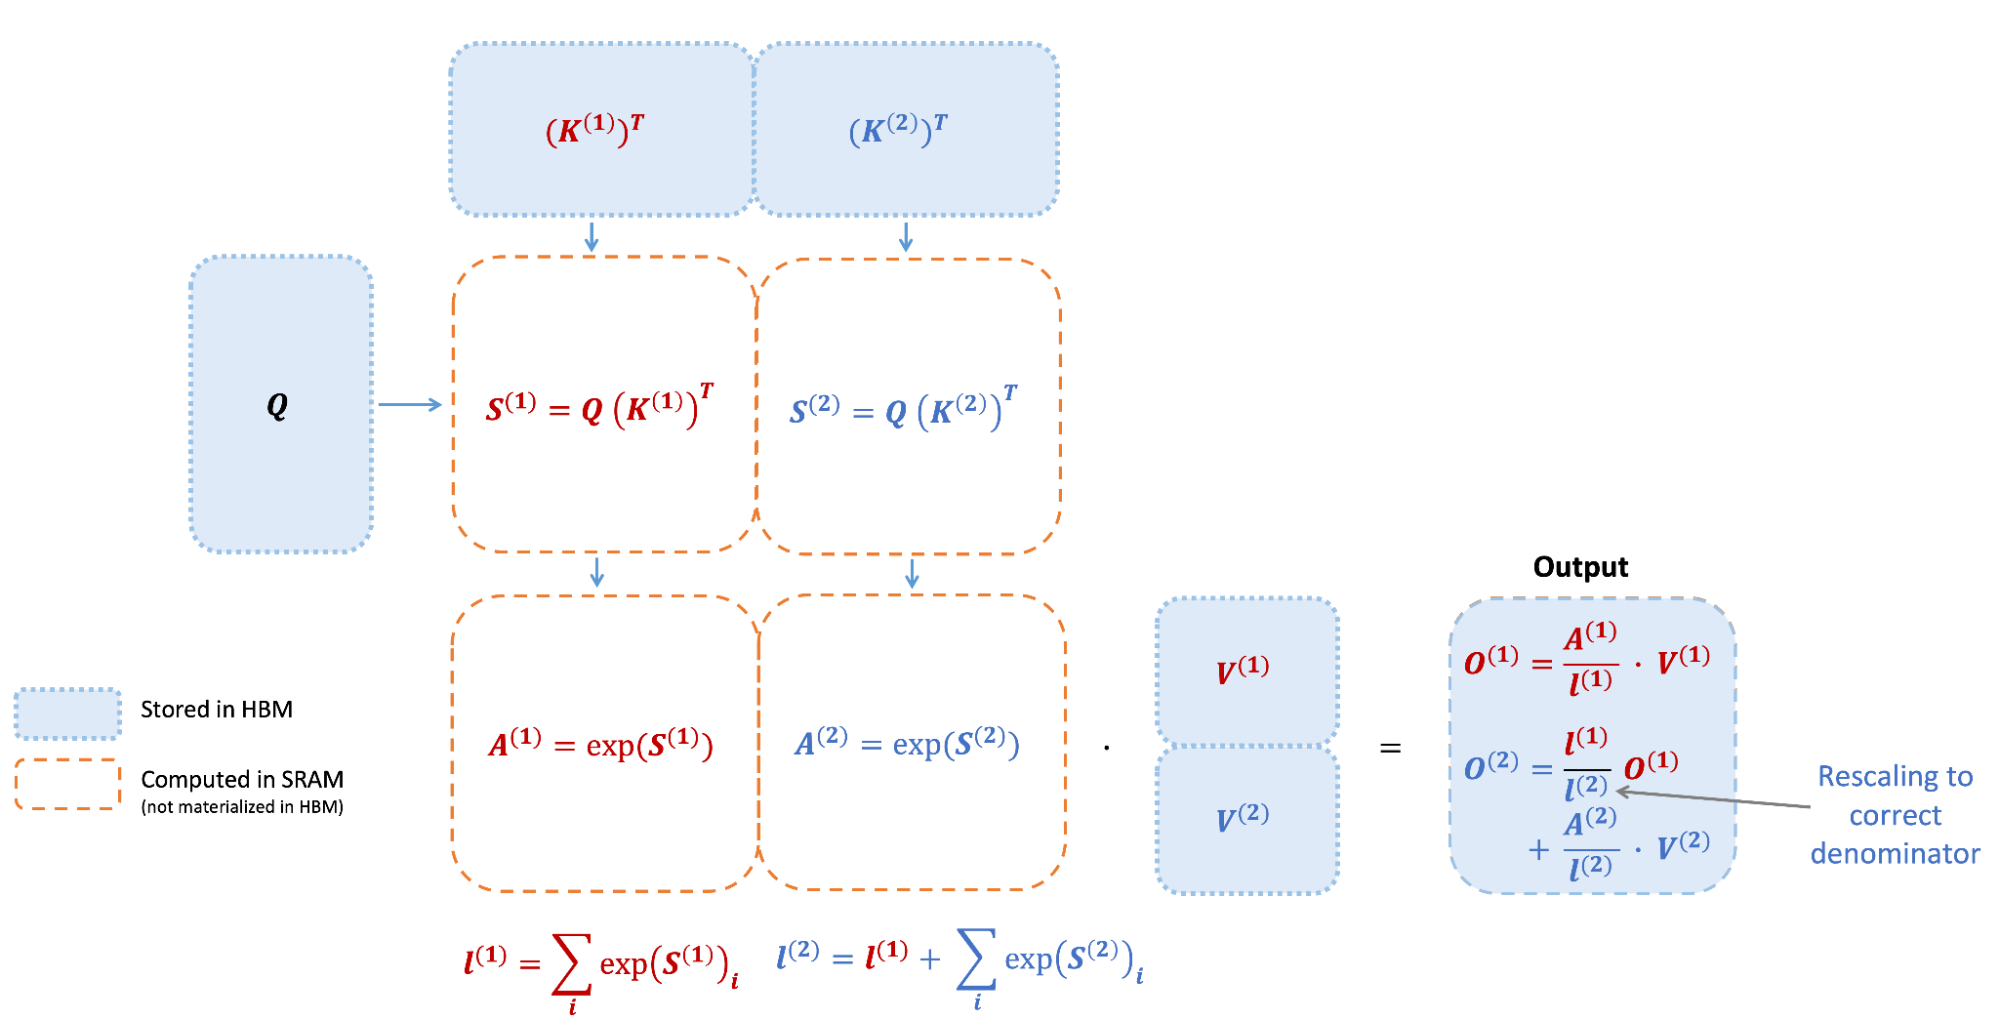
3. Finalization: Normalizing and Writing the Output
After the inner loop has finished iterating over all the and tiles, the output accumulator O_i holds the unnormalized final output, and l_i holds the final normalization constant (the denominator of the softmax).
The final step within the thread block is to perform the normalization:
This is an element-wise division of each value in the output accumulator by the final denominator sum. The resulting O_final tile is the correct, exact attention output for that block of , which can then be written back to global memory.
To understand the mathematical justification for this online method and see how it all fits together, the following video provides an excellent and intuitive walkthrough.
ELI5 FlashAttention Algorithm and Online Normalizer Calculation for Softmax (NVIDIA Paper) - part 3
This video by Sachin Kalsi, which you may have seen before, gives one of the clearest explanations of the online normalizer algorithm that makes FlashAttention possible.
Watching these two segments will solidify the theory behind our implementation: Theory: Watch the segment on the online normalizer algorithm. Focus on the intuition of how the running maximum and denominator are updated by "undoing" the previous normalization and applying the new one. This is the core logic inside our kernel's main loop. Example: Next, watch the Python implementation walkthrough. This demonstrates concretely how you can process a list in chunks (just like our kernel processes matrix tiles) and combine the intermediate statistics to get the exact same result as processing the whole list at once. This directly mirrors our kernel's "initialize -> loop -> finalize" structure.
Assembling the Full Kernel in CUDA C++
With the theory of initialization and finalization clear, let's look at a complete, simplified CUDA C++ kernel. We'll use the attention_v1.cu implementation from the blog post we've been following, as it clearly lays out all the components.
Writing Speed-of-Light Flash Attention for 5090 in CUDA C++
This article by "gau-nernst" provides a low-level walkthrough of building a FlashAttention kernel. We'll now examine the full draft kernel code to see how initialization, the main loop, and finalization are combined.
Please review the code in the section titled Draft version. This time, identify these three key stages in the attention_v1_kernel function: Initialization: Before the main loop, notice the declaration and zero-initialization of the accumulator float S_rmem[...] = {}; (inside the loop for each tile) and the main output accumulator float O_rmem[...], which is implicitly initialized before being used. The online softmax logic, which we will add conceptually, would also initialize its m and l statistics here. Main Loop: Re-identify the for (int kv_idx = 0; ...) loop, which we studied in the last lesson. This is where K and V tiles are loaded and the two MMAs are performed. Finalization & Output: After the main loop, find the code block that writes the output. While this simplified code omits the explicit final division O_i / l_i for clarity, this is where it would happen. The code then handles the complex task of taking the float results from registers (O_rmem) and writing them back to global memory as bfloat16.
By studying this code, you see a direct translation of the algorithm's three stages into a single CUDA kernel.
Verification: Does It Actually Work?
Writing a complex kernel is only half the battle. You must be able to prove that it produces the correct output. The standard method is to compare its results against a "golden reference"—a trusted, simpler implementation.
For attention, a perfect baseline is a naive kernel that follows the textbook definition:
- Compute the full matrix and store it in global memory.
- Read , compute the softmax, and store the resulting matrix.
- Read and , compute , and store the final result.
This approach is terribly inefficient due to the massive memory transfers involving the matrices, but it is simple to write and verify. Your optimized kernel should produce numerically similar results.
The pedagogical GitHub repository from our last lesson provides exactly what we need: a naive implementation and an optimized FlashAttention kernel, along with a benchmark notebook.
FlashAttention Pedagogical Implementation in CUDA C++ - GitHub
This GitHub repository by "23silicon" is designed for learning. It provides clear, simplified implementations and the tools to compare them.
First, familiarize yourself with the repository's contents by reading the main README.md file. Focus on the project structure and performance table. naive_self_attention_first_attempt.cu: This file contains the "golden reference" implementation. FlashAttention.cu: This is the optimized, tiled implementation, similar in spirit to the one we've been building. FlashAttentionBenchmark.ipynb: This notebook contains the Python code to run both kernels and compare their outputs and performance. You don't need to read the CUDA files line-by-line, but understand their roles. The performance table is especially insightful; it shows that while the naive kernel is faster for very small sequences (where memory access fits in cache), the FlashAttention kernel quickly becomes superior and is the only one that can handle large sequences without running out of memory.
The key steps for verification, as demonstrated in the benchmark notebook, are:
- Setup: Create random
Q,K, andVtensors in Python. - Execute: Run both the naive kernel and your FlashAttention kernel on the same input tensors.
- Compare: Use a tolerance-based check, such as
torch.allclose(output_naive, output_flash, atol=..., rtol=...), to compare the results. Due to the different order of floating-point operations, you will not get bit-for-bit identical results, so checking for "close enough" is the correct approach.
Conclusion
You have now journeyed from the conceptual underpinnings of FlashAttention to the practical assembly and verification of a complete forward pass kernel. You've seen how the pieces fit together and, just as importantly, how to ensure the final result is correct.
Key Takeaways:
- Complete Kernel Flow: A FlashAttention kernel consists of three main stages: initializing running statistics (), a main loop that iteratively updates these statistics, and a finalization step that normalizes and writes the output.
- Online Softmax in Practice: The online normalizer algorithm allows these three stages to produce an exact softmax output without ever storing the full attention score matrix.
- Verification is Non-Negotiable: Writing a kernel is not complete until it is verified. Comparing against a simpler, naive implementation using a tolerance-based check is a standard and robust methodology.
- Performance Payoff: You've seen clear evidence that while complex, the tiling and fusion strategy of FlashAttention provides massive performance and scalability benefits over the standard algorithm, making it a cornerstone of modern AI systems.
In our next and final module, we will explore how to integrate your custom kernels into the larger AI ecosystem, making them accessible from frameworks like PyTorch and looking at alternative, higher-level programming models like Triton.