Introduction
In our last lesson, we successfully assembled a complete, albeit simplified, forward pass for FlashAttention. You saw how to initialize the running statistics for the online softmax, execute the main tiled loop, and finalize the result before writing it to global memory. We also established the critical importance of verifying your kernel's output against a trusted, naive implementation.
While that kernel is a powerful, standalone piece of C++/CUDA code, it exists in isolation. To make it useful in the real world, we need to bridge the gap between our low-level CUDA environment and the high-level Python frameworks where AI models are built, like PyTorch. This lesson begins that journey. You will learn how to wrap a custom CUDA kernel into a PyTorch C++ extension, making it directly callable from Python. This is the first and most fundamental step in integrating high-performance custom code into the broader AI ecosystem.
Why Do We Need C++ Extensions?
You've invested significant effort into writing kernels that are orders of magnitude faster than what a pure Python implementation could achieve. However, the AI development world revolves around Python for its flexibility and ease of use. This presents a core challenge: how do you invoke a function compiled with nvcc from a Python interpreter?
The answer lies in creating a shared library (a .so file on Linux or .dll on Windows) that the Python interpreter can load dynamically. PyTorch provides a streamlined mechanism for this called C++ extensions.
The primary motivations for using extensions are:
- Performance: To execute computationally intensive operations that would be bottlenecks in Python, such as the GEMMs and fused operations in FlashAttention.
- Customization: To implement novel algorithms or operators from research papers that are not yet part of the standard PyTorch library.
- Integration: To link against and use other pre-existing high-performance C or C++ libraries.
A video from the "AI葵" YouTube channel provides a concise overview of these motivations.
Pytorch+cpp/cuda extension 教學 tutorial 1 - English CC -
This video explains the motivation for using C++/CUDA extensions in PyTorch, focusing on performance.
Watch the initial segment from Why C++/CUDA?. The speaker highlights two key scenarios where native PyTorch is slow: non-parallel computations and long sequences of operations that could be fused. Our work on custom kernels directly addresses these issues.
The Call Stack: From Python to CUDA
When you call a function from your custom extension in Python, you initiate a chain of calls that crosses the boundary between languages and hardware. Understanding this flow is crucial.
- Python Layer: Your PyTorch code works with
torch.Tensorobjects. You call a function from your imported extension, e.g.,my_extension.forward(x, y). - C++ Binding Layer: This call is received by a C++ function that has been "bound" to Python using a library called pybind11. This layer acts as a bridge, converting Python objects into their C++ equivalents. In our case, a Python
torch.Tensorbecomes a C++torch::Tensor. - C++ Wrapper/Launcher Layer: This C++ function validates the input
torch::Tensors (e.g., checking they are on the correct device and are contiguous in memory). Its main job is to prepare for the CUDA launch. It calculates the grid and block dimensions and extracts the raw memory pointer from eachtorch::Tensorusing the.data_ptr()method. - CUDA Kernel Layer: The C++ wrapper then launches the CUDA kernel using the
<<<...>>>syntax, passing the raw data pointers. The__global__kernel function executes on the GPU, accessing the tensor data directly in global memory.
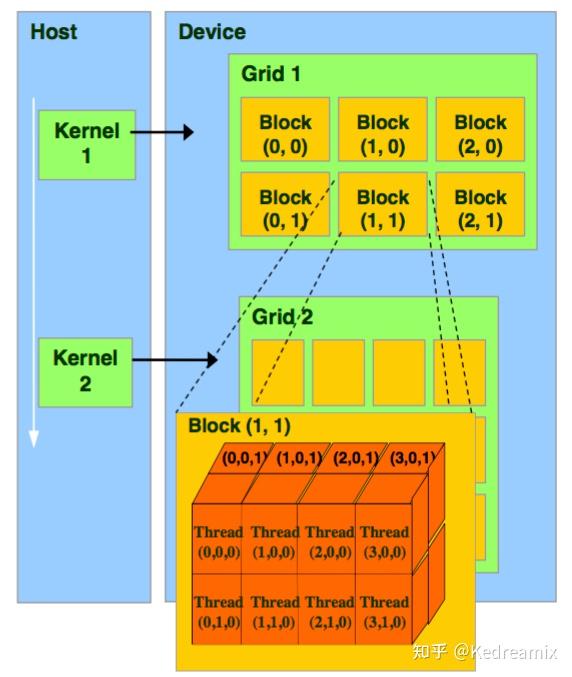
This diagram illustrates the separation between the Host (CPU) and Device (GPU). Your Python and C++ wrapper code run on the Host, which then launches kernels to execute on the Device's grid of thread blocks.
A "Just-In-Time" Approach with load_inline
The most straightforward way to get started with C++ extensions is using PyTorch's Just-In-Time (JIT) compilation features. The torch.utils.cpp_extension.load_inline function allows you to write your C++ and CUDA code as Python strings and have PyTorch compile and load them on the fly. This is perfect for rapid prototyping and learning.
Let's see how this works by creating an extension for a simple element-wise squaring operation. The following video provides an excellent, hands-on demonstration.
Lecture 1 How to profile CUDA kernels in PyTorch
This video from the GPU MODE channel demonstrates the load_inline function, showing how it compiles C++ and CUDA code provided as strings within a Python script.
Please watch the following segments to understand the load_inline workflow: First, see the basic principle with a simple C++ example. The key takeaway is how load_inline automatically generates the necessary C++ binding code (using pybind11) and the build script (build.ninja). This demystifies the "magic" of the extension-building process. Next, watch the main CUDA kernel example. Here, the presenter defines both a CUDA kernel and a C++ wrapper function as strings and passes them to load_inline. This is a complete, self-contained example of a PyTorch C++ extension.
Let's break down the code from the video to solidify the concepts.
1. The CUDA Kernel (as a Python string)
This is a standard CUDA kernel. It calculates a unique thread index and performs an operation. Note the use of template <typename T> to make it work with different data types (like float or double).
// cuda_source string in Python
template <typename T>
__global__ void square_kernel(T* data, int n) {
    int idx = blockIdx.x * blockDim.x + threadIdx.x;
    if (idx < n) {
        data[idx] = data[idx] * data[idx];
    }
}
2. The C++ Wrapper and Binding (as a Python string)
This code does two things:
- Defines a
square_matrixC++ function that accepts atorch::Tensor, gets its data pointer, and launches the CUDA kernel. - Uses the
PYBIND11_MODULEmacro to expose thesquare_matrixfunction to Python under the name"square_matrix".
// cpp_source string in Python
#include <torch/extension.h>

// CUDA forward declaration
template <typename T>
void square_kernel_launcher(T* data, int n);

// C++ wrapper
void square_matrix(torch::Tensor A) {
    // Dispatch to the correct kernel based on tensor type
    AT_DISPATCH_FLOATING_TYPES(A.scalar_type(), "square_matrix", [&] {
        square_kernel_launcher<scalar_t>(
            A.data_ptr<scalar_t>(),
            A.numel()
        );
    });
}

// pybind11 module definition
PYBIND11_MODULE(TORCH_EXTENSION_NAME, m) {
    m.def("square_matrix", &square_matrix, "Square a matrix element-wise (CUDA)");
}
Notice the square_kernel_launcher is defined separately in the CUDA source. This function would contain the kernel launch square_kernel<<<...>>>. This separation is good practice. The AT_DISPATCH_FLOATING_TYPES macro is a utility from PyTorch that generates a switch statement to call the templated function square_kernel_launcher with the correct type (scalar_t) that matches the input tensor's type at runtime.
3. The Python Call
Finally, the load_inline function compiles these strings and returns a Python module.
import torch
from torch.utils.cpp_extension import load_inline

# (cuda_source and cpp_source defined as above)

# Compile and load the extension
square_module = load_inline(name='square_module',
                            cpp_sources=cpp_source,
                            cuda_sources=cuda_source,
                            functions=['square_matrix'])

# Use the extension
a = torch.randn(3, 3).cuda()
square_module.square_matrix(a)
The load_inline approach is powerful for learning because, as the video shows, you can inspect the build_directory to see the exact files PyTorch generates. This provides a "first principles" look into the build process.
A More Structured Approach: Separate Files
While load_inline is great for small examples, real projects use separate .cpp and .cu files. This is managed using either torch.utils.cpp_extension.load() (another JIT method) or a setup.py script for ahead-of-time (AOT) compilation.
The core C++/CUDA code remains the same, but it's organized into different files. Let's review the canonical structure for building a mixed C++/CUDA extension, which is essential for more complex projects.
Custom C++ and CUDA Extensions - PyTorch Tutorials
The official PyTorch tutorial provides the standard blueprint for creating a mixed C++/CUDA extension with separate files.
Please read the section Writing a Mixed C++/CUDA extension. Pay close attention to the division of responsibilities: The C++ file (lltm_cuda.cpp): This file serves as the public-facing interface. It includes the <torch/extension.h> header, handles the pybind11 bindings, and performs input checks (CHECK_CUDA, CHECK_CONTIGUOUS). Critically, it declares the CUDA functions (e.g., lltm_cuda_forward) but does not define them. The CUDA file (lltm_cuda_kernel.cu): This file contains the actual implementation. It defines the __global__ CUDA kernels and the C++ launcher functions (like lltm_cuda_forward) that were declared in the C++ file. This is where the kernel is launched with <<<...>>> and where tensor data pointers are used.
This separation of interface (.cpp) from implementation (.cu) is a robust pattern. You would compile these files together using a build script, which we'll cover in detail in the next lesson. The Tinkerd blog post you have seen before also provides a very clear summary of this entire process.
Writing CUDA Kernels for PyTorch - Tinkerd
This blog post provides another excellent, visual walkthrough of the Python -> C++ -> CUDA connection.
Review the section Writing Custom PyTorch Kernels. The author builds a simple roll_call kernel extension step-by-step. The visualization diagram in this section is particularly helpful for understanding how the setup.py file, the C++ binding file, and the CUDA kernel file all connect to create the final, callable Python module.
Conclusion
You have now taken the crucial first step in making your custom CUDA code a practical part of the AI development workflow. By wrapping your kernels in a PyTorch C++ extension, you can combine the raw performance of CUDA with the high-level flexibility of Python.
Key Takeaways:
- The Bridge: PyTorch C++ extensions act as a bridge, allowing Python code to call high-performance C++ and CUDA functions.
- The Call Stack: The process involves a clear sequence: Python (
torch.Tensor) -> C++ Binding (torch::Tensor) -> C++ Wrapper (extractsdata_ptr) -> CUDA Kernel (operates on raw pointers). - JIT Compilation: The
load_inlineandloadfunctions provide a "Just-In-Time" mechanism to quickly compile and use extensions, which is ideal for development and learning. - Code Organization: For real-world applications, code is structured into separate interface (
.cpp) and implementation (.cu) files, which are then compiled together.
In the next lesson, we will build on this foundation. You will learn how to use a setup.py script to perform a more permanent "Ahead-of-Time" build and installation of your extension, which is the standard practice for distributing and using custom operators in larger projects.