Welcome to the first lesson of our module on CUDA Programming Fundamentals. In the previous module, we completed our deep dive into the architecture of modern GPUs, culminating in our discussion of SM occupancy and how it's constrained by physical resources like registers and shared memory. You now have a solid theoretical foundation for why and how GPUs achieve massive parallelism.
Today, we transition from theory to practice. This lesson marks your first concrete step into writing code for the GPU. Our goal is to demystify the process of getting a program to run on the device. By the end of this lesson, you will be able to compile and execute a basic CUDA C++ program using nvcc, the NVIDIA C++ compiler. We'll cover the essential tools and concepts that bridge the gap between your C++ code and the GPU's execution units.
The CUDA C++ Programming Model: A Hybrid System
Before we write any code, it's crucial to understand the fundamental model of CUDA programming. Unlike pure CPU programming, a CUDA program operates in a hybrid environment. A single source file contains two types of code:
- Host Code: This is standard C++ code that runs on the CPU. The CPU acts as the orchestrator or "host," managing the overall application flow, allocating resources, and launching tasks on the GPU.
- Device Code: This is the code written to be executed in parallel by the thousands of cores on the GPU (the "device"). These specialized functions are called kernels.
Your entire application begins and ends on the host. The host code is responsible for setting up the computation, telling the device to execute the kernel, and then gathering the results.

This separation is at the heart of GPU computing. The CPU handles serial tasks and high-level logic, while the GPU is leveraged for what it does best: massively parallel, throughput-oriented computation.
The Tool for the Job: The NVIDIA C++ Compiler (nvcc)
How does the system know which code to run on the CPU and which to send to the GPU? This is the job of the NVIDIA C++ Compiler, nvcc.
nvcc is not just a compiler; it's a compiler driver. When you feed it a source file, it processes the code and intelligently dispatches the host and device portions to the appropriate back-end compilers.
To see this in action, let's watch a short segment where a developer discovers the role of nvcc and the special file extension required for CUDA code.
Coding on NVIDIA GPUs with CUDA C
This video from the channel Daniel Hirsch provides a perfect first-person perspective on encountering the CUDA compilation process for the first time.
First, watch from as far as I know to understand why a special compiler is needed. The key takeaway is that CUDA C++ is an extension of C and requires nvcc to process its unique syntax and target the GPU architecture. Next, watch the segment from Do we need to explicitly. Notice how the compiler fails on a .c file but succeeds once the file is renamed to .cu. This extension is the crucial signal that tells nvcc to activate its CUDA compilation path.
As you saw, nvcc is the gateway to the GPU. Files ending in .cu are treated as CUDA C++ source files, allowing you to mix host and device code seamlessly.
Under the Hood of nvcc
Given your interest in low-level systems, let's take a closer look at what nvcc is actually doing. It's a sophisticated driver that orchestrates a multi-stage compilation process.
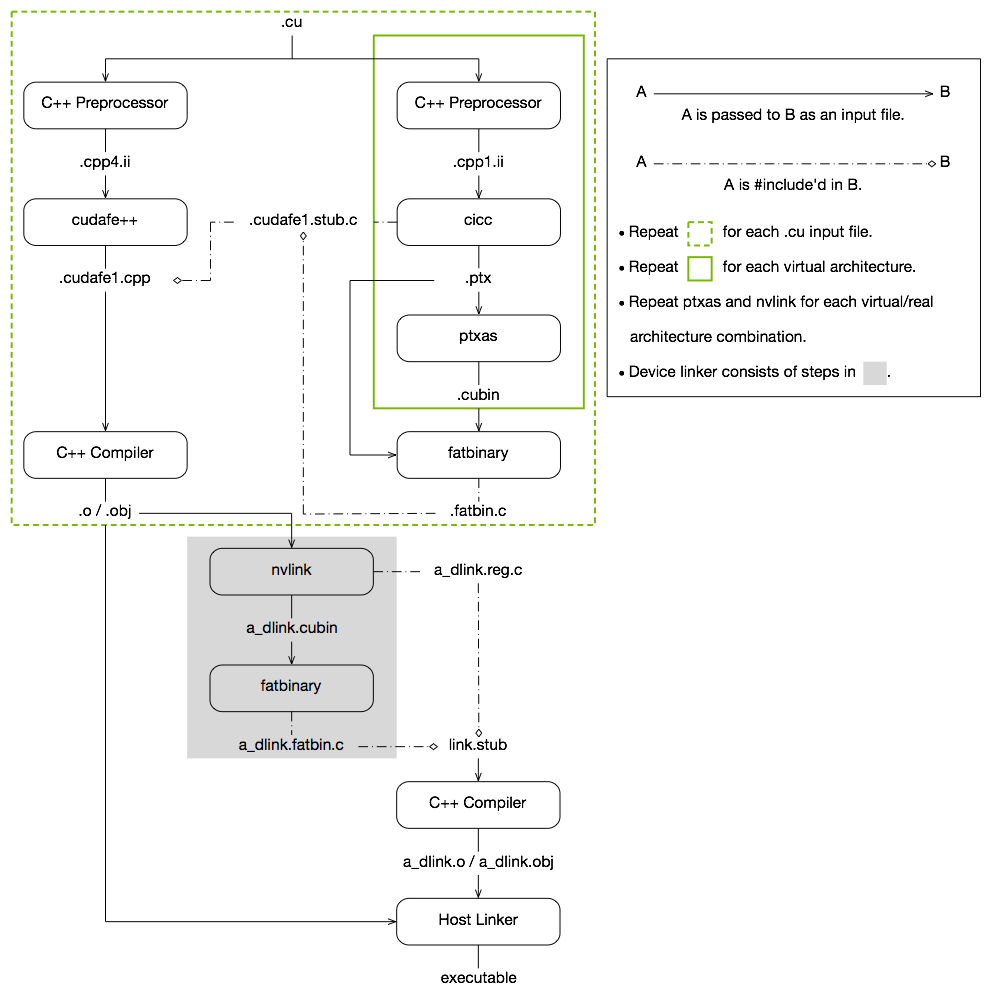
Here's a simplified breakdown of the device code path shown in the green box:
- Separation:
nvccfirst separates the device code (__global__functions, which we'll see next) from the host code. - Compilation to PTX: The device code is compiled into PTX (Parallel Thread Execution), an intermediate assembly-like language. PTX is analogous to Java bytecode; it's a stable instruction set that can be just-in-time (JIT) compiled for future GPU architectures.
- Assembly to CUBIN:
ptxas, the PTX assembler, then compiles the PTX code into a CUBIN (CUDA Binary) file. This is the actual machine code that is executable on a specific GPU architecture (e.g., Ampere, Hopper). - Linking: Finally, the host object code and the device CUBIN object are linked together by the host linker into a single executable file.
This process allows a single .cu file to contain everything needed to run on a complex, heterogeneous system.
Writing and Compiling Your First Program
Now, let's assemble the key ingredients for our first program. We will use a simple "Hello, World" example to focus purely on the compilation and execution mechanics.
The following guide from NVIDIA's developer blog walks through the process of turning a standard C++ program into a basic CUDA program.
An Even Easier Introduction to CUDA (Updated) - NVIDIA Developer
This article provides a clear, step-by-step transformation of a C++ program into a CUDA program. We will focus on the key syntax and compiler commands.
First, read the two paragraphs starting from the first steps. This introduces the __global__ specifier, which is the keyword that marks a function as a GPU kernel. Next, read the paragraph starting Finally, I need. This introduces the <<<...>>> execution configuration syntax used to launch a kernel. We will explore what goes inside the brackets in our next lesson; for now, just recognize it as the "call" syntax for a kernel. Read the section from Just one more thing. This introduces a critical function, cudaDeviceSynchronize(), and provides the final nvcc compilation command.
Let's summarize the essential components from that reading:
- Kernel Definition (
__global__): A function intended to run on the GPU is marked with__global__. It must have avoidreturn type.__global__ void myFirstKernel() { // Device code goes here } - Kernel Launch (
<<<...>>>): To call the kernel from host code, you use a special syntax.// In main() or another host function: myFirstKernel<<<1, 1>>>(); - Synchronization (
cudaDeviceSynchronize): Kernel launches are asynchronous. The CPU launches the kernel and immediately continues to the next line of code without waiting for the GPU to finish.cudaDeviceSynchronize()acts as a barrier, pausing the CPU thread until all previously issued GPU tasks have completed. This is crucial for ensuring correctness, especially when you need to use the results from the GPU or, in our case, simply wait for it to print a message.
Now, let's see these pieces come together in a complete, runnable example.
hello_gpu.cu
#include <iostream>
#include <cuda_runtime.h> // Required for cudaDeviceSynchronize

// This is the kernel that will run on the GPU
__global__ void helloFromGPU() {
    // printf can be used inside a kernel for debugging.
    // The output will be buffered and displayed after the kernel finishes.
    printf("Hello, World from the GPU!\n");
}

int main() {
    // This code runs on the CPU
    std::cout << "Hello from the CPU!" << std::endl;

    // Launch the kernel on the GPU. We are launching a grid
    // with 1 block, and that block has 1 thread.
    helloFromGPU<<<1, 1>>>();

    // The kernel launch is asynchronous. The CPU would exit
    // immediately without waiting for the GPU.
    // We must explicitly synchronize to wait for the GPU to finish.
    cudaError_t err = cudaDeviceSynchronize();
    if (err != cudaSuccess) {
        std::cerr << "CUDA Error: " << cudaGetErrorString(err) << std::endl;
    }

    return 0;
}
To compile and run this program, save it as hello_gpu.cu. Then, open your terminal and execute the following commands:
-
Compile with
nvcc:nvcc hello_gpu.cu -o hello_gpuThis command tells the NVIDIA C++ Compiler to compile
hello_gpu.cuand create an executable file namedhello_gpu. -
Execute the program:
./hello_gpu
You should see the following output:
Hello from the CPU!
Hello, World from the GPU!
Congratulations! You have successfully written, compiled, and executed your first program that runs code on the GPU.
Conclusion
In this lesson, we made the pivotal transition from GPU architecture theory to hands-on programming. We established the fundamental hybrid programming model of CUDA C++ and explored the central role of the nvcc compiler in managing host and device code.
Key Takeaways:
- Hybrid Model: CUDA programs consist of host code (C++ on the CPU) and device code (kernels on the GPU).
.cuExtension: CUDA C++ source files use the.cuextension as a signal to thenvcccompiler.nvccCompiler: This compiler driver intelligently separates host and device code, sending each to the appropriate back-end tools to produce a single executable.- Essential Syntax:
__global__defines a function as a GPU kernel.<<<...>>>is the syntax used to launch a kernel from host code.cudaDeviceSynchronize()is necessary to make the host wait for the asynchronous device to complete its work.
You now have the foundational toolchain and workflow in place. However, our first program didn't perform any meaningful computation because we haven't given the GPU any data to work with. In our next lesson, we will address this by learning how to allocate memory on the GPU and transfer data between the host and device, setting the stage for writing our first real parallel algorithm.