Hello! Welcome to the next lesson in your shell scripting journey.
In our last session, you learned how to control the flow of your scripts using conditional statements (if/then/else) and loops (for, while). This gave your scripts the ability to make decisions and automate repetitive actions.
Today, we'll make your scripts even more powerful and flexible. This lesson addresses the learning outcome: Accept and process user input and command-line arguments in scripts. You'll learn the two main ways to get data into a script from the outside world:
- Command-line arguments, which are provided when you first run the script.
- Interactive user input, where the script pauses and prompts the user for information while it's running.
Mastering these techniques is essential for creating reusable and interactive tools, moving beyond scripts with hard-coded values.
1. Processing Command-Line Arguments
Command-line arguments are the words you type after the script's name when you execute it. They are a fundamental way to pass information to a program. For example, in the command ls -l /home, -l and /home are arguments to the ls program.
Bash provides special built-in variables to access these arguments within your script.
Special Variables for Arguments
To understand how these variables work, let's start with a foundational article.
How to Use Command Line Arguments in a Bash Script
This article from Baeldung provides a clear explanation of the special variables Bash uses for command-line arguments. It forms the theoretical base for this section.
Read section 2.1, 'Basic Command-Line Argument Handling'. Focus on understanding the purpose of $0, $1, $2, $#, and $@.
Here is a summary of the most important variables:
$0: The name of the script itself.$1,$2,$3, ...: The arguments passed to the script, in order. These are called positional parameters.$1is the first argument,$2is the second, and so on.$#: The total number of arguments passed to the script. This is very useful for validation.$@: All the arguments, treated as separate, individually quoted strings. This is the safest way to process all arguments.
The following image provides a great visual summary of how these variables are populated when a script is run.

Using Arguments in a Script
Now let's see how to use these positional parameters in a practical script. The following video from Learn Linux TV starts with a simple demonstration and builds to a more useful example.
How To Write Bash Scripts In Linux - Complete Guide (Part 16 - Arguments)
This video provides a practical walkthrough of using arguments. You'll see how $1 and $2 can be used to pass data directly into your script's logic.
Watch from the beginning to 10:06. The first part (to 03:45) covers the basics of $1, $2, etc. The second part (to 10:06) shows a more practical example of using an argument as a directory path for the ls command.
Validating Input
What happens if a user runs your script without the required arguments? It will likely fail or produce strange results. A robust script should always check that it has received the input it expects. This is a perfect use for the $# variable and an if statement, which you learned about in the previous lesson.
The next segment of the video demonstrates how to implement this crucial validation step.
How To Write Bash Scripts In Linux - Complete Guide (Part 16 - Arguments)
Here, you'll see how to make your scripts more robust by checking the number of arguments and providing a helpful usage message if the input is incorrect.
Watch from 10:06 to 14:13. Pay close attention to how if [ "$#" -ne 1 ] is used to check the argument count, and how exit 1 is used to terminate the script with a failure status.
As you just saw, the basic structure for validating one argument is:
if [ "$#" -ne 1 ]; then
    echo "Usage: $0 <directory>"
    exit 1
fi

# ... rest of the script logic ...
echo "Processing directory: $1"
Processing an Unknown Number of Arguments
Sometimes you want your script to handle any number of arguments. For example, a script that processes multiple files. You can't use $1, $2, etc., because you don't know how many there will be.
This is where the $@ variable and a for loop (from our last lesson) become a powerful combination.
How to Use Command Line Arguments in a Bash Script
This article shows a clean and effective way to process a variable number of arguments using a for loop.
Read section 3.2, 'Loop Construct'. Note how for user in "$@" iterates through every single argument passed to the script.
Test your understanding!
Write a script named create_files.sh that accepts one or more filenames as command-line arguments. For each argument, it should create an empty file with that name using the touch command and print a confirmation message.
Example usage: ./create_files.sh report.txt notes.md data.csv
Expected output:
Created file: report.txt
Created file: notes.md
Created file: data.csv
(Hint: Use a for loop with "$@".)
Show answer
Here is a correct script:
#!/bin/bash

# First, check if at least one argument was provided.
if [ "$#" -eq 0 ]; then
    echo "Error: Please provide at least one filename."
    echo "Usage: $0 <file1> [file2] ..."
    exit 1
fi

# Loop through all the command-line arguments.
for filename in "$@"; do
    touch "$filename"
    echo "Created file: $filename"
done
2. Accepting Interactive User Input
While command-line arguments are great for automation, sometimes you need to get input from a user while the script is running. The primary tool for this is the read command. It pauses the script, waits for the user to type something and press Enter, and stores the input in a variable.
The read Command
Let's watch a video from Mental Outlaw that introduces read and its most useful options.
Bash Shell Scripting For Beginners 2019 - Grabbing User Input With the Read Command
This video will quickly get you up to speed on the read command, showing you how to prompt the user for input and how to handle sensitive information like passwords.
Watch the following segments: 00:40 - 01:53: Covers the basic read command and why using echo for a prompt is good practice. 03:05 - 04:52: Introduces the -p (prompt) option as a more concise way to ask for input. 09:02 - 10:59: Shows the very important -s (silent) option for hiding password input. 10:59 - 12:10: Explains the -t (timeout) option to prevent the script from waiting forever.
Key read Options
- No options:
read my_variable- Waits for input and stores it in
$my_variable. If no variable is given, it uses the default$REPLYvariable.
- Waits for input and stores it in
- Prompting (
-p):read -p "Enter your name: " user_name- Displays the prompt string and waits for input on the same line. This is much cleaner than a separate
echocommand.
- Displays the prompt string and waits for input on the same line. This is much cleaner than a separate
- Silent/Secret (
-s):read -s -p "Enter password: " user_pass- Hides the user's input. Essential for passwords or other sensitive data.
- Timeout (
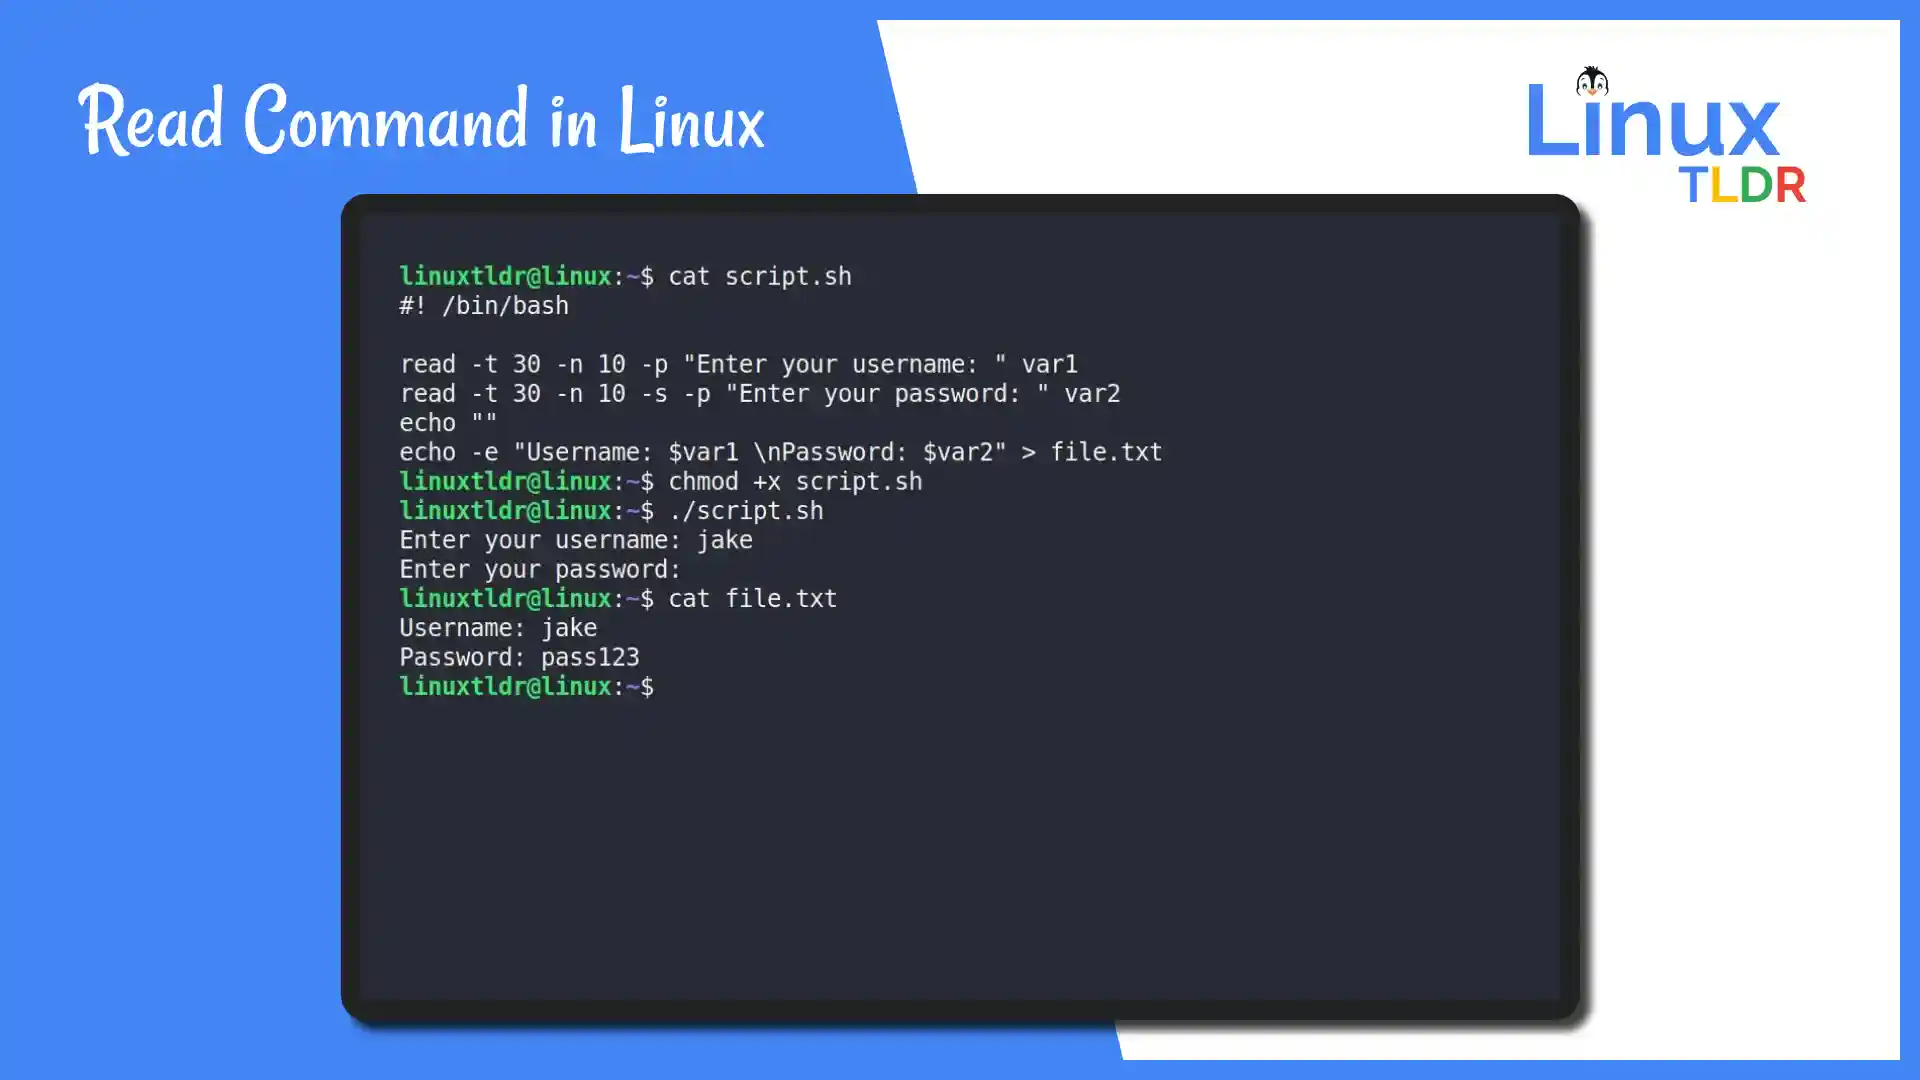
-t):read -t 10 -p "You have 10 seconds to answer: " response- Waits for a specified number of seconds. If no input is received, the script continues.
This image shows a script that uses several of these options together in a common scenario: asking for a username and password.
Test your understanding!
Write a script that interactively asks for a user's name and their favorite Linux distribution. It should then print a sentence combining this information.
Example interaction:
What is your name?
Alex
What is your favorite Linux distribution?
Arch
Hi Alex! Your favorite distro is Arch. A fine choice!
Show answer
Here is a correct script using the read -p option:
#!/bin/bash

read -p "What is your name? " name
read -p "What is your favorite Linux distribution? " distro

echo "Hi $name! Your favorite distro is $distro. A fine choice!"
Conclusion
You now have the skills to make your scripts interactive and adaptable. By accepting input, your scripts are no longer limited to pre-defined data; they can react to information provided at runtime.
Key Takeaways:
- Command-Line Arguments: Use
$1,$2, etc., to access data provided when the script is launched. They are ideal for automation and passing file paths or options. - Argument Validation: Always use
$#within anifstatement to check if the correct number of arguments was provided. This makes your scripts reliable. - Processing All Arguments: Use
for arg in "$@"to loop through an unknown number of arguments. - Interactive Input: Use the
readcommand to pause the script and ask the user for information. readOptions: Useread -pto provide a clean prompt andread -sto hide sensitive input like passwords.
Preview of the Next Lesson:
In this lesson, we used exit 1 to signal a failure when argument validation failed. This is an example of an exit code. In the next lesson, we will dive deeper into this concept and learn to "Use exit codes to signal success or failure in scripts." Understanding exit codes is crucial for writing scripts that can be chained together and for proper error handling in automation workflows.