Hello! Welcome back to our final lesson in the "Shell Scripting and Automation" module.
In our last lesson, we explored the "why" of configuration management, understanding it as a way to define and maintain our server's state using code. We focused on Ansible, appreciating its agentless architecture and simple, human-readable YAML syntax.
Today, we'll move from theory to practice. This lesson directly addresses the learning outcome: Write a basic Ansible playbook to automate a simple system task. You will learn the fundamental building blocks of an Ansible playbook and use them to write and execute your first piece of automation. This is where the power of Infrastructure as Code truly comes to life.
1. The Anatomy of an Ansible Playbook
Before we write a playbook, let's dissect its structure. A playbook is a YAML file that describes a series of tasks to be executed on a set of target machines.
To help build a mental model, let's watch a short, conceptual explanation.
Ansible Playbook Basics - FINALLY Explained Clearly!
The video "Ansible Playbook Basics" by Alta3 Research uses a clever analogy of building a birdhouse to explain the core components of a playbook. This will help you understand the relationship between tasks, modules, and parameters.
Watch from 00:40 to 03:29. As you watch, map the birdhouse analogy to Ansible concepts: The steps (cut wood, assemble, paint) are Tasks. The tools (saw, hammer, paintbrush) are Modules. The instructions (length, color) are Parameters.
As the video illustrates, a playbook is organized into a clear hierarchy:
- Playbook: The entire
.ymlfile. It can contain one or more plays. - Play: A set of tasks mapped to a specific group of hosts. A play defines the what (tasks) and the where (hosts).
- Task: A single action to be performed, like installing a package or starting a service. Each task has a name and calls a module.
- Module: The "tool" that performs the work. Ansible has hundreds of modules for everything from managing packages (
apt,yum) and services (service) to manipulating files (copy,lineinfile). - Parameters: The arguments you pass to a module to tell it how to behave.
These components are written in YAML, where structure is defined by key: value pairs and indentation. Indentation is crucial; it shows the relationship between items. List items are denoted by a hyphen and a space (- ).
Let's look at a concrete example.
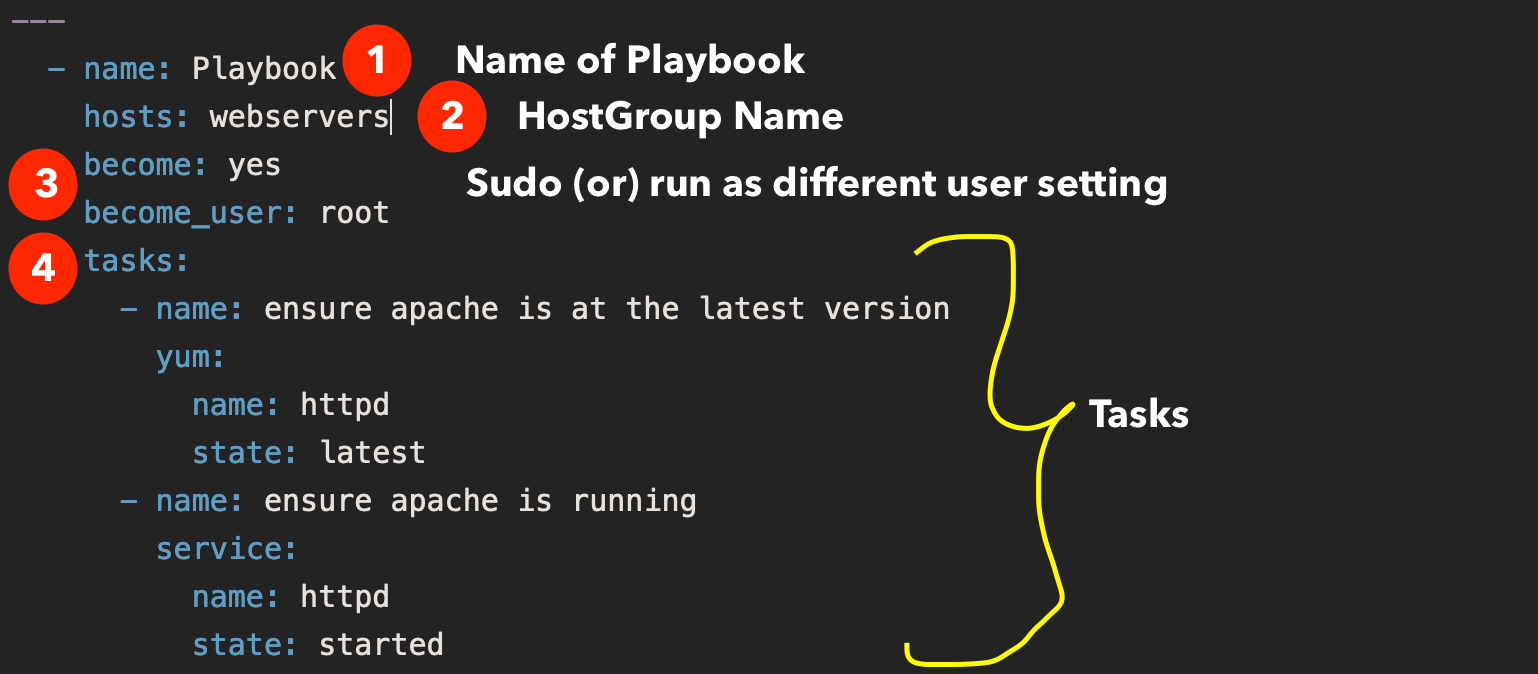
Notice how this real playbook maps to our concepts:
- Play Name:
Playbook to Install and Start Apache. - Hosts:
webservers(the target group of machines). - Privilege Escalation:
become: yestells Ansible to usesudoto run the tasks, which is necessary for installing software. - Tasks: A list of actions. The first installs
httpdusing theyummodule, and the second ensures the service is started using theservicemodule.
2. Writing Your First Playbook: Installing Nginx
Now, let's write our own playbook. Our simple system task will be to install and enable the Nginx web server. Since you are using a Debian/Ubuntu-based VM, we will use the ansible.builtin.apt module.
The following video provides a complete walk-through of creating and running a playbook. We'll use it as our guide.
Getting started with Ansible 06 - Writing our first Playbook
The video "Writing our first Playbook" from Learn Linux TV is an excellent, practical guide. It demonstrates the entire process step-by-step, from creating the file to running the playbook and verifying the results.
Watch from 01:39 to 06:06. This section will guide you through creating a playbook file, defining the hosts and tasks, and explaining the importance of correct YAML indentation.
Following the structure shown in the video, let's build our playbook.
-
Create the Playbook File
In your terminal, create a new file namedinstall_nginx.ymlusing a text editor likenanoorvim.nano install_nginx.yml -
Construct the Playbook
Enter the following content into your file. Pay very close attention to the indentation (two spaces are standard).--- - name: Install and enable Nginx hosts: all become: true tasks: - name: Install nginx package ansible.builtin.apt: name: nginx state: present update_cache: yes - name: Ensure nginx service is started and enabled ansible.builtin.service: name: nginx state: started enabled: yesLet's break this down:
---: A standard way to start a YAML file.- name: ...: The name of our single play.hosts: all: This play will run on all hosts defined in our inventory. For local testing,allwill just be your local machine.become: true: This enables privilege escalation (likesudo).tasks:: This block contains our list of actions.- First Task: Installs Nginx.
ansible.builtin.apt: The module for managing packages on Debian/Ubuntu systems. Using the full name (ansible.builtin.apt) is called a Fully Qualified Collection Name (FQCN) and is a best practice.state: present: This is declarative! We are ensuring the package is present. If it's already installed, Ansible will do nothing.update_cache: yes: This is equivalent to runningapt updatebefore installing.
- Second Task: Starts and enables the Nginx service.
ansible.builtin.service: The module for managing services.state: started: Ensures the service is running.enabled: yes: Ensures the service will start automatically at boot.
3. Running the Playbook and Understanding the Output
Before you can run a playbook, Ansible needs to know which machines to manage. This is handled by an inventory file. For running a playbook on your own local machine (your VM), you can create a simple inventory file named inventory.
[local]
localhost ansible_connection=local
This tells Ansible that there is a host named localhost and it should connect to it directly, not over SSH.
Now, you can run your playbook with the ansible-playbook command.
ansible-playbook -i inventory install_nginx.yml --ask-become-pass
-i inventory: Specifies your inventory file.--ask-become-pass: Prompts you for yoursudopassword.
Getting started with Ansible 06 - Writing our first Playbook
Let's return to the Learn Linux TV video to see how to run a playbook and, most importantly, how to interpret the output.
Watch from 06:06 to 10:25. Pay close attention to the explanation of the output colors and statuses (ok, changed) and what happens when the playbook is run a second time. This is the practical demonstration of idempotency.
When you run the playbook, you'll see output for each step:
- GATHERING FACTS: Ansible's first step is to connect to the host and gather information (like OS type, memory, etc.) which can be used in the playbook.
- TASK [...]: Each task is executed in order.
changed(yellow text): The task made a change to the system (e.g., a package was installed).ok(green text): The system was already in the desired state, so no change was made.failed(red text): An error occurred and the task could not be completed.
If you run the exact same playbook again, the output for your tasks will change from changed to ok. This is idempotency in action. Ansible checks the state first and only acts if necessary.
Test your understanding!
You've written a playbook to ensure a user named jane exists (state: present).
- What will the task status be the first time you run the playbook on a system where
janedoes not exist? - What will the task status be the second time you run it on the same system?
- How does this behavior differ from simply running the
useradd janecommand twice in a shell script?
Show answer
- The first time, the status will be
changedbecause Ansible will create the userjane. - The second time, the status will be
okbecause Ansible will check and see that the userjanealready exists, so no action is needed. - Running
useradd janea second time in a shell script would result in an error (useradd: user 'jane' already exists), and the script might stop executing. Ansible's idempotent approach avoids this error and gracefully confirms the desired state is met.
Conclusion
Congratulations! You have successfully written and executed your first Ansible playbook. You've taken a manual, multi-step process—installing, enabling, and starting a service—and encoded it into a simple, reusable, and self-documenting file.
Key Takeaways:
- Playbook Structure: Playbooks are YAML files containing a list of plays. Each play targets specific hosts and runs a list of tasks.
- Declarative Tasks: Tasks use modules (like
aptorservice) with parameters (state: present) to declare a desired state. - YAML Syntax: Structure is defined by indentation.
key: valuepairs define properties, and-defines list items. - Execution: The
ansible-playbookcommand runs your automation. The output (ok,changed,failed) tells you exactly what happened. - Idempotency: Running a playbook multiple times produces the same end result, with Ansible only making changes when necessary.
Preview of the Next Module:
This lesson concludes our module on Shell Scripting and Automation. You've progressed from simple scripts to a powerful configuration management tool.
The next module, "System Security and Hardening," will build on these skills. In the very first lesson, we will cover how to implement SSH key-based authentication and harden the SSH service. Automating SSH configuration is a perfect use case for Ansible, and the skills you've learned today will be directly applicable.